Datasource Adapters
Flat File Reader
Overview
The AMI Flat File Reader Datasource Adapter is a highly configurable adapter designed to process extremely large flat files into tables at rates exceeding 100mb per second*. There are a number of directives which can be used to control how the flat file reader processes a file. Each line (delineated by a Line feed) is considered independently for parsing. Note the EXECUTE <sql> clause supports the full AMI sql language.
*Using Pattern Capture technique (_pattern) to extract 3 fields across a 4.080 gb text file containing 11,999,504 records. This generated a table of 11,999,504 records x 4 columns in 37,364 milliseconds (additional column is the default linenum). Tested on raid-2 7200rpm 2TB drive
Generally speaking, the parser can handle three (4) different methods of parsing files:
Delimited list or ordered fields
Example data and query:
11232|1000|123.20
12412|8900|430.90
CREATE TABLE mytable AS USE _file="myfile.txt" _delim="|"
_fields="String account, Integer qty, Double px"
EXECUTE SELECT * FROM file
Key value pairs
Example data and query:
account=11232|quantity=1000|price=123.20
account=12412|quantity=8900|price=430.90
CREATE TABLE mytable AS USE _file="myfile.txt" _delim="|" _equals="="
_fields="String account, Integer qty, Double px"
EXECUTE SELECT * FROM file
Pattern Capture
Example data and query:
Account 11232 has 1000 shares at $123.20 px
Account 12412 has 8900 shares at $430.90 px
CREATE TABLE mytable AS USE _file="myfile.txt"
_fields="String account, Integer qty, Double px"
_pattern="account,qty,px=Account (.*) has (.*) shares at \\$(.*) px"
EXECUTE SELECT * FROM fil
Raw Line
If you do not specify a _fields, _mapping nor _pattern directive then the parser defaults to a simple row-per-line parser. A "line" column is generated containing the entire contents of each line from the file
CREATE TABLE mytable AS USE _file="f.txt" EXECUTE SELECT * FROM FILE
Configuring the Adapter for first use
1. Open the datamodeler (In Developer Mode -> Menu Bar -> Dashboard -> Datamodel)
2. Choose the "Add Datasource" button
3. Choose Flat File Reader
4. In the Add datasource dialog:
Name: Supply a user defined Name, ex: MyFiles
URL: /full/path/to/directory/containing/files (ex: /home/myuser/files )
(Keep in mind that the path is on the machine running AMI, not necessarily your local desktop)
5. Click "Add Datasource" Button
Accessing Files Remotely: You can also access files on remote machines as well using an AMI Relay. First install an AMI relay on the machine that contains the files, or at least has access to the files, you wish to read ( See AMI for the Enterprise documentation for details on how to install an AMI relay). Then in the Add Datasource wizard select the relay in the "Relay To Run On" dropdown.
General Directives
File name Directive (Required)
Syntax
_file=path/to/file
Overview
This directive controls the location of the file to read, relative to the datasource's url. Use the forward slash (/) to indicate directories (standard UNIX convention)
Examples
_file="data.txt" (Read the data.txt file, located at the root of the datasource's url)
_file="subdir/data.txt" (Read the data.txt file, found under the subdir directory)
Field definitions Directive (Required)
Syntax
_fields=col1_type col_name, col2_type col2_name, ...
Overview
This directive controls the Column names that will be returned, along with their types. The order in which they are defined is the same as the order in which they are returned. If the column type is not supplied, the default is String. Special note on additional columns: If the line number (see _linenum directive) column is not supplied in the list, it will default to type integer and be added to the end of the table schema. Columns defined in the Pattern (see _pattern directive) but not defined in _fields will be added to the end of the table schema.
Types should be one of: String, Long, Integer, Boolean, Double, Float, UTC
Column names must be valid variable names.
Examples
_fields="String account,Long quantity" (define two columns)
_fields ="fname,lname,int age" (define 3 columns, fname and lname default to String)
Directives for parsing Delimited list of ordered Fields
_file=file_name (Required, see general directives)
_fields=col1_type col1_name, ... (Required, see general directives)
_delim=delim_string (Required)
_conflateDelim=true|false (Optional. Default is false)
_quote=single_quote_char (Optional)
_escape=single_escape_char (Optional)
The _delim indicates the char (or chars) used to separate each field (If _conflateDelim is true, then 1 or more consecutive delimiters are treated as a single delimiter). The _fields is an ordered list of types and field names for each of the delimited fields. If the _quote is supplied, then a field value starting with quote will be read until another quote char is found, meaning delims within quotes will not be treated as delims. If the _escape char is supplied then when an escape char is read, it is skipped and the following char is read as a literal.
Examples
_delim="|"
_fields="code,lname,int age"
_quote="'"
_escape="\\"
This defines a pattern such that:
11232-33|Smith|20
'1332|ABC'||30
Account\|112|Jones|18
Maps to:
| code | lname | age |
|---|---|---|
| 11232-33 | Smith | 20 |
| 1332|ABC | 30 | |
| Account|112 | Jones | 18 |
Directives for parsing Key Value Pairs
_file=file_name (Required, see general directives)
_fields=col1_type col1_name, ... (Required, see general directives)
_delim=delim_string (Required)
_conflateDelim=true|false (Optional. Default is false)
_equals=single_equals_char (Required)
_mappings=from1=to1,from2=to2,... (Optional)
_quote=single_quote_char (Optional)
_escape=single_escape_char (Optional)
The _delim indicates the char (or chars) used to separate each field (If _conflateDelim is true, then 1 or more consecutive delimiters are treated as a single delimiter). The _equals char is used to indicate the key/value separator. The _fields is an ordered list of types and field names for each of the delimited fields. If the _quote is supplied, then a field value starting with quote will be read until another quote char is found, meaning delims within quotes will not be treated as delims. If the _escape char is supplied then when an escape char is read, it is skipped and the following char is read as a literal.
The optional _mappings directive allows you to map keys within the flat file to file names specified in the _fields directive. This is useful when a file has key names that are not valid field names, or a file has multiple key names that should be used to populate the same column.
Examples
_delim="|"
_equals="="
_fields="code,lname,int age"
_mappings="20=code,21=lname,22=age"
_quote="'"
_escape="\\"
This defines a pattern such that:
code=11232-33|lname=Smith|age=20
code='1332|ABC'|age=30
20=Act\|112|21=J|22=18 (Note: this row will work due to the _mappings directive)
Maps to:
| code | lname | age |
|---|---|---|
| 11232-33 | Smith | 20 |
| 1332|ABC | 30 | |
| Act|112 | J | 18 |
Directives for Pattern Capture
_file=file_name (Required, see general directives)
_fields=col1_type col1_name, ... (Optional, see general directives)
_pattern=col1_type col1_name, ...=regex_with_grouping (Required)
The _pattern must start with a list of column names, followed by an equal sign (=) and then a regular expression with grouping (this is dubbed a column-to-pattern mapping). The regular expression's first grouping value will be mapped to the first column, 2nd grouping to the second and so on.
If a column is already defined in the _fields directive, then it's preferred to not include the column type in the _pattern definition.
For multiple column-to-pattern mappings, use the \n (new line) to separate each one.
Examples
_pattern="fname,lname,int age=User (.*) (.*) is (.*) years old"
This defines a pattern such that:
User John Smith is 20 years old
User Bobby Boy is 30 years old
Maps to:
| fname | lname | age |
|---|---|---|
| John | Smith | 20 |
| Bobby | Boy | 30 |
_pattern="fname,lname,int age=User (.*) (.*) is (.*) years old\n lname,fname,int weight=Customer (.*),(.*) weighs (.*) pounds"
This defines two patterns such that:
User John Smith is 20 years old
User Boy,Bobby weighs 130 pounds'
Maps to:
| fname | lname | age | weight |
|---|---|---|---|
| John | Smith | 20 | |
| Bobby | Boy | 130 |
Optional Line Number Directives
Skipping Lines Directive (optional)
Syntax
_skipLines=number_of_lines
Overview
This directive controls the number of lines to skip from the top of the file. This is useful for ignoring "junk" at the top of a file. If not supplied, then no lines are skipped. From a performance standpoint, skipping lines is highly efficient.
Examples
_skipLines="0" (this is the default, don't skip any lines)
_skipLines="1" (skip the first line, for example if there is a header)
Line Number Column Directive (optional)
Syntax
_linenum=column_name
Overview
This directive controls the name of the column that will contain the line number. If not supplied, the default is "linenum". Notes about the line number: The first line is line number 1, and skipped/filtered out lines are still considered in numbering. For example, if the _skipLines=2 , then the first line will have a line number of 3.
Examples
_linenum="" (A line number column is not included in the table)
_linenum="linenum" (The column linenum will contain line numbers, this is the default)
_linenum="rownum" (The column rownum will contain line numbers)
Optional Line Filtering Directives
Filtering Out Lines Directive (optional)
Syntax
_filterOut=regex
Overview
Any line that matches the supplied regular expression will be ignored. If not supplied, then no lines are filtered out. From a Performance standpoint, this is applied before other parsing is considered, so ignoring lines using a filter out directive is faster, as opposed to using a WHERE clause, for example.
Examples
_filterOut="Test" (ignore any lines containing the text Test)
_filterOut="^Comment" (ignore any lines starting with Comment)
_filterOut="This|That" (ignore any lines containing the text This or That)
Filtering In Lines Directive (optional)
Syntax
_filterIn=regex
Overview
Only lines that match the supplied regular expression will be considered. If not supplied, then all lines are considered. From a Performance standpoint, this is applied before other parsing is considered, so narrowing down the lines considered using a filter in directive is faster, as opposed to using a WHERE clause, for example. If you use a grouping (..) inside the regular expression, then only the contents of the first grouping will be considered for parsing
Examples
_filterIn="3Forge" (ignore any lines that don't contain the word 3Forge)
_filterIn="^Outgoing" (ignore any lines that don't start with Outgoing)
_filterIn="Data(.*)" (ignore any lines that don't start with Data, and only consider the text after the word Data for processing)
Shell Command Reader
Overview
The AMI Shell Command Datasource Adapter is a highly configurable adapter designed to execute shell commands and capture the stdout, stderr and exitcode. There are a number of directives which can be used to control how the command is executed, including setting environment variables and supplying data to be passed to stdin. The adapter processes the output from the command. Each line (delineated by a Line feed) is considered independently for parsing. Note the EXECUTE <sql> clause supports the full AMI sql language.
Please note, that running the command will produce 3 tables:
- Stdout - Contains the contents of standard out
- Stderr - Contains the contents from standard err
- exitCode - Contains the executed code of the process
(You can limit which tables are returned using the _include directive)
Generally speaking, the parser can handle four (4) different methods of parsing:
Delimited list or ordered fields
Example data and query:
11232|1000|123.20
12412|8900|430.90
CREATE TABLE mytable AS USE _cmd="my_cmd" _delim="|"
_fields="String account, Integer qty, Double px"
EXECUTE SELECT * FROM cmd
Key value pairs
Example data and query:
account=11232|quantity=1000|price=123.20
account=12412|quantity=8900|price=430.90
CREATE TABLE mytable AS USE _cmd="my_cmd" _delim="|" _equals="="
_fields="String account, Integer qty, Double px"
EXECUTE SELECT * FROM cmd
Pattern Capture
Example data and query:
Account 11232 has 1000 shares at $123.20 px
Account 12412 has 8900 shares at $430.90 px
CREATE TABLE mytable AS USE _cmd="my_cmd"
_fields="String account, Integer qty, Double px"
_pattern="account,qty,px=Account (.*) has (.*) shares at \\$(.*) px"
EXECUTE SELECT * FROM cmd
Raw Line
If you do not specify a _fields, _mapping nor _pattern directive then the parser defaults to a simple row-per-line parser. A "line" column is generated containing the entire contents of each line from the command's output
CREATE TABLE mytable AS USE _cmd="my_cmd" EXECUTE SELECT * FROM cmd
Configuring the Adapter for first use
1. Open the datamodeler (In Developer Mode -> Menu Bar -> Dashboard -> Datamodel)
2. Choose the "Add Datasource" button
3. Choose Shell Command Reader
4. In the Add datasource dialog:
Name: Supply a user defined Name, ex: MyShell
URL: /full/path/to/path/of/working/directory (ex: /home/myuser/files )
(Keep in mind that the path is on the machine running AMI, not necessarily your local desktop)
5. Click "Add Datasource" Button
Running Commands Remotely: You can execute commands on remote machines as well using an AMI Relay. First install an AMI relay on the machine that the command should be executed on ( See AMI for the Enterprise documentation for details on how to install an AMI relay). Then in the Add Datasource wizard select the relay in the "Relay To Run On" dropdown.
General Directives
Command Directive (Required)
Syntax
_cmd="command to run"
Overview
This directive controls the command to execute.
Examples
_cmd="ls -lrt" (execute ls -lrt)
_cmd="ls | sort" (execute ls and pipe that into sort)
_cmd="dir /s" (execute dir on a windows system)
Supplying Standard Input (Optional)
Syntax
_stdin="text to pipe into stdin"
Overview
This directive is used to control what data is piped into the standard in (stdin) of the process to run.
Example
_cmd="cat > out.txt" _stdin="hello world" (will pipe "hello world" into out.txt)
Controlling what is captured from the Process (Optional)
Syntax
_capture="comma_delimited_list" (default is stdout,stderr,exitCode)
Overview
This directive is used to control what output data from running the command is captured. It is a comma delimited list and the order determines what order the tables are returned in. An empty list ("") indicates that nothing will be captured (the command is executed, and all output is ignored). Options include the following:
- stdout - Capture standard out from the process
- stderr - Capture standard error from the process
- exitCode - Capture the exit code from the process
Examples
_capture="exitCode,stdout" (the 1st table will contain the exit code, 2nd will contain stdout)
Field Definitions Directive (Required)
Syntax
_fields=col1_type col_name, col2_type col2_name, ...
Overview
This directive controls the Column names that will be returned, along with their types. The order in which they are defined is the same as the order in which they are returned. If the column type is not supplied, the default is String. Special note on additional columns: If the line number (see _linenum directive) column is not supplied in the list, it will default to type integer and be added to the end of the table schema. Columns defined in the Pattern (see _pattern directive) but not defined in _fields will be added to the end of the table schema.
Types should be one of: String, Long, Integer, Boolean, Double, Float, UTC
Column names must be valid variable names.
Examples
_fields="String account,Long quantity" (define two columns)
_fields ="fname,lname,int age" (define 3 columns, fname and lname default to String)
Environment Directive (Optional)
Syntax
_env="key=value,key=value,..." (Optional. Default is false)
Overview
This directive controls what environment variables are set when running a command
Example
_env="name=Rob,Location=NY"
Use Host Environment Directive (Optional)
Syntax
_useHostEnv=true|false (Optional. Default is false)
Overview
If true, then the environment properties of the Ami process executing the command are passed to the shell. Please note, that _env values can be used to override specific environment variables.
Example
_useHostEnv="true"
Directives for parsing Delimited list of ordered Fields
_cmd=command_to_execute (Required, see general directives)
_fields=col1_type col1_name, ... (Required, see general directives)
_delim=delim_string (Required)
_conflateDelim=true|false (Optional. Default is false)
_quote=single_quote_char (Optional)
_escape=single_escape_char (Optional)
The _delim indicates the char (or chars) used to separate each field (If _conflateDelim is true, then 1 or more consecutive delimiters are treated as a single delimiter). The _fields is an ordered list of types and field names for each of the delimited fields. If the _quote is supplied, then a field value starting with quote will be read until another quote char is found, meaning delims within quotes will not be treated as delims. If the _escape char is supplied then when an escape char is read, it is skipped and the following char is read as a literal.
Examples
_delim="|"
_fields="code,lname,int age"
_quote="'"
_escape="\\"
This defines a pattern such that:
11232-33|Smith|20
'1332|ABC'||30
Account\|112|Jones|18
Maps to:
| code | lname | age |
|---|---|---|
| 11232-33 | Smith | 20 |
| 1332|ABC | 30 | |
| Account|112 | Jones | 18 |
Directives for parsing Key Value Pairs
_cmd=command_to_execute (Required, see general directives)
_fields=col1_type col1_name, ... (Required, see general directives)
_delim=delim_string (Required)
_conflateDelim=true|false (Optional. Default is false)
_equals=single_equals_char (Required)
_mappings=from1=to1,from2=to2,... (Optional)
_quote=single_quote_char (Optional)
_escape=single_escape_char (Optional)
The _delim indicates the char (or chars) used to separate each field (If _conflateDelim is true, then 1 or more consecutive delimiters are treated as a single delimiter). The _equals char is used to indicate the key/value separator. The _fields is an ordered list of types and field names for each of the delimited fields. If the _quote is supplied, then a field value starting with quote will be read until another quote char is found, meaning delims within quotes will not be treated as delims. If the _escape char is supplied then when an escape char is read, it is skipped and the following char is read as a literal.
The optional _mappings directive allows you to map keys within the output to field names specified in the _fields directive. This is useful when the output has key names that are not valid field names, or the output has multiple key names that should be used to populate the same column.
Examples
_delim="|"
_equals="="
_fields="code,lname,int age"
_mappings="20=code,21=lname,22=age"
_quote="'"
_escape="\\"
This defines a pattern such that:
code=11232-33|lname=Smith|age=20
code='1332|ABC'|age=30
20=Act\|112|21=J|22=18 (Note: this row will work due to the _mappings directive)
Maps to:
| code | lname | age |
|---|---|---|
| 11232-33 | Smith | 20 |
| 1332|ABC | 30 | |
| Act|112 | J | 18 |
Directives for Pattern Capture
_cmd=command_to_execute (Required, see general directives)
_fields=col1_type col1_name, ... (Optional, see general directives)
_pattern=col1_type col1_name, ...=regex_with_grouping (Required)
The _pattern must start with a list of column names, followed by an equal sign (=) and then a regular expression with grouping (this is dubbed a column-to-pattern mapping). The regular expression's first grouping value will be mapped to the first column, 2nd grouping to the second and so on.
If a column is already defined in the _fields directive, then it's preferred to not include the column type in the _pattern definition.
For multiple column-to-pattern mappings, use the \n (new line) to separate each one.
Examples
_pattern="fname,lname,int age=User (.*) (.*) is (.*) years old"
This defines a pattern such that:
User John Smith is 20 years old
User Bobby Boy is 30 years old
Maps to:
| fname | lname | age |
|---|---|---|
| John | Smith | 20 |
| Bobby | Boy | 30 |
_pattern="fname,lname,int age=User (.*) (.*) is (.*) years old\n lname,fname,int weight=Customer (.*),(.*) weighs (.*) pounds"
This defines two patterns such that:
User John Smith is 20 years old
User Boy,Bobby weighs 130 pounds'
Maps to:
| fname | lname | age | weight |
|---|---|---|---|
| John | Smith | 20 | |
| Bobby | Boy | 130 |
Optional Line Number Directives
Skipping Lines Directive (optional)
Syntax
_skipLines=number_of_lines
Overview
This directive controls the number of lines to skip from the top of the output. This is useful for ignoring a head at the top of output. If not supplied, then no lines are skipped. From a performance standpoint, skipping lines is highly efficient.
Examples
_skipLines="0" (this is the default, don't skip any lines)
_skipLines="1" (skip the first line, for example if there is a header)
Line Number Column Directive (optional)
Syntax
_linenum=column_name
Overview
This directive controls the name of the column that will contain the line number. If not supplied, the default is "linenum". Notes about the line number: The first line is line number 1, and skipped/filtered out lines are still considered in numbering. For example, if the _skipLines=2 , then the first line will have a line number of 3.
Examples
_linenum="" (A line number column is not included in the table)
_linenum="linenum" (The column linenum will contain line numbers, this is the default)
_linenum="rownum" (The column rownum will contain line numbers)
Optional Line Filtering Directives
Filtering Out Lines Directive (optional)
Syntax
_filterOut=regex
Overview
Any line that matches the supplied regular expression will be ignored. If not supplied, then no lines are filtered out. From a Performance standpoint, this is applied before other parsing is considered, so ignoring lines using a filter out directive is faster, as opposed to using a WHERE clause, for example.
Examples
_filterOut="Test" (ignore any lines containing the text Test)
_filterOut="^Comment" (ignore any lines starting with Comment)
_filterOut="This|That" (ignore any lines containing the text This or That)
Filtering In Lines Directive (optional)
Syntax
_filterIn=regex
Overview
Only lines that match the supplied regular expression will be considered. If not supplied, then all lines are considered. From a Performance standpoint, this is applied before other parsing is considered, so narrowing down the lines considered using a filter in directive is faster, as opposed to using a WHERE clause, for example. If you use a grouping (..) inside the regular expression, then only the contents of the first grouping will be considered for parsing
Examples
_filterIn="3Forge" (ignore any lines that don't contain the word 3Forge)
_filterIn="^Outgoing" (ignore any lines that don't start with Outgoing)
_filterIn="Data(.*)" (ignore any lines that don't start with Data, and only consider the text after the word Data for processing)
SSH Adapter
Overview
The AMI SSH Datasource Adapter is a highly configurable adapter designed to execute shell commands and capture the stdout, stderr and exitcode on remote hosts via the secure ssh protocol. There are a number of directives which can be used to control how the command is executed, including supplying data to be passed to stdin. The adapter processes the output from the command. Each line (delineated by a Line feed) is considered independently for parsing. Note the EXECUTE <sql> clause supports the full AMI sql language.
Please note, that running the command will produce 3 tables:
- Stdout - Contains the contents of standard out
- Stderr - Contains the contents from standard err
- exitCode - Contains the executed code of the process
(You can limit which tables are returned using the _include directive)
Generally speaking, the parser can handle four (4) different methods of parsing:
Delimited list or ordered fields
Example data and query:
11232|1000|123.20
12412|8900|430.90
CREATE TABLE mytable AS USE _cmd="my_cmd" _delim="|"
_fields="String account, Integer qty, Double px"
EXECUTE SELECT * FROM cmd
Key value pairs
Example data and query:
account=11232|quantity=1000|price=123.20
account=12412|quantity=8900|price=430.90
CREATE TABLE mytable AS USE _cmd="my_cmd" _delim="|" _equals="="
_fields="String account, Integer qty, Double px"
EXECUTE SELECT * FROM cmd
Pattern Capture
Example data and query:
Account 11232 has 1000 shares at $123.20 px
Account 12412 has 8900 shares at $430.90 px
CREATE TABLE mytable AS USE _cmd="my_cmd"
_fields="String account, Integer qty, Double px"
_pattern="account,qty,px=Account (.*) has (.*) shares at \\$(.*) px"
EXECUTE SELECT * FROM cmd
Raw Line
If you do not specify a _fields, _mapping nor _pattern directive then the parser defaults to a simple row-per-line parser. A "line" column is generated containing the entire contents of each line from the command's output
CREATE TABLE mytable AS USE _cmd="my_cmd" EXECUTE SELECT * FROM cmd
Configuring the Adapter for first use
1. Open the datamodeler (In Developer Mode -> Menu Bar -> Dashboard -> Datamodel)
2. Choose the "Add Datasource" button
3. Choose SSH Command adapter
4. In the Add datasource dialog:
Name: Supply a user defined Name, ex: MyShell
URL: hostname or hostname:port
Username: the name of the ssh user to login as
Password: the password of the ssh user to login as
Options: See below, note when using multiple options they should be comma delimited
- For servers requiring keyboard interactive authentication: authMode=keyboardInteractive
- To use a public/private key for authentication: publicKeyFile=/path/to/key/file (Note this is often /your_home_dir/.ssh/id_rsa)
- To request a dumb pty connection: useDumbPty=true
5. Click "Add Datasource" Button
Running Commands Remotely: You can execute commands on remote machines as well using an AMI Relay. First install an AMI relay on the machine that the command should be executed on ( See AMI for the Enterprise documentation for details on how to install an AMI relay). Then in the Add Datasource wizard select the relay in the "Relay To Run On" dropdown.
General Directives
Command Directive (Required)
Syntax
_cmd="command to run"
Overview
This directive controls the command to execute.
Examples
_cmd="ls -lrt" (execute ls -lrt)
_cmd="ls | sort" (execute ls and pipe that into sort)
_cmd="dir /s" (execute dir on a windows system)
Supplying Standard Input (Optional)
Syntax
_stdin="text to pipe into stdin"
Overview
This directive is used to control what data is piped into the standard in (stdin) of the process to run.
Example
_cmd="cat > out.txt" _stdin="hello world" (will pipe "hello world" into out.txt)
Controlling what is captured from the Process (Optional)
Syntax
_capture="comma_delimited_list" (default is stdout,stderr,exitCode)
Overview
This directive is used to control what output data from running the command is captured. It is a comma delimited list and the order determines what order the tables are returned in. An empty list ("") indicates that nothing will be captured (the command is executed, and all output is ignored). Options include the following:
- stdout - Capture standard out from the process
- stderr - Capture standard error from the process
- exitCode - Capture the exit code from the process
Example
_capture="exitCode,stdout" (the 1st table will contain the exit code, 2nd will contain stdout)
Field Definitions Directive (Required)
Syntax
_fields=col1_type col_name, col2_type col2_name, ...
Overview
This directive controls the Column names that will be returned, along with their types. The order in which they are defined is the same as the order in which they are returned. If the column type is not supplied, the default is String. Special note on additional columns: If the line number (see _linenum directive) column is not supplied in the list, it will default to type integer and be added to the end of the table schema. Columns defined in the Pattern (see _pattern directive) but not defined in _fields will be added to the end of the table schema.
Types should be one of: String, Long, Integer, Boolean, Double, Float, UTC
Column names must be valid variable names.
Examples
_fields="String account,Long quantity" (define two columns)
_fields ="fname,lname,int age" (define 3 columns, fname and lname default to String)
Environment Directive (Optional)
Syntax
_env="key=value,key=value,..." (Optional. Default is false)
Overview
This directive controls what environment variables are set when running a command
Example
_env="name=Rob,Location=NY"
Use Host Environment Directive (Optional)
Syntax
_useHostEnv=true|false (Optional. Default is false)
Overview
If true, then the environment properties of the Ami process executing the command are passed to the shell. Please note, that _env values can be used to override specific environment variables.
Example
_useHostEnv="true"
Directives for parsing Delimited list of ordered Fields
_cmd=command_to_execute (Required, see general directives)
_fields=col1_type col1_name, ... (Required, see general directives)
_delim=delim_string (Required)
_conflateDelim=true|false (Optional. Default is false)
_quote=single_quote_char (Optional)
_escape=single_escape_char (Optional)
The _delim indicates the char (or chars) used to separate each field (If _conflateDelim is true, then 1 or more consecutive delimiters are treated as a single delimiter). The _fields is an ordered list of types and field names for each of the delimited fields. If the _quote is supplied, then a field value starting with quote will be read until another quote char is found, meaning delims within quotes will not be treated as delims. If the _escape char is supplied then when an escape char is read, it is skipped and the following char is read as a literal.
Examples
_delim="|"
_fields="code,lname,int age"
_quote="'"
_escape="\\"
This defines a pattern such that:
11232-33|Smith|20
'1332|ABC'||30
Account\|112|Jones|18
Maps to:
| code | lname | age |
|---|---|---|
| 11232-33 | Smith | 20 |
| 1332|ABC | 30 | |
| Account|112 | Jones | 18 |
Directives for parsing Key Value Pairs
_cmd=command_to_execute (Required, see general directives)
_fields=col1_type col1_name, ... (Required, see general directives)
_delim=delim_string (Required)
_conflateDelim=true|false (Optional. Default is false)
_equals=single_equals_char (Required)
_mappings=from1=to1,from2=to2,... (Optional)
_quote=single_quote_char (Optional)
_escape=single_escape_char (Optional)
The _delim indicates the char (or chars) used to separate each field (If _conflateDelim is true, then 1 or more consecutive delimiters are treated as a single delimiter). The _equals char is used to indicate the key/value separator. The _fields is an ordered list of types and field names for each of the delimited fields. If the _quote is supplied, then a field value starting with quote will be read until another quote char is found, meaning delims within quotes will not be treated as delims. If the _escape char is supplied then when an escape char is read, it is skipped and the following char is read as a literal.
The optional _mappings directive allows you to map keys within the output to field names specified in the _fields directive. This is useful when the output has key names that are not valid field names, or the output has multiple key names that should be used to populate the same column.
Examples
_delim="|"
_equals="="
_fields="code,lname,int age"
_mappings="20=code,21=lname,22=age"
_quote="'"
_escape="\\"
This defines a pattern such that:
code=11232-33|lname=Smith|age=20
code='1332|ABC'|age=30
20=Act\|112|21=J|22=18 (Note: this row will work due to the _mappings directive)
Maps to:
| code | lname | age |
|---|---|---|
| 11232-33 | Smith | 20 |
| 1332|ABC | 30 | |
| Act|112 | J | 18 |
Directives for Pattern Capture
_cmd=command_to_execute (Required, see general directives)
_fields=col1_type col1_name, ... (Optional, see general directives)
_pattern=col1_type col1_name, ...=regex_with_grouping (Required)
The _pattern must start with a list of column names, followed by an equal sign (=) and then a regular expression with grouping (this is dubbed a column-to-pattern mapping). The regular expression's first grouping value will be mapped to the first column, 2nd grouping to the second and so on.
If a column is already defined in the _fields directive, then it's preferred to not include the column type in the _pattern definition.
For multiple column-to-pattern mappings, use the \n (new line) to separate each one.
Examples
_pattern="fname,lname,int age=User (.*) (.*) is (.*) years old"
This defines a pattern such that:
User John Smith is 20 years old
User Bobby Boy is 30 years old
Maps to:
| fname | lname | age |
|---|---|---|
| John | Smith | 20 |
| Bobby | Boy | 30 |
_pattern="fname,lname,int age=User (.*) (.*) is (.*) years old\n lname,fname,int weight=Customer (.*),(.*) weighs (.*) pounds"
This defines two patterns such that:
User John Smith is 20 years old
User Boy,Bobby weighs 130 pounds'
Maps to:
| fname | lname | age | weight |
|---|---|---|---|
| John | Smith | 20 | |
| Bobby | Boy | 130 |
Optional Line Number Directives
Skipping Lines Directive (optional)
Syntax
_skipLines=number_of_lines
Overview
This directive controls the number of lines to skip from the top of the output. This is useful for ignoring a head at the top of output. If not supplied, then no lines are skipped. From a performance standpoint, skipping lines is highly efficient.
Examples
_skipLines="0" (this is the default, don't skip any lines)
_skipLines="1" (skip the first line, for example if there is a header)
Line Number Column Directive (optional)
Syntax
_linenum=column_name
Overview
This directive controls the name of the column that will contain the line number. If not supplied, the default is "linenum". Notes about the line number: The first line is line number 1, and skipped/filtered out lines are still considered in numbering. For example, if the _skipLines=2 , then the first line will have a line number of 3.
Examples
_linenum="" (A line number column is not included in the table)
_linenum="linenum" (The column linenum will contain line numbers, this is the default)
_linenum="rownum" (The column rownum will contain line numbers)
Optional Line Filtering Directives
Filtering Out Lines Directive (optional)
Syntax
_filterOut=regex
Overview
Any line that matches the supplied regular expression will be ignored. If not supplied, then no lines are filtered out. From a Performance standpoint, this is applied before other parsing is considered, so ignoring lines using a filter out directive is faster, as opposed to using a WHERE clause, for example.
Examples
_filterOut="Test" (ignore any lines containing the text Test)
_filterOut="^Comment" (ignore any lines starting with Comment)
_filterOut="This|That" (ignore any lines containing the text This or That)
Filtering In Lines Directive (optional)
Syntax
_filterIn=regex
Overview
Only lines that match the supplied regular expression will be considered. If not supplied, then all lines are considered. From a Performance standpoint, this is applied before other parsing is considered, so narrowing down the lines considered using a filter in directive is faster, as opposed to using a WHERE clause, for example. If you use a grouping (..) inside the regular expression, then only the contents of the first grouping will be considered for parsing
Examples
_filterIn="3Forge" (ignore any lines that don't contain the word 3Forge)
_filterIn="^Outgoing" (ignore any lines that don't start with Outgoing)
_filterIn="Data(.*)" (ignore any lines that don't start with Data, and only consider the text after the word Data for processing)
REST adaptor
Overview
The AMI REST adaptor aims to establish a bridge between the AMI and the RESTful API so that we can interact with RESTful API from within AMI. Here are some basic instructions on how to add a REST Api Adapter and use it.
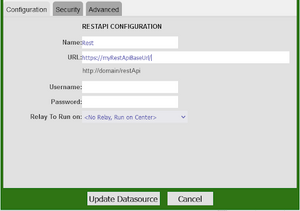
Setting up your first Rest API Datasource
1. Go to Dashboard -> Datamodeler
2. Click Attach Datasource
3. Select the RestAPI Datasource Adapter
4. Fill in the fields:
Name: The name of the Datasource

URL: The base url of the target api. (Alternatively you can use the direct url to the rest api, see the directive _urlExtensions for more information)

Username: (Username for basic authentication)

Password: (Password for basic authentication)
How to use the 3forge RestAPI Adapter
The available directives you can use are
- _method = GET, POST, PUT, DELETE
- _validateCerts = (true or false) indicates whether or not to validate the certificate by default this is set to validate.
- _path = The path to the object that you want to treat as table (by default, the value is empty-string which correlates to the response json)
- _delim = This is the delimiter used to grab nested values
- _urlExtensions = Any string that you want to add to the end of the Datasource URL
- _fields = Type name comma delimited list of fields that you desire. If none is provided, AMI guesses the types and fields
- _headers or _header_xxxx: any headers you would like to send in the REST request, (If you use both, you will have the headers from both types of directives)
- _headers expects a valid json string
- _header_xxxx is used to do key-value pairs
- _params or _param_xxxx is used to provide params to the REST request. (If you provide both, they will be joined)
- _params will send the values as is
- _param_xxxx is a way to provide key-value params that are joined with the delimiter & and the associator
- _returnHeaders = (true or false) this enables AMI to return the response headers in a table, set to true this will return two tables, the result and the response headers. See the section on ReturnHeaders Directive for more details and examples.
A simple example of how to use the 3forge Rest Adapter
The following example demonstrates how to use the directives mentioned above. We will start with the four fundamental methods: GET, POST, PUT, DELETE. The example below is using a dummy RESTful API constructed from flask.
The base url is http://127.0.0.1:5000/ , running on the port 5000 on the localhost.
The code snippet below demonstrates how you can set up a restful API using python and flask.
Install and import relevant modules and packages
To start with, we would need to install and import flask on our environment. If you don’t have these packages in place, you need to do pip install flask and pip install flask_restful
from flask import Flask,jsonify,request,Response
from flask_restful import Resource,Api,reqparse

parser = reqparse.RequestParser()
parser.add_argument('title',required=True)
app = Flask(__name__)
api = Api(app)
Create the class Home and set up home page
class Home(Resource):
	def __init__(self):
		pass
	def get(self):
		return {
			"msg": "welcome to the home page"
		}
api.add_resource(Home, '/')
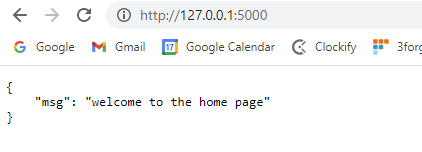
The add_resoure function will add Home class to the root directory of the url and display the message “Welcome to the home page”.
Add endpoints onto the root url
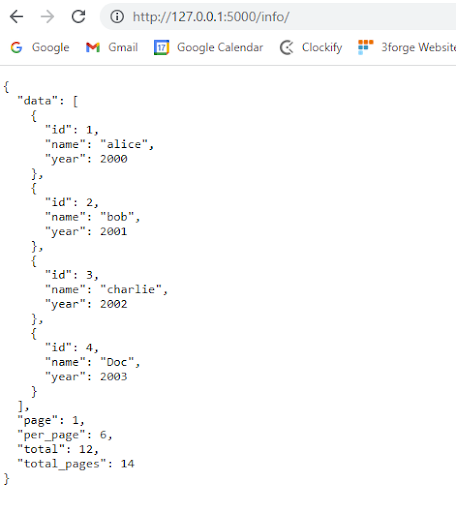
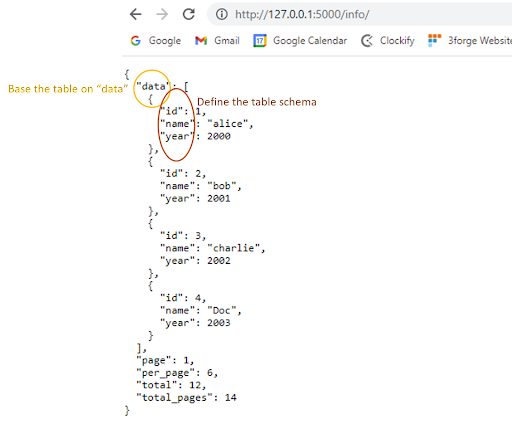
The following snippet code will display all the information from variable “all” in JSON format once we hit the url: 127.0.0.1:5000/info/
#show general info
#url:http://127.0.0.1:5000/info/
all = {
 "page": 1,
 "per_page": 6,
 "total": 12,
 "total_pages":14,
 "data": [
     {
      "id": 1,
      "name": "alice",
      "year": 2000,
     },
     {
      "id": 2,
      "name": "bob",
      "year": 2001,
     },
     {
      "id": 3,
      "name": "charlie",
      "year": 2002,
     },
     {
      "id": 4,
      "name": "Doc",
      "year": 2003,
     }
      ]
}
Define GET,POST,PUT and DELETE methods for http requests
- GET method
@app.route('/info/', methods=['GET'])
def show_info():
    return jsonify(all)
- POST method
@app.route('/info/', methods=['POST'])
def add_datainfo():
    newdata = {'id':request.json['id'],'name':request.json['name'],'year':request.json['year']}
    all['data'].append(newdata)
    return jsonify(all)
- DELETE method
@app.route('/info/', methods=['DELETE'])
def del_datainfo():
    delId = request.json['id']
    for i,q in enumerate(all["data"]):
        if delId  in q.values():
            popidx = i
            all['data'].pop(popidx)
            return jsonify(all)
- PUT method
@app.route('/info/', methods=['PUT'])
def put_datainfo():
    updateData = {'id':request.json['id'],'name':request.json['name'],'year':request.json['year']}
    for i,q in enumerate(all["data"]):
        if request.json['id']  in q.values():
            all['data'][i] = updateData
            return jsonify(all)
    return jsonify({"msg":"No such id!!"})
Add one more endpoint employees using query parameters
- Define employees information to be displayed
#info for each particular user
employees_info = {
    "John":{
        "salary":"10k",
        "deptid": 1
    },
    "Kelley":{

        "salary":"20k",
        "deptid": 2
           }
                 }
- Create employee class and add onto the root url
We will query the data using query requests with the key being “ename” and value being the name you want to fetch.
class Employee(Resource):
    def get(self):
        if request.args:
            if "ename" not in request.args.keys():
                message = {"msg":"only use ename as query parameter"}
                return jsonify(message)
            emp_name = request.args.get("ename")
            if emp_name in employees_info.keys():
                return jsonify(employees_info[emp_name])
            return jsonify({"msg":"no employee with this name found"})
        return jsonify(employees_info)

api.add_resource(Employee, "/info/employees")

if __name__ == '__main__':
	app.run(debug=True)
GET method
Example: simple GET method with nested values and paths
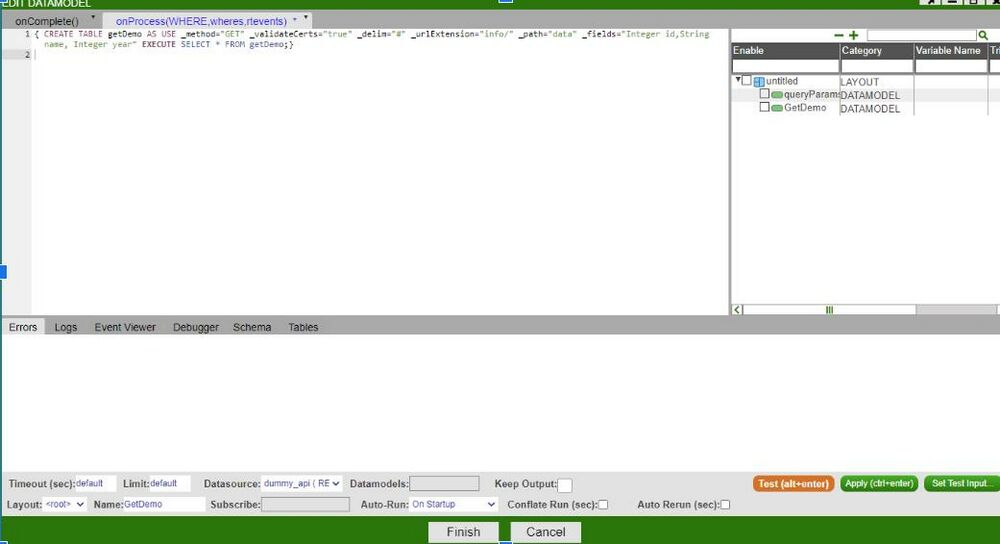
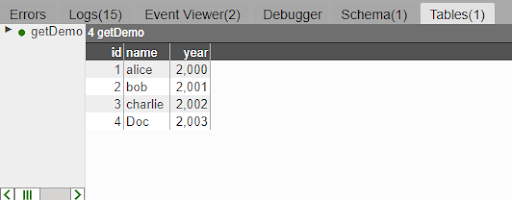
CREATE TABLE getDemo AS USE _method="GET" _validateCerts="true" _delim="#" _urlExtension="info/" _path="data" _fields="Integer id,String name, Integer year" EXECUTE SELECT * FROM getDemo;
Overview
The query that we are using in this example
One can use _urlExtension= directive to specify any endpoint information added onto the root url. In this example, you can use _urlExtension="info/" to navigate you to the following url address, which, corresponds to this url address: http://127.0.0.1:5000/info/
The result table “getDemo” being returned:
Example2: GET method with query parameters
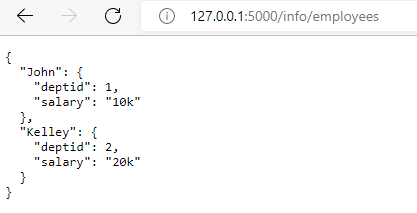
Now let’s attach a new endpoint “/employees” onto the previous url. The new url now is: 127.0.0.1:5000/info/employees
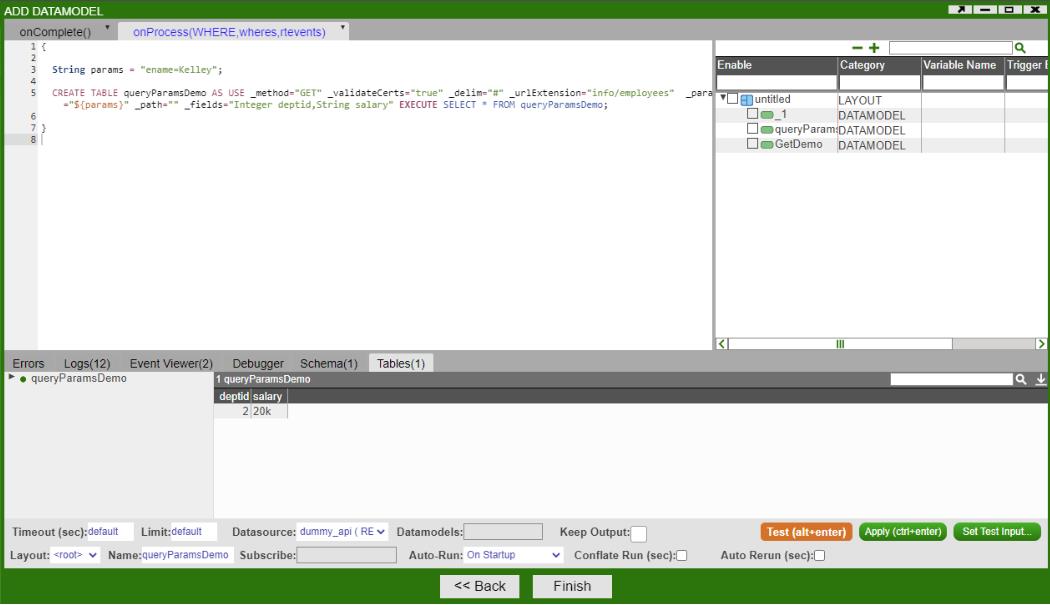
Suppose we want to get the employee information for the employer named “John”. We can use query parameters to achieve this. On the AMI, we can configure our data modeler like this:
{
  String params = "ename=Kelley";

  CREATE TABLE queryParamsDemo AS USE
              _method="GET" _validateCerts="true"
              _delim="#" _urlExtension="info/employees"
              _params="${params}" _path="" _fields="Integer deptid,String salary"
              EXECUTE SELECT * FROM queryParamsDemo;
}
Overview
The query that we are using in this example
Note that this is the same as to create a string for appending to the end of the url as you would in a GET request ( "?param1=val1¶m2=value2" ) and assign the string to “_params”.
The result table “queryParamsDemo” being returned
The result corresponds to the url: 127.0.0.1:5000/info/employees?ename=Kelley
POST method with nested values
One can also use the POST method to add new information to the existing data.
- We would use _path="" to specify what you want your table to be based on. For the above example where the data is nested, if you want your table to be based on "data" , then you would set _path="data" .
- We use the _fields="" to specify the schema of your table. For this example, you would set _fields="Integer id,String name, Integer year" to grab all the attributes from the data path.
- We use the _params="${params}" to specify the new row information you want to insert into the existing table in the format of JSON.
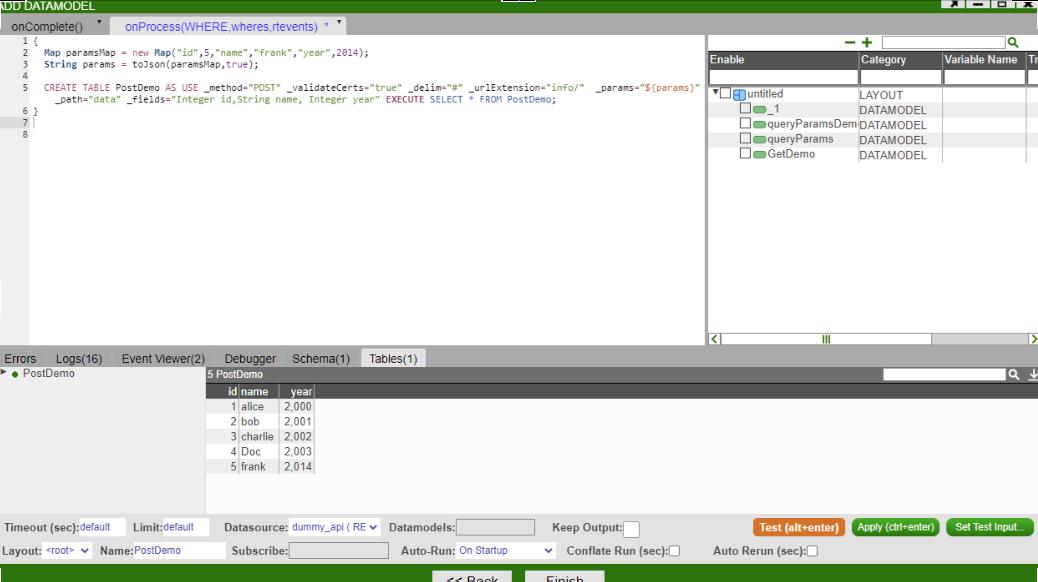
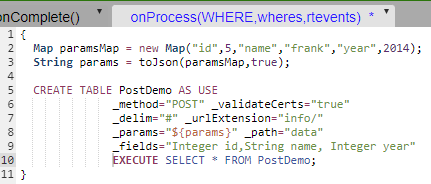
The example shows how you can insert a new row record Map("id",5,"name","frank","year",2014) into the existing table.
Here is how you can configure the example in the AMI:
{
  Map paramsMap = new Map("id",5,"name","frank","year",2014);
  String params = toJson(paramsMap,true);

  CREATE TABLE PostDemo AS USE _method="POST" _validateCerts="true" _delim="#" _urlExtension="info/"  _params="${params}" _path="data" _fields="Integer id,String name, Integer year" EXECUTE SELECT * FROM PostDemo;
}
Overview
The query we are using in this example:
Note: For POST method: params (from “_params”) will be passed in as a JSON format in the request body.
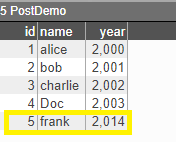
The table “PostDemo” being returned
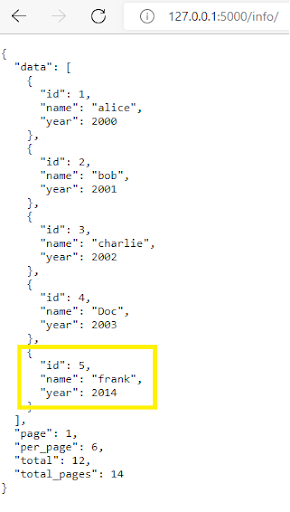
The new record is shown on the browser after POST method.
DELETE method
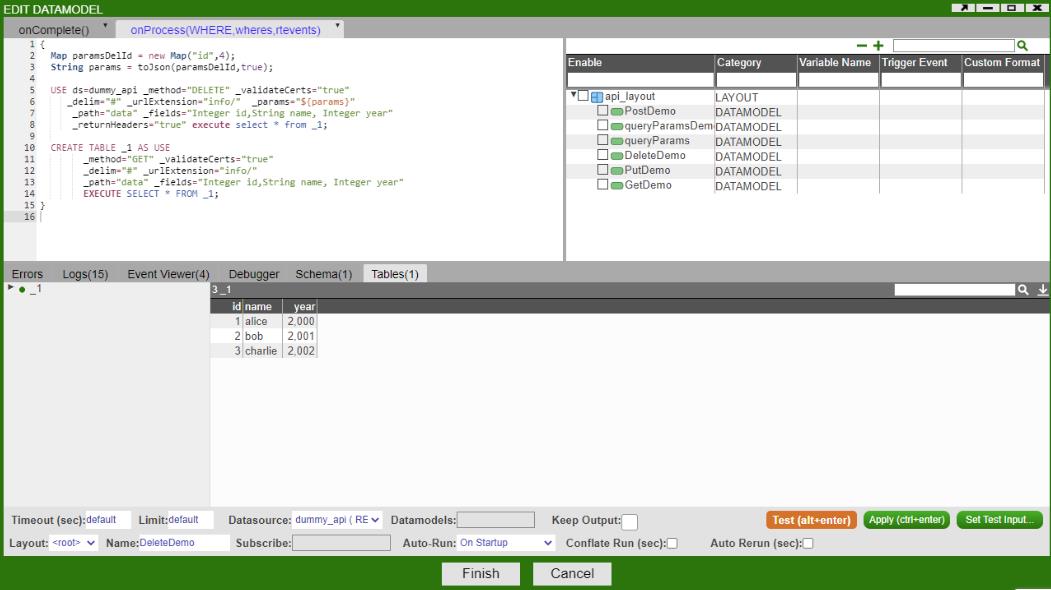
One can use DELETE method to remove specific data record given, say the id of the particular data. If we want to remove the data record with the id of 4 in the “data” path, here is how you can configure your data modeler.
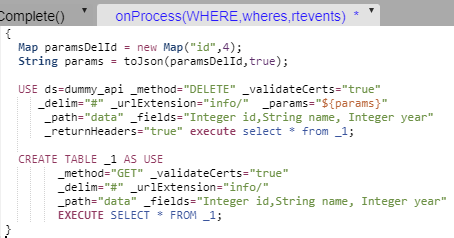
{
  Map paramsDelId = new Map("id",4);
  String params = toJson(paramsDelId,true);

  USE ds=dummy_api _method="DELETE" _validateCerts="true"
     _delim="#" _urlExtension="info/"  _params="${params}"
      _path="data" _fields="Integer id,String name, Integer year"
      _returnHeaders="true" execute select * from _1;

  CREATE TABLE _1 AS USE
        _method="GET" _validateCerts="true"
        _delim="#" _urlExtension="info/"
        _path="data" _fields="Integer id,String name, Integer year"
        EXECUTE SELECT * FROM _1;
}
Overview
The query we are using in this example
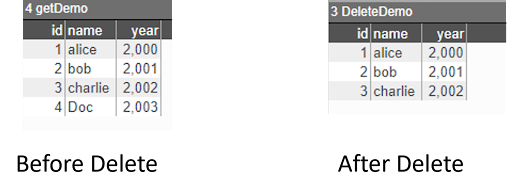
The returned tables “DeleteDemo” before and after “DELETE” method
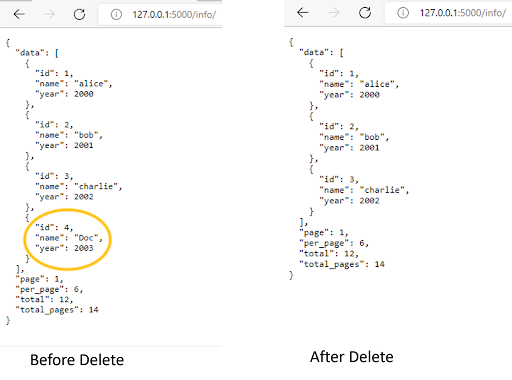
The results on the web browser before and after DELETE method
PUT method
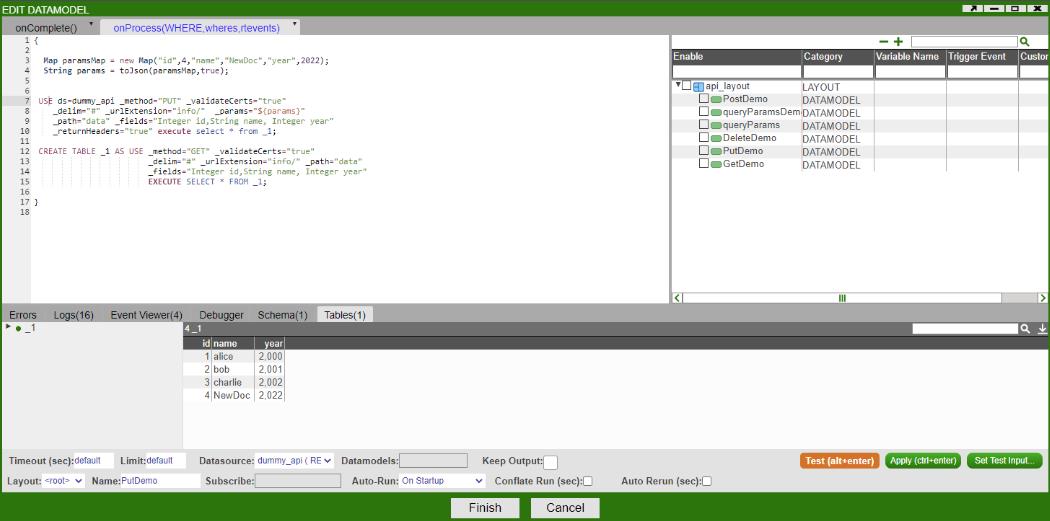
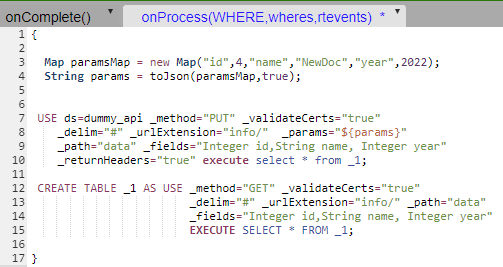
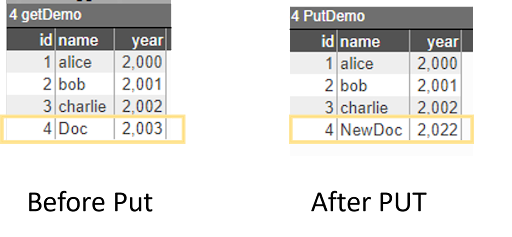
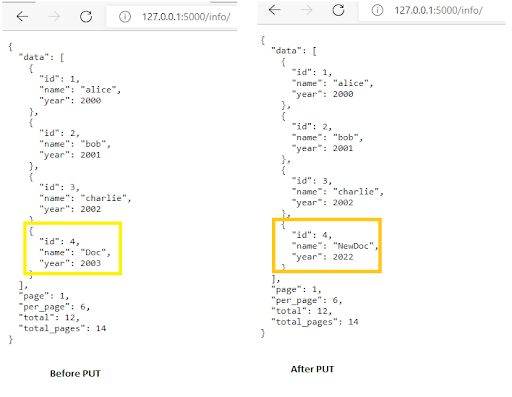
One can use PUT method to update the existing data record (usually by data id). The example below demonstrates how you can update the data record where id is equal to 4 to Map("id",4,"name","NewDoc","year",2022);
Here is how you can configure PUT method in AMI:
{
  Map paramsMap = new Map("id",4,"name","NewDoc","year",2022);
  String params = toJson(paramsMap,true);


 USE ds=dummy_api _method="PUT" _validateCerts="true"
    _delim="#" _urlExtension="info/"  _params="${params}"
    _path="data" _fields="Integer id,String name, Integer year"
    _returnHeaders="true" execute select * from _1;

 CREATE TABLE _1 AS USE _method="GET" _validateCerts="true"
                        _delim="#" _urlExtension="info/" _path="data"
                        _fields="Integer id,String name, Integer year"
                        EXECUTE SELECT * FROM _1;
}
