Advanced
AMI Remote Procedure Calling (RPC)
AMI Remote Procedure Calling (RPC) Overview
AMI RPC leverages the HTTP CORS (Cross Origin Resource Sharing) standard to provide a mechanism for separate AMI dashboards within the same domain to communicate with each other. As such, different teams working on distinct dashboards/use cases can easily integrate them. For example, there are two teams, one building a dashboard for viewing orders and a second team building an order analytics dashboard. The first team could configure the order-dashboard such that when the user clicks on an order, an RPC instruction is sent to the other team’s dashboard, which in turn displays analytics about the selected order. This paradigm promotes seamless integration across any number of dashboards at scale, providing users with a simple workflow accordingly.
How AMI RPC Works (User Perspective)
If a user is logged into two or more dashboards built on the AMI platform, then it's possible for the dashboards to call ami script across those dashboards.
Dashboards must be opened in the same browser space. For example, if one dashboard is opened in Chrome then the other dashboard must be opened in Chrome as well. Additionally, if one dashboard is opened in non-cognito mode then the other must also be opened in non-cognito mode.
Although it is not necessary for both dashboards to be logged in with same user ID, it can be enforced if necessary.
How AMI RPC Works (Configuration Perspective)
This is done by way of configuring custom AmiScript methods such that one dashboard can execute a custom AmiScript Method on another dashboard. Communication supports full round trip, meaning the calling dashboard sends arguments to the receiving dashboard and then the receiving dashboard can respond to the call with data as well.
The target of such a call is identified using a host and method name combination. It is common for the builder of the target dashboard to properly determine the host(s), method(s) and structure of the request and response payloads, which in aggregate is considered an API. This "API" is then communicated to those teams wishing to use the API.
For further reading on the general usage of CORS visit https://developer.mozilla.org/en-US/docs/Web/HTTP/CORS
Please note that both dashboards must be hosted within the same domain, ex: analytics.acme.com and orders.acme.com are both in the acme.com so they can communicate via CORS, despite having different subdomains. It's important that the all references to the domains use the fully qualified domain.
Creating a Method for being remotely called
Create a custom method with a predetermined "well-known" name that returns a Map, and takes an RpcRequest object as a single Argument of the form:
Map myMethod (RpcRequest request){
    Map requestArgs = request.getArguments();
    //Do something here
    Map responseArgs = new Map("key","someReturnValue");
    return responseArgs;
}
Important: Please note that the return type of Map and argument type of RpcRequest is required and specifically indicates that the method can be called remotely.
Calling a Method remotely
Use the callRpcSnyc(RpcRequest) method on the session object. The RpcRequest constructor takes these 3 arguments.
target - URL of the host that you wish to call the method on.
methodName - Name of the method to call (in the example above, it's myMethod).
Arguments - Key/value pair of data to send. Note that the data will be transported using JSON, so complex objects, such as panels, cannot be referenced.
For Example, let’s say the example above is running on a dashboard at some.host.com:33332. This would call that method:
Map requestArgs=new Map("key","someRequestValue");

String host="http://some.host.com:33332/";

RpcRequest request=new RpcRequest(host,"myMethod",requestArgs);

RpcResponse response = session.callRpcSync(request);

Map responseArgs=response.getReturnValues();
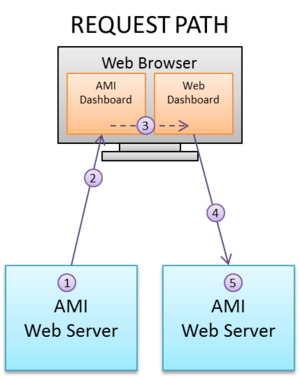
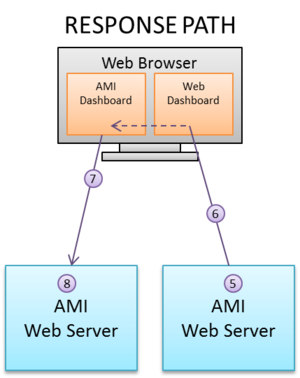
HOW AMI RPC Transport Works
- The Source dashboard calls session.callRpcSync(...)
- The Source dashboard creates a JSON request that is sent to the dashboard via websockets
- AMI's javascript forwards the JSON to the target Server (the browser will do CORS authentication against the target web server, which AMI is compatible with)
- The target webserver will receive the JSON, confirm headers and create an RpcRequest object for processing
- The target dashboard's amiscript custom method will process the request and produce a response
- The reply from the target server is sent back to the web browser in the http response as JSON
- The response is forwarded back to the source webserver via web sockets
- AMI converts the JSON to an RpcResponse which is passed back to the dashboard for processing
Error Condition Handling
The session.callRpcSync(...) method will always return an RpcResponse object. You can inspect the Error for the success or failure status.
Here are the possible return values of getError:
| Return Value | Description |
|---|---|
| null | The rpc call executed successfully |
| "NO_RESPONSE" | The server failed to respond, this is generally caused if the user refreshes the webpage while the rpc request is inflight, which will reset the connection. |
| "CONNECTION_FAILED" | The CORS could not successfully establish a connection. This may be because the target url does not point to an existing AMI instance. |
| "INVALID_URL" | The format of the target url is not valid. |
| "ERROR_FROM_SERVER" | The server responded with an error. |
| "ERROR_FROM_SERVER_ORIGIN_NOT_PERMITTED" | The origin was not permitted (based on the ami.web.permitted.cors.origins option) |
| "ERROR_FROM_SERVER_USER_NOT_LOGGED_IN" | The user does not have a browser open which is logged into the server |
| "ERROR_FROM_SERVER_NO_SUCH_METHOD" | The dashboard does not have a custom method of the supplied name. Or the method does not return a Map, or the method does not take an RpcRequest as it's single argument. |
| "ERROR_FROM_SERVER_METHOD_EXCEPTION" | The method was executed but threw an unhandled exception. |
| "ERROR_FROM_SERVER_USERNAME_MISMATCH" | The RpcRequest constructor was supplied a requiredUserName, which did not match the username currently logged in on the target dashboard. |
| "ERROR_FROM_SERVER_LAYOUT_NAME_MISMATCH" | The RpcRequest constructor was supplied a requiredLayoutName, which did not match the name of the layout on the target dashboard. |
| "ERROR_FROM_SERVER_LAYOUT_NAME_MISMATCH" | The RpcRequest constructor was supplied a requiredSessionId, which did not match the sessionId of the layout on the target dashboard. |
Please Note, you can look at RpcResponse::getErrorMessage for further details.
Security
The ami.web.permitted.cors.origins option can be supplied (in the ami web's properties) to control which origins are accepted. See the Access-Control-Allow-Origin header for further information on how CORS origins works. Here are 3 separate examples:
# Disable CORS, no origins will be allowed to remotely call functions
ami.web.permitted.cors.origins=
# All origins are allowed
ami.web.permitted.cors.origins=*
# Allow a specific host
ami.web.permitted.cors.origins=http://myhost.com|http://thathost.com
Encrypting and Decrypting using tools.sh
The pdf below contains instructions on how to encrypt and decrypt using tools.sh
File:Instructions for encrypting and decrypting using tool.sh.pdf
AMI Center Replication
This document details how to replicate data from one AMI Center to another AMI Center using its built-in support for data replication. It supports subscription to tables and replication to another AMI Center.
This document provides an example on how to use AMI Center Replication.
Prerequisites
- Have at least 2 AMI centers running (e.g. host:center_port e.g. localhost:3270 & localhost:4270)
- Have the table schema predefined on both source and target centers.
Replication Procedures
__ADD_CENTER(CenterName String, Url String, Certfile String, Password String)
- CenterName (Required): Specified name for center (source)
- Url (Required): Url of center (host: ami.center.port)
- Certfile: Path to the certfile (optional)
- Password: Password if a certfile is given (optional)
__REMOVE_CENTER(CenterName String)
__ADD_REPLICATION(Definition String, Name String, Mapping String, Options String)
- Definition: Target_TableName=Source_CenterName.Source_TableName or Source_CenterName.TableName (if both source and target has same table name)
- Name: Name for the replication
- Mapping (Optional): Mappings to be applied for the tables, (key value delimited by comma) ex: "target_col_name=source_col_name" or ex: "(act=account,symbol=symbol,value=(px*qty))". Pass in null to skip mapping.
- Options (Optional): options to clear the replication on
- "Clear=onConnect" or "Clear=onDisconnect"
- Note: If configured the replicated table will clear when the center connects or disconnect
- "Clear=onConnect" or "Clear=onDisconnect"
__REMOVE_REPLICATION(Name String)
SHOW CENTERS
- Shows properties of all replication sources. Properties shown include:
- CenterName (String)
- URL (String)
- CertFile (String)
- Password (String)
- Status (String): shows whether the replication source is connected or not
- ReplicatedTables (int): Number of replicated tables
- ReplicatedRows (int): Number of replicated rows
SHOW REPLICATIONS
- Shows properties of all replications. Properties shown include:
- ReplicationName (String)
- TargetTable (String)
- SourceCenter (String)
- SourceTable (String)
- Mapping (String): shows the mapping for the replication
- Options (String): shows options to clear replications on
- ReplicatedRows (int): Number of replicated rows
- Status (String): shows whether a successful connection is established to the target table
Note: When replicating from the source AMI Center and the source table, ensure the table is a Public table with Broadcast Enabled.
Note 2: Configuring the RefreshPeriodMs will allow you to adjust for throughput, performance and how often updates are pushed.
See the following documentation: create_public_table_clause
Lower RefreshPeriodMs means updates are pushed more frequently which potentially means lower throughput.
Higher RefreshPeriodMs could mean higher throughput and better performance but fewer updates.
Note 3: Removing the replication will clear all the copied entries on the target side’s table, regardless of the options.
Replication Sample Guide
To replicate data from one AMI Center to a destination AMI Center, first we need to `add` the source AMI Center in the destination AMI Center. After which we can replicate target tables from the source to the destination.
Example
call __ADD_CENTER("source", "localhost:3270");
__ADD_CENTER Adds the source center you want to copy from. So if your AMI Center Port is 3270, and you call __ADD_CENTER on the destination AMI Center, that means you plan to replicate data from 3270 to 4270.
call __ADD_REPLICATION("dest_table=source.mytable","myReplication"," account=account", "Clear=onConnect");
__ADD_REPLICATION specifies which table on the source side the target side wants to replicate. The data travels from source to target, from 3270 to 4270.
AMI Center Persist Files
There are two persist files responsible for maintaining the replications, __REPLICATION.dat and __CENTER.dat. We do not recommend modifying the contents of these files manually, these files may have strict formatting and could cause serious issues if altered incorrectly.
Persist File Location
By default these files are located in the default persist directory. This may not be the case if the persist dir has been changed by the property: ami.db.persist.dir or the system tables directory has been changed by the property: ami.db.persist.dir.system.tables.
To change only the __REPLICATION.dat or __CENTER.dat locations add the following property.
ami.db.persist.dir.system.table.__REPLICATION=path ami.db.persist.dir.system.table.__CENTER=path
__REPLICATION.dat Format
ReplicationName|TargetTable|SourceCenter|SourceTable|Mapping|Options| "ReplicationName"|"SourceTableName"|"SourceName"|"TargetTableName"|"TableMapping"|"ClearSetting"|
__CENTER.dat Format
CenterName|Url|CertFile|Password| "CenterName"|"CenterURL"|"CertFileIfProvided"|"PasswordForCertFile"|
List of available AMI procedures
Parameters in bold indicate no null.
For the following procedure calls, refer to the pdf document in the previous section, AMI Center Replication
1. __ADD_CENTER
2. __REMOVE_CENTER
3. __ADD_REPLICATION
4. __REMOVE_REPLICATION
Note: to call a procedure in the frontend, e.g. in a datamodel, or an AMI editor, use this syntax:
- use ds=AMI execute call... (your procedure here);
to use this in the AMIDB console, just use:
- call... (your procedure here)
Example frontend usage:
- use ds=AMI execute __RESET_TIMER_STATS("mytimer",true,true);
Example console usage:
- call __RESET_TIMER_STATS("mytimer",true,true);
Add Datasource
- __ADD_DATASOURCE(String name, String adapter_type, String url, String username, String password, String options1, String relayId2, String permittedOverrides3)
1options refer to values under the Advanced section. Must be a comma delimited list.
- Ex: “DISABLE_BIGDEC=true,URL_OVERRIDE=jdbc:mysql://serverUrl:1234/databaseName”
2relayId refers to “Relay to Run on” under the Configuration section.
3permittedOverrides refers to the checkboxes under the Security section. Must be a comma delimited list. The available values are URL, USERNAME, PASSWORD, OPTIONS, RELAY.
- Ex: “URL,USERNAME” <- this will tick the URL and USERNAME checkbox.
| Name | Alias (to be used in the procedure call) |
|---|---|
| AMI datasource | __AMI |
| Sybase IQ JDBC | SYBASE_IQ |
| Shell Command | SHELL |
| AMIDB | AMIDB |
| MySQL JDBC | MYSQL |
| KDB | KDB |
| SSH Command | SSH |
| Redis | Redis |
| Fred | FRED |
| SQLServer JDBC | SQLSERVER |
| Oracle JDBC | ORACLE |
| Sybase JDBC | SYBASE |
| RestAPI | RESTAPI |
| Postgres JDBC | POSTGRES |
| Flat File Reader | FLAT_FILE |
| Generic JDBC | GENERIC_JDBC |
| IMB DB2 | IMBDB2 |
| SQLITE JDBC | SQLITE |
| OneTick | ONETICK |
| Quandl | QUANDL |
remove datasource
- Call __REMOVE_DATASOURCE(String DSName)
- Use show datasources to see a list of datasources.
- This procedure removes the specified datasource.
reset timer statistics
- Call __RESET_TIMER_STATS(String timerName, Boolean executedStats, Boolean errorStats)
- Use show timers to see information for all timers..
- This procedure clears NextRunTime. Optionally clears ExecutedCount, MillisSpent, and AvgMillisSpent if ExecutedStats is set to true, and optionally clears ErrorCounts if ErrorStats is set to true.
reset trigger statistics
- Call __RESET_TRIGGER_STATS(String triggerName)
- Use show triggers to see information for all triggers.
- This procedure will reset ExecutedCount, MillisSpent, AvgMillisSpent, ErrorsCount, ReturnedFalseCount for a particular trigger.
schedule timer
- Call __SCHEDULE_TIMER(String timerName, Long delayMillis)
- This procedure schedules the timer to run after the specified number of milliseconds passes. For instance, call __SCHEDULE_TIMER(“mytimer”, 5000) means mytimer will start running after 5000 milliseconds, or 5 seconds.
show timer error
- Call __SHOW_TIMER_ERROR(String timerName)
- This procedure shows you the last error the specified timer encountered in a table format.
show trigger error
- Call __SHOW_TRIGGER_ERROR(String triggerName)
- This procedure shows you the last error the specified trigger encountered in a table format.
OMAS Installation Instructions
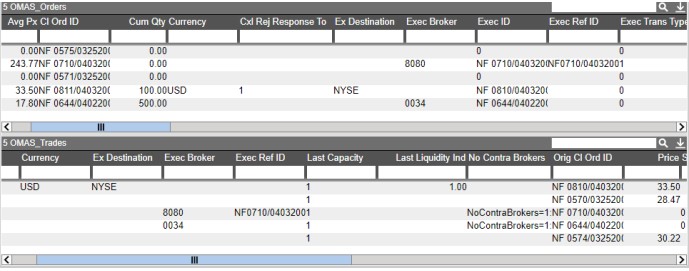
The OMAS architecture allows realtime streaming of FIX messages into AMI for easy visualization and analystics.
1. Download the fix2ami.<version>.<type>.tar.gz file from your 3forge account and extract. 2. Configure properties in the config/fix2ami folder
a. root.properties - FIX session properties

b. db.properties - AMI DB properties
- host, port, login values can be obtained from your local AMI settings
- Optionally, configure AMI table names for OMAS using the same property
3. Run the startFix2Ami.sh script located in the scripts folder and connect to the FIX sessions. To connect multiple sessions, add session names to the sessions variable and configure properties for each session
Now, FIX messages will be processed to AMI and you can begin creating visualizations in the AMI dashboard:
4. To stop, run the stopFix2Ami.sh script
Notes:
- If you change AMI table names for OMAS in the db.properties file later, the old tables will still be
defined in AMI DB.
- Fix2Ami sequence numbers are stored in the data/fix2ami folder.
Encrypted Persist At Rest
This section details how to create encrypted AMI tables, including system tables. Adding decrypters on existing encrypted tables is also supported.
Creating a Encrypted User Table
To create an encrypted user table, add persist_encrypter="default" to the CREATE TABLE statement containing PersistEngine. This will encrypt the data stored for the persistent user table. By default the encrypter should be "default". Example:
CREATE PUBLIC TABLE MyTable(c1 Integer, c2 Short, c3 Long, c4 Double, c5 Character, c6 Boolean, c7 String) USE PersistEngine="FAST" persist_encrypter="default" RefreshPeriodMs="100"
- persist_encrypter(required): name of encrypter
Adding Decrypters
To add decrypters, add the following option to the start.sh file (found in amione/scripts):
-Dproperty.f1.properties.decrypters=DECRYPTER_NAME=package.ClassName
- DECRYPTER_NAME: name of decrypter
- ClassName: name of decrypter Java class
Encrypting System Tables
To encrypt system tables, add either of the following lines to the local.properties file (found in amione/config):
ami.db.persist.encrypter.system.tables=default
OR
ami.db.persist.encrypter.system.table._DATASOURCE=[encryptername]
- encryptername: name of encrypter used
NOTE: The old unencrypted .dat persist files will not be deleted after encryption, and will be appended with .deleteme
Azure Vault AMI
Prerequisites
Required version: > 14952.dev
Following credentials are to be generated
Quickstart: Create a new tenant in Azure Active Directory - Refer to this guide to generate the following credentials
Required VM Option:
- Dproperty.f1.properties.decrypters=AZURE=com.f1.utils.encrypt.azurevault.AzureVaultRestDecrypter
VM Option for enabling debugging:
- DAzureDebug=true
VM Options for Authentication (Use one of the following)
- DAzureAuth=[Token, ClientSecret, or Identity]
VM Options for Token
- DAzureAuth=Token
- DAzureBearerToken=[your generated token]
VM Options for Client Secret
- DAzureAuth=ClientSecret
- DAzureTenant=[Tenant, e.g. 218f57a4-c14b-4be5-a57… ]
- DAzureClientId=[AppId, e.g. 14752cd8-e62d-484d-b11a… ]
- DAzureClientSecret=[Password, e.g. wLr6evrQBmgPkb6d9… ]
- DAzureScope=https://vault.azure.net/.default
VM Options for Managed Identity
- DAzureAuth=Identity
- DAzureIdentityApiVersion=[ 2018-02-01 ]
- DAzureIdentityResource=[ https://management.azure.com/ ]
- DAzureIdentityObjectId=[ optional ]
- DAzureIdentityClientId=[ optional ]
- DAzureIdentityMiResId=[ optional ]
VM Options for Decryption
- DAzureUrlBase=[Vault base url, e.g. https://example.vault.azure.net/]
- DAzureDecrypterKeyName=[Key name]
- DAzureDecrypterKeyVersion=[Key Version]
- DAzureDecrypterApiVersion=[Azure API version, default 7.2]
- DAzureDecrypterAlg=[Encryption algorithm, e.g. RSA1_5]
- DAzureDecrypterCharset=[Charset, e.g. UTF-8 (default)]
local.properties
Add the encrypted text in local.properties file
amiscript.variable.secret=${CIPHER:AZURE:[EncryptedText]}
Example: amiscript.variable.secret1=${CIPHER:AZURE:QNEdUh7jWNW_LJZTFN6gocxyxDmuZSMhikSATAmzEqpH1X3nrNVAIA5PJONottcr6O7L3XlO1T1_0OWeaT5xP2i3lOFHg4fl39YzgNb4w_T1dupL22RC9185xADDSeY6dHcfFIVcJuGE78PlN1EA1shi6vQv4JtAcjFjSaFfv40X5LOWNZFEah6z3MhkPuTP7XrfauNheKQunRt_-bTKV9CNHSEReWAvaTv8sEt67EDHasKSM1Uz3FK9nwoUmS2_wksjMPGCSrkF67DD66pZU03BRGLAuLF51qp8-GWfY9lxKaLJdatD2LdEm3K17cx1v526XZoYX88uOBlwdA4-mQ==}
amiscript.variable.secret2=${CIPHER:AZURE:JUjao9oG8DyiTyfsaoA8dMrGC4AeR7eECT_FLzLC6BYFulOz4WqGo8pdTmmACvUtCo_WRQN_EzlIFDJip4zaUt56MIbwuo5x1ngrX0IJ1QvGrZdBQajvBPOD3cQb6sX8DcCYmaW1NiTuwH4dpHw8n92wYwHipTI4hbtcKDp4XqZMAV2I9Aq9EXMUovm8kQOzzgS7AoV5k8mxrmvOX9GmoYs-kA2P3XMFQSO72ty-zLaRk4olNaPDAsju0-yt4hkrGqCkgispUIThrEj-TtbDU6BWJNCGqmVr086TBmZ4h5ZSg9D5DhLyP6bbqms8RKc0Rxf5heUi9GQT2XfG-69Hyg==}
amiscript.variable.secret3=${CIPHER:AZURE:hWHhogjKt3KPwfBHDntgyhyP8zBiiKVVgYf0P73W1FwkjW_cRX3fUHNzq-gtoLZhvDTk2_yFPjHJBDdvQN5rP5WssUiciyZnyxzuZUEgMjgXt0GFKTyrIvIydaTbGjPA_lKK0FYsf1ImfnR1HcKZc7WGC58h29KVwmcYmx14WujLSBBrf9rvTVGN520uStqVS_0zoxEyYnnIPQx40EUDoawYwOjV7fRwzeJwJihmZHkeIqPnJyBxk_H_Gfuqi32WZ-v0zN3fQlVR19KxS0-qoghwuvbp3tYkByYirO5KDghRJG4VtZTrbODltJP1TBOAy6WBaBRaNOSlOdMp2mI9Hw==}
AWS KMS AMI
Prerequisites
Required version: > 14952.dev
Following credentials are to be generated
Getting Started with AWS Key Management Service - Refer to this guide to generate the following credentials
Required VM Option:
- Dproperty.f1.properties.decrypters=AWSKMS=com.f1.utils.encrypt.awskms.AwsKmsRestDecrypter
VM Option for enabling debugging:
- DAwsKmsDebug=true
VM Options for Client Secret
- DAwsKmsAccessKey=[Access key Id, e.g. AKIAZV…]
- DAwsKmsSecret=[Secret access key, e.g. FDNa3B61gyKOK…]
VM Options for Decryption
- DAwsKmsEndpoint=[Aws Endpoint]
- DAwsKmsKeyId=[Key id, e.g. arn:aws:kms:us-east-1:6646…]
- DAwsKmsRegion=[Region]
- DAwsKmsHost=[Hostname]
- DAwsKmsDecrypterCharset=[Charset, e.g. UTF-8 (default)]
local.properties
Add the encrypted text in local.properties file
amiscript.variable.secret=${CIPHER:AWSKMS:[EncryptedText]}
Example
amiscript.variable.secret1=${CIPHER:AZURE:AQICAHi7Za0I+383Smwa+mSrtevEempSHyYcNJPdGhqP8wG5+QEv8OUTaFzz2muBu+PGrU2WAAAAfTB7BgkqhkiG9w0BBwagbjBsAgEAMGcGCSqGSIb3DQEHATAeBglghkgBZQMEAS4wEQQM6ITa0o4Naj0UvhA+AgEQgDpkJ9kt2cJHsOQ327mUl7bmIUJLJDb/GKye1mmfpx1v5HGUQjcssaFEOZJPsCpUMRTp0lvc0CHjRnLH}
On Login
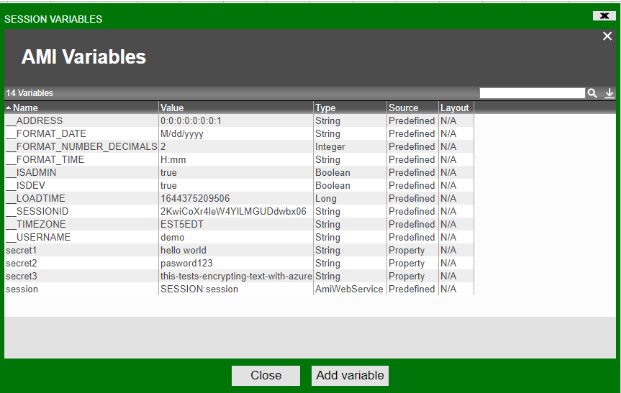
Decrypted values would be shown in AMI session variables
AMI Replay Plugin
This document details the use of the Replay plugin, which allows the user to “replay” real-time data streams from a AMI messages log file (e.g. AmiMessages.log).
Replay can be used for retrieving and rendering data from otherwise hard-to-read data from AMI real-time message log files.
Logging in to AMI real-time stream
Before using this plugin, run AMI and connect to the real-time port:
1. Telnet into the platform’s real-time streaming port
- The default port (3289) can be found in defaults.properties file, under property ami.port
2. Login with unique process identity string
L|I="demo"
Using Replay
Sample Replay command:
V|T="Replay"|LOGIN="demo"|FILE="replay/AmiMessages_Replay.log"|MAXDELAY=0
| Instruction | Description |
|---|---|
| T="Replay" | To indicate a Replay command |
| LOGIN="xxx" | Required login instruction for replay file |
| FILE="/path/xxx.log" | Name and path to AMI messages log file to replay
You can also use the relative path from the AMI application installation directory (amione/) |
| MAXDELAY=xxx (long) | OPTIONAL - delay between each line read from log file |
| MAX_PER_SECOND=xxx (long) | OPTIONAL - maximum stream commands from log file per second |
Multiple files can be replayed within the same command, with the file names and paths delimited with a comma. For example:
V|T="Replay"|LOGIN="demo"|FILE="replay/AmiMessages_Replay.log,/home/somepath/somefolder/Another_AmiMessages.log"|MAXDELAY=0
Using AMI script to change column types on tables loaded from a data model
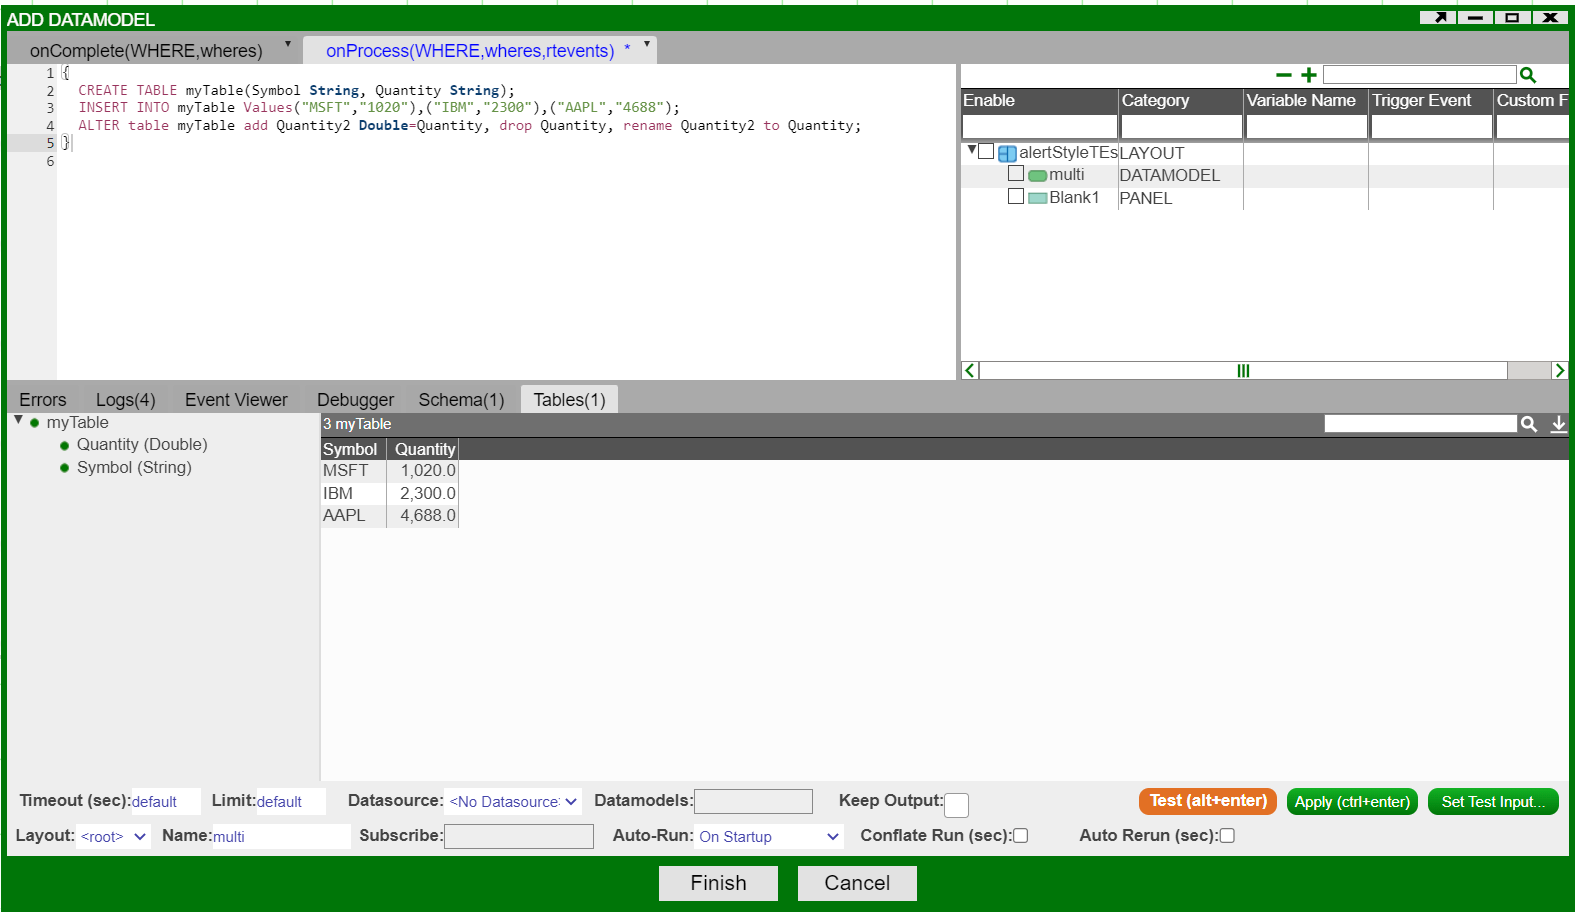
If your table in a data model has a String column called Quantity but you would like to change it to a Long, you can use this query in the data model:
alter Table myTable add Quantity2 long=Quantity, drop Quantity;
Then if you would like to keep the same name, you can do:
alter table myTable rename Quantity2 to Quantity;
You can also do this in one line:
alter Table myTable add Quantity2 long=Quantity, drop Quantity, rename Quantity2 to Quantity;
Here is a screenshot showing how it looks in AMI
However, if your String column contains commas, then you need to remove them before converting the column to a numeric type:
alter Table myTable add Quantity2 long=Quantity.replaceAll(",",""), drop Quantity;
Here, the String method repalceAll replaces all instances of `,` with an empty string.
Storing a datamodel table to AMI DB
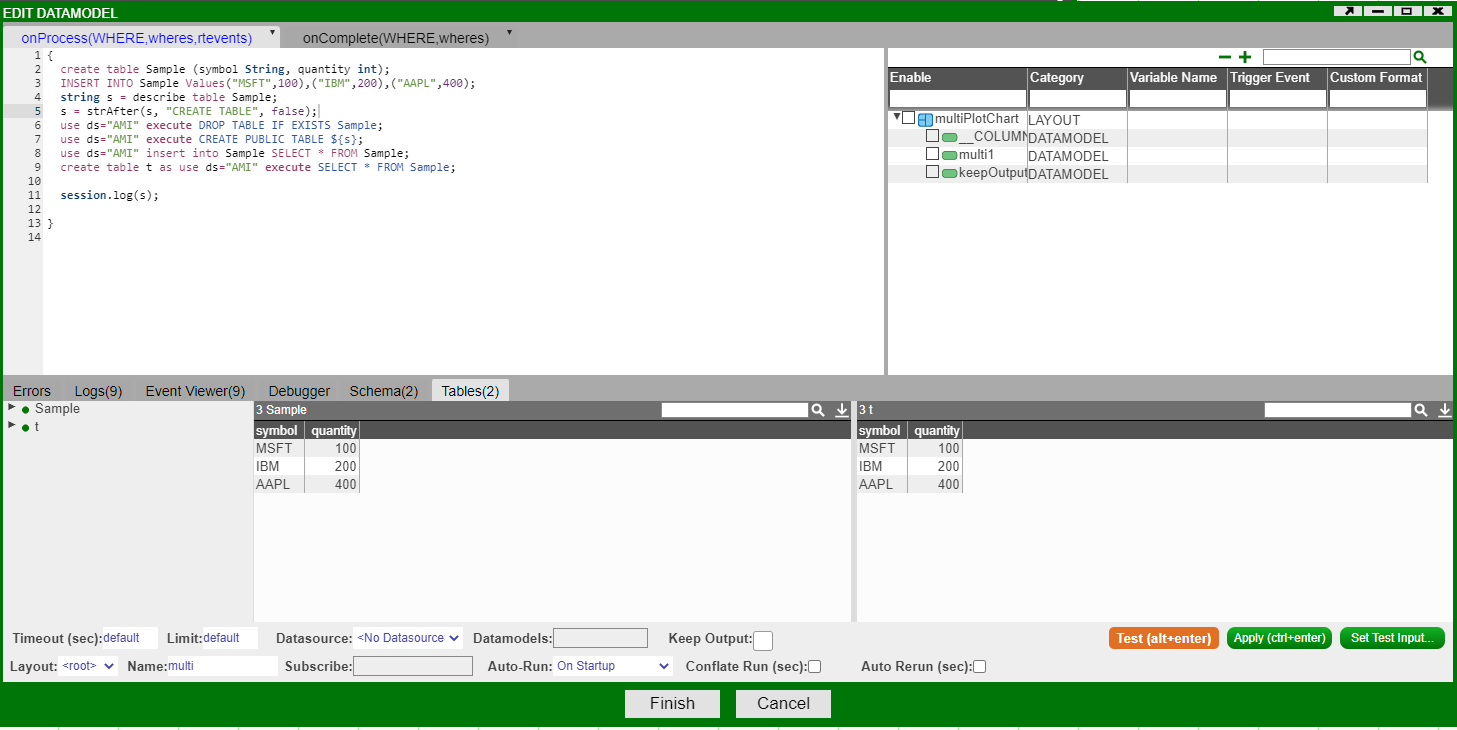
If you have a table that only exists in AMI Web and you want to store it to AMI DB, here are the steps:
  // create an example table
  create table Sample (symbol String, quantity int);
  // insert some values
  INSERT INTO Sample Values("MSFT",100),("IBM",200),("AAPL",400);
  // store the table schema as a string
  string s = describe table Sample;
  // s = "CREATE TABLE Sample (symbol String,quantity Integer)"
  // use `strAfter` to extract the string after a delimiter
  s = strAfter(s, "CREATE TABLE", false);
  // s = "Sample (symbol String,quantity Integer)"
  // ensure AMI DB does not have a duplicate table with the same name
  use ds="AMI" execute DROP TABLE IF EXISTS Sample;
  // create a public table. Any AMI DB table that is public will be visible in AMI Web. Conversely non-public AMI DB table will NOT be visible in AMI Web
  use ds="AMI" execute CREATE PUBLIC TABLE ${s};
  // using the `use ... insert` syntax to insert a AMI Web table to the AMI DB.
  use ds="AMI" insert into Sample SELECT * FROM Sample;
  // sanity check
  create table t as use ds="AMI" execute SELECT * FROM Sample;
Here is the output: The left table, Sample, lives in the web. Right table, t, is pulled from AMI DB.
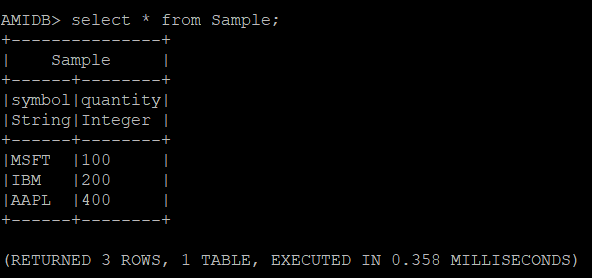
In AMI DB, we can see that the table has been inserted.
Explanation of AMI's Dashboard Resource Indication (DRI)
AMI Center Startup Process
The following diagram describes the process when AMI Center starts up in chronological order.
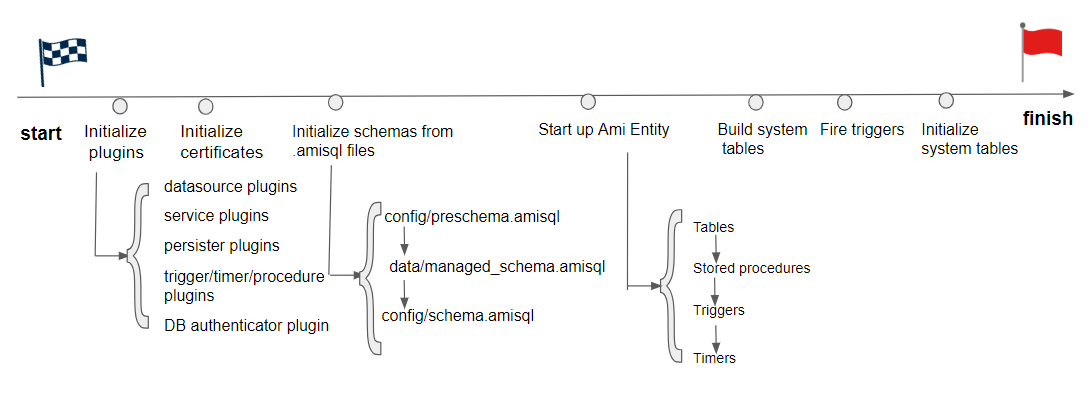
Note1: During Initialize schemas frim .amisql files , this is when your custom methods/tables/triggers/timers are being initialized from your ami.db.schema.config.files and ami.db.schema.managed.file
Note2: During Start up AMI Entity , the child diagram describes the order in which different AMI Entities start up. Because timers get initialized after the triggers, the timer's onStartupScript will not cause triggers to fire. If you want onStartupScript to be picked up by the trigger at startup, you should use stored procedure's onStartupScript instead.
Automated Report Generation
Below are the steps for automatically generating reports and sharing them by sending an email, sending to an SFTP server, and saving to a filesystem.
Note that before starting AMI you will need to configure your headless.txt in amione/data/ to create a headless session:
headless|headless123|2000x1000|ISDEV=true
If you are looking to send reports by email then please set the relevant Email Configuration Properties in your local.properties file e.g.
email.client.host=<MAIL_HOST>;
email.client.port=<MAIL_PORT>;
email.client.username=<Sender username email>;
email.client.password=<Sender password token>;
Create the report
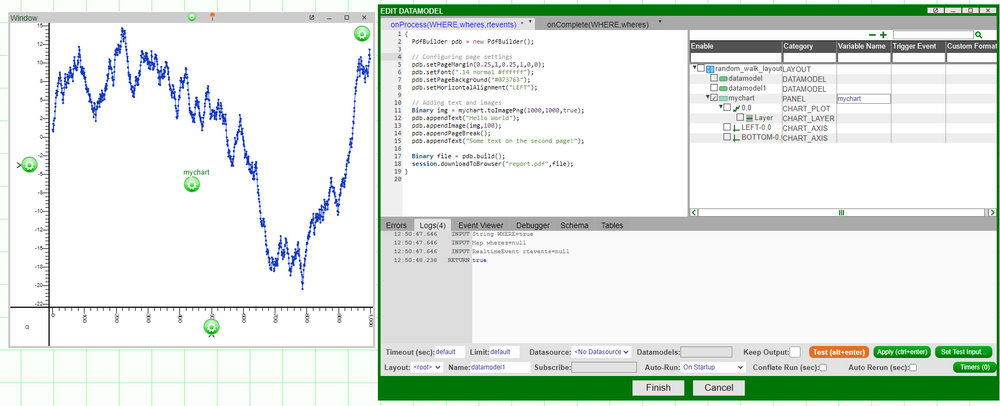
The PdfBuilder can be used to construct pdf documents, collating text and images together. First, go to Dashboard > Data Modeller then right click on the background and select "Add Datamodel", then put in the relevant pdf logic. Below is an example of a pdf with two pages, the first page has some text and a chart from the layout, the second just has text.
{
  PdfBuilder pdb = new PdfBuilder();

  // Configuring page settings
  pdb.setPageMargin(0.25,1,0.25,1,0,0);
  pdb.setFont(".14 normal #ffffff");
  pdb.setPageBackground("#073763");
  pdb.setHorizontalAlignment("LEFT");

  // Adding text and images
  Binary img = mychart.toImagePng(1000,1000,true);
  pdb.appendText("Hello World");
  pdb.appendImage(img,100);
  pdb.appendPageBreak();
  pdb.appendText("Some text on the second page!");

  Binary file = pdb.build();
}
The report can then be sent to a number of targets:
It can be sent via email (given email properties mentioned above were set):
session.sendEmailSync("test@gmail.com", new List("test@gmail.com"), "Report", false, "Body", new List("report.pdf"), new List(pdf), null, null);
Embedding Charts in Email Body
You can also embed charts directly to the body of the email. Convert the chart to an image and pass the binary data into the attachment. The filename you give the chart, will be the content id (cid) which is what you refer to in the img src as seen in htmlStr. Make sure the isHmtl argument in the sendEmail() method, is set to true. You can also use multiline for the html string you create, but make sure you do setlocal string_template=on.
 ChartPanel vBar = layout.getPanel("vBar");
 Binary vBarImg = vBar.toImagePng(1000,1000,true);
 String htmlStr = "<img src=\"cid:vBarImg.png\" alt=\"Vertical Bar Graph\" width=\"450\" height=\"450\">";
 session.sendEmail("test@gmail.com",new List("test@gmail.com"),"Report", true, "${htmlStr}",new List("vBarImg.png"), new List(vBarImg),null,null);
Embedding Tables in Email Body
You can also embed tables from your dashboard directly into the body of the email. You can create a custom method, in our example it will be called createTableElement.
  String createTableElement(Table t) {
       String tableHtml = "<tr style=\"background-color: #3E4B4F;color:#FFFFFF\">";
       for (String colName: t.getColumnNames()) {
         tableHtml += "<th style=\"width:110px; height:20px; border: 1px solid;\"> ${colName} </th>";
       }
       tableHtml += "</tr>";

       for (Row r: t.getRows()){
         tableHtml += "<tr>";
         for (int i = 0; i < r.size(); i++) {
           String cell = r.getValueAt(i);
           tableHtml += "<td style=\" background-color: #3A3A3A;color:#FFFFFF;width:110px; height:20px; border: 1px solid;\"> ${cell} </td>";
         }
         tableHtml += "</tr>";
       }
       return tableHtml;
     };
Now you can call your custom method and generate the html representing the table. The below example embeds both a table and a chart to the body.
   TablePanel tab = layout.getPanel("Opp");
   Table t = tab.asFormattedTable(true,true,true,true,false);
   String table = createTableElement(t);
   String htmlStr = "<table style=\"border: 1px solid;background-color: #D6EEEE;\"> ${table} </table> <img src=\"cid:vBarImg.png\" alt=\"Vertical Bar Graph\" width=\"450\" height=\"450\">";
   session.sendEmail("test@gmail.com",new List("test@gmail.com"),"Report", true, "${htmlStr}",new List("vBarImg.png"), new List(vBarImg),null,null);
Saved to local file system
The pdf can also be saved to amione/reports/, in this case titled with the date it is generated on:
FileSystem fs = session.getFileSystem();
String dt = formatDate(timestamp(), "yyyy-MM-dd", "UTC");
String saveFile = "reports/charts ${dt}.pdf";
fs.writeBinaryFile(saveFile, pdf, false);
SFTP
The report can also be shared via a SFTP connection. First, go to Dashboard -> Data Modeler -> Attach Datasource…; then select SFTP from the datasources, and input your sftp server details. Click Add Datasource. Once successful, you can upload files to your remote server like so:
use ds=ServerSFTP insert `reports/report.pdf` from select pdf as text;
The above line will upload the pdf to the remote server at the path reports/report.pdf.
Automate the datamodel
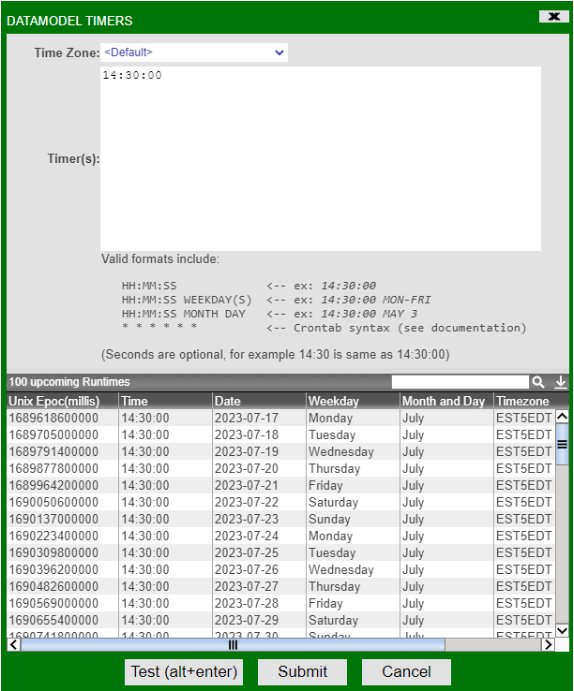
To automate the datamodel (and pdf generation) we can use the Timer interface, this can be accessed by clicking the Timers (0) button in the bottom right corner of the Edit Datamodel window.
Any standard crontab timer can then be used. For example, 0 */2 * * * * UTC runs every two minutes. Inputting a time like 14:30:00 would make it run every day at 14:30. Click Test and make sure that the upcoming Runtimes are expected.
Once you've configured everything correctly, submit the timer, finish the datamodel, and save the layout.
Creating a headless session
We now have a layout with a datamodel which creates and sends a pdf. However, this is tied to a user session, so when the user logs out the reports will stop generating. To make sure our reports continue to run we'll need to use a Headless Session.
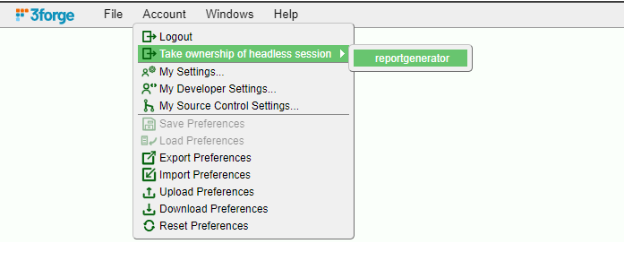
First, edit headless.txt in amione/data/ as described at the start of this guide. Then start AMI and login as admin or dev user. Under Account -> Take ownership of headless session, select the headless session you set up in the headless.txt file.
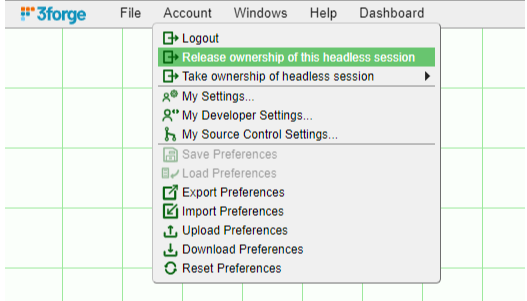
Open the layout you made for constructing the report, then select Account -> Release ownership of this headless session.
This session will now continuously run and keep sending reports.
OpenFin Documentation
To start utilizing the integration features, you need to run this in the Openfin workspace and include this in your local.properties file: ami.guiservice.plugins=com.f1.ami.web.guiplugin.AmiWebGuiServicePlugin_OpenFin
New AMI Object
__OpenFin: You can see this in Dashboard*>Session Variables.
Supported AMI Script Methods
raiseIntent(String intent, Map context)
- Raises the specified intent with context, to be handled by another app.
- String context= "{ type: 'fdc3.instrument', id: { ticker: 'AAPL}' } }";
- map m = parseJson(context);
- __OpenFin.raiseIntent("ViewChart", m);
broadcast(Map context)
- Broadcasts context to all the other apps in workspace that are in the same color channel.
- Example usage
- String context= "{ type: 'fdc3.instrument', id: { ticker: 'AAPL}' } }";
- map m = parseJson(context);
- __OpenFin.broadcast(m);
addIntentListener(String intentType)
- This method adds an intent handler for the specified intent. You will need to have a corresponding entry in the intent section of the apps.json as well to indicate AMI can handle the specified intent.
- Example usage
- __OpenFin.addIntentListener("ViewChart");
addContextListener(String context type)
- This method qualifies AMI to receive the specified context from a broadcast. Both the broadcaster and the receiver need to be in the same color channel.
- Example usage
- __OpenFin.addContextListener("fdc3.instrument");
bringToFront()
- This method brings the current AMI window to the front of the OpenFin stack. This is different from AMI's own bringToFront method.
setAsForeground()
- This method brings the AMI window to the front.
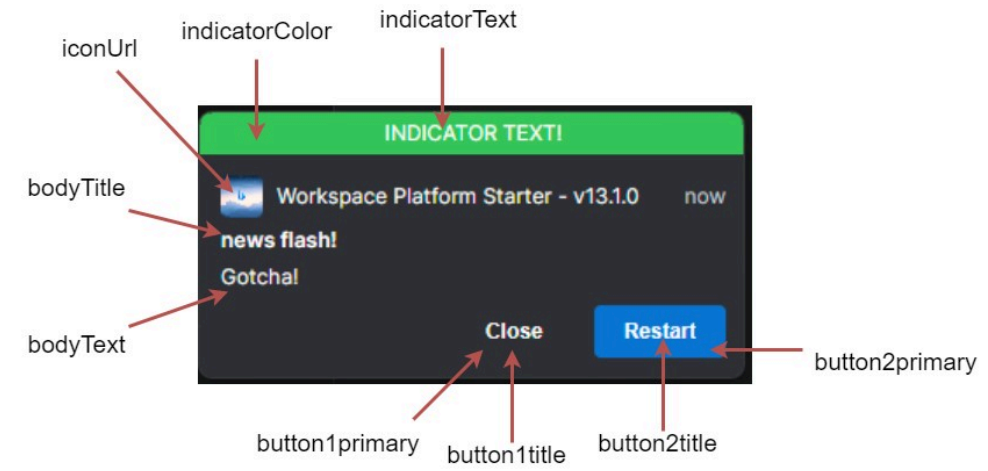
sendNotification(Map options)
- Sends a notification to the Openfin workspace.
- Available keys in the map are:
- bodyTitle (required)
- bodyText (required)
- iconUrl
- customData
- You may specify the data for each notification, to be used when user clicks on a button
- indicatorColor
- Must be of the following: red, green, yellow, blue, purple, gray
- indicatorText
- button1title (required if adding buttons, see below for explanation)
- button1primary
- button1data
- For adding button, follow this format:
- button + number + title/data/primary/iconUrl
- number corresponds to the ordering of the button. The lower the value, the more left the button appears.
- E.g. if you have 3 buttons, 1*3, the ordering will be 1 2 3.
- primary indicates whether it will have the blue background color, this color cannot be changed.
- title: title of the button, required.
- iconUrl: image url for the button icon.
- data: custom data for each button.
- Note that the maximum number of buttons is 8, per OpenFin.
- Example configuration below creates 2 buttons:
- Map config= new Map();
- config.put("customData",new map("myData", "data1"));
- config.put("indicatorColor","green");
- config.put("indicatorText","indicator Text!");
- config.put("bodyTitle","news flash!");
- config.put("bodyText","Gotcha!");
- config.put("button1title","Close");
- config.put("button1data","some data here");
- config.put("button1primary","false");
- config.put("button2title","Shut Down");
- config.put("button2data","some data there");
- config.put("button2title","Restart");
button1iconUrl and button2iconUrl not shown here.
New AMI Script Callbacks
1. onRaiseIntent(Object intentResolution): triggered when AMI receives an intentResolution or its result from raising the intent.
- On fdc3 ver 2.0, if AMI is able to get the result of the intentResolution, then you will receive the result, otherwise the intentResolution is returned.
- On fdc3 ver 1.2, it always returns the intentResolution.
2. onContext(Object context, Object metadata): triggered when AMI receives a broadcast of a specific context.
- You will need to set up a listener first to receive the specific context. See Supported AMI script methods for an example.
3. onReceiveIntent(Object context): triggered when AMI receives an intent from another app.
- You will need to set up an intent listener first to trigger this. See Supported AMI script methods for an example.
4. onNotificationAction(Object event): triggered when the user clicks on a button in the notification.
- You can use the following to parse the json into a map for ease of access
- Map m= parseJson((String) event);
- Below is a sample json structure that you will receive from the callback once the user clicks on the button
{
"type": "notification-action",
"trigger": "control",
"notification": {
"form": null,
"body": "Gotcha!",
"buttons": [
{
"submit": false,
"onClick": {
"data": "some data here"
},
"index": 0,
"iconUrl": "",
"cta": false,
"title": "Close",
"type": "button"
},
{
"submit": false,
"onClick": {
"data": "some data there"
},
"index": 1,
"iconUrl": "",
"cta": true,
"title": "Restart",
"type": "button"
}
],
"onExpire": null,
"onClose": null,
"onSelect": null,
"stream": null,
"expires": null,
"date": "2023-09-21T18:09:04.481Z",
"toast": "transient",
"customData": {
"myData": "data1"
},
"priority": 1,
"icon":
"http://www.bing.com/sa/simg/facebook_sharing_5.png",
"indicator": {
"color": "green",
"text": "indicator Text!"
},
"allowReminder": true,
"category": "default",
"title": "news flash!",
"template": "markdown",
"id": "a938f456-ef36-4f21-8062-7dd556bf093d"
},
"source": {
"type": "desktop",
"identity": {
"uuid": "workspace-platform-starter",
"name": "f3amione"
}
},
"result": {
"data": "some data here"
},
"control": {
"submit": false,
"onClick": {
"data": "some data here"
},
"index": 0,
"iconUrl": "",
"cta": false,
"title": "Close",
"type": "button"
}
}
Format log file name to include current date
If you want to know from the name of the log when this log was first created, you can use the following steps:
1. In your start.sh file, declare a variable that evaluates to current date, such as below:
date=$(date +'%Y%m%d')
2. then add this date to as a VM variable in JAVA_OPTIONS (should be line 45, if you have never modified start.sh before), such as below:
JAVA_OPTIONS=" -Df1.license.mode=dev\

      -Df1.license.file=${HOME}/f1license.txt,f1license.txt,config/f1license.txt \

      -Df1.license.property.file=config/local.properties \

      -Dproperty.f1.conf.dir=config/ \

      -Dproperty.current.date=${date} \

      -Djava.util.logging.manager=com.f1.speedlogger.sun.SunSpeedLoggerLogManager \

      -Dlog4j.configuratorClass=com.f1.speedloggerLog4j.Log4jSpeedLoggerManager \

      -Dlog4j.configuration=com/f1/speedloggerLog4j/Log4jSpeedLoggerManager.class \

      -Dfile.encoding=UTF-8\

      -Dproperty.f1.logging.mode=\

      -Djava.security.properties=config/3fsecurity.properties \

      -Djava.security.debug=properties \

      $JAVA_OPTIONS $*"
Note that what you put after -Dproperty. becomes available in local.properties using ${}.
3. Reference current.date in your local.properties:
speedlogger.sink.FILE_SINK.fileName=${f1.logs.dir}/${f1.logfilename}_${current.date}.log
4. Log file name now becomes:
-rw-r--r--. 1 deploy users 91865 Mar 14 11:13 AmiOne_20240314.log
