Difference between revisions of "Feed Handlers"
| Line 533: | Line 533: | ||
<span style="font-family: courier new; color: blue;">ami.relay.fh.hazelcast.props.hzMap2.portableclassid</span>=2<br> | <span style="font-family: courier new; color: blue;">ami.relay.fh.hazelcast.props.hzMap2.portableclassid</span>=2<br> | ||
<span style="font-family: courier new; color: blue;">ami.relay.fh.hazelcast.props.hzMap2.portablefactoryid</span>=333<br> | <span style="font-family: courier new; color: blue;">ami.relay.fh.hazelcast.props.hzMap2.portablefactoryid</span>=333<br> | ||
| + | |||
| + | ====Additional (Optional) Properties==== | ||
| + | <span style="font-family: courier new; color: green;">#Hazelcast credentials - if any</span><br> | ||
| + | <span style="font-family: courier new; color: blue;">ami.relay.fh.hazelcast.props.username</span>=demo<br> | ||
| + | <span style="font-family: courier new; color: blue;">ami.relay.fh.hazelcast.props.password</span>=demo123<br> | ||
| + | |||
| + | <span style="font-family: courier new; color: green;">#SSL default=off</span><br> | ||
| + | <span style="font-family: courier new; color: blue;">ami.relay.fh.hazelcast.props.sslenabled</span>=true<br> | ||
===Writing a Hazelcast Portable Serializer class for AMI=== | ===Writing a Hazelcast Portable Serializer class for AMI=== | ||
Revision as of 10:12, 20 October 2023
KDB Feed Handler
Prerequisites
Be sure that KDB is running before adding as a data source. Fully tested versions include 3.x
Configuring KX live streaming inside AMI Relays
KX live streaming integrates with kdb+tick via the AMI Feed handler mechanism. AMI can be configured to connect and subscribe to KX ticker plants. This enables AMI to receive all real-time updates from the ticker plant. Optionally, AMI can also be configured to recover from ticker plant log files before consuming real time updates.
Ami Relay Property Settings for KX feed handler
The following properties should be set in ami relays' config/local.properties
As with all feed handlers, add one uniquely named entry for each KX feed handler to the ami.relay.fh.active property. Be sure to include the default ssocket,cfg and cmd feed handlers. For example if you have only one kx feed handler:
- ami.relay.fh.active,=cfg,cmd,kx1
Then, for each KX feed handler, include the following properties. NOTE: Be sure to include the proper feed handler name in the property name:
- ami.relay.fh.kx1.start=true #must be set to true, otherwise it will be disabled
- ami.relay.fh.kx1.class=com.f1.ami.relay.fh.AmiKxFH #required, must be exact
- ami.relay.fh.kx1.props.kxUrl=hostname:port #location of the ticker plant
- ami.relay.fh.kx1.props.kxUsername=username #optional
- ami.relay.fh.kx1.props.kxPassword=password #optional
- ami.relay.fh.kx1.props.amiId=KX_APP_ID #indicates what the application id of messages coming from this ticker plant will be mapped to (See AMI Backend API Manual for explanation on application ids)
- ami.relay.fh.kx1.props.replayUrl=hostname:port #optional, only if recovery is required. See KDB Ticker plant Recovery steps below on how to configure and start kdb replay process.
- ami.relay.fh.kx1.props.tableKeyMap=kxTableName=AMITableName #No need to declare AMITable upfront, this directive is gonna create it for you and populate the data. If not specified, AMI table will have the same name as kx table
- ami.relay.fh.kx1.props.date.format=yyyy-MM-dd'T'HH:mm:ss The format of the data Column
- ami.relay.fh.kx1.props.date.timezone=<Your_Time_Zone> The time zone that you want your time to appear as
- ami.relay.fh.kx1.props.subscribeQuery=subscription_kx_query #optional
- Default is: .u.sub[`;`]; (.u `i`L;.u.t!{0!meta x} each .u.t)
Example Config:
ami.relay.fh.active=ssocket,kx1
ami.relay.fh.kx1.start=true
ami.relay.fh.kx1.class=com.f1.ami.relay.fh.AmiKxFH
ami.relay.fh.kx1.props.kxUrl=localhost:1235
ami.relay.fh.kx1.props.kxUsername=demo
ami.relay.fh.kx1.props.kxPassword=demo123
ami.relay.fh.kx1.props.amiId=KX_APP_ID
ami.relay.fh.kx1.props.replayUrl=localhost:1234
ami.relay.fh.kx1.props.tableKeyMap=table1=col1,col2,coln|table2=col1, col2
Example Setup
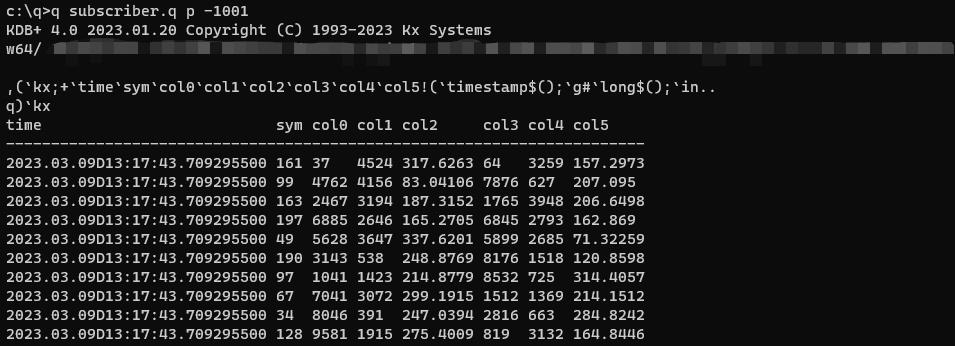
1. Suppose on the kx side, we have a publisher and a subscriber, where inside the publisher we have a kx table called kx
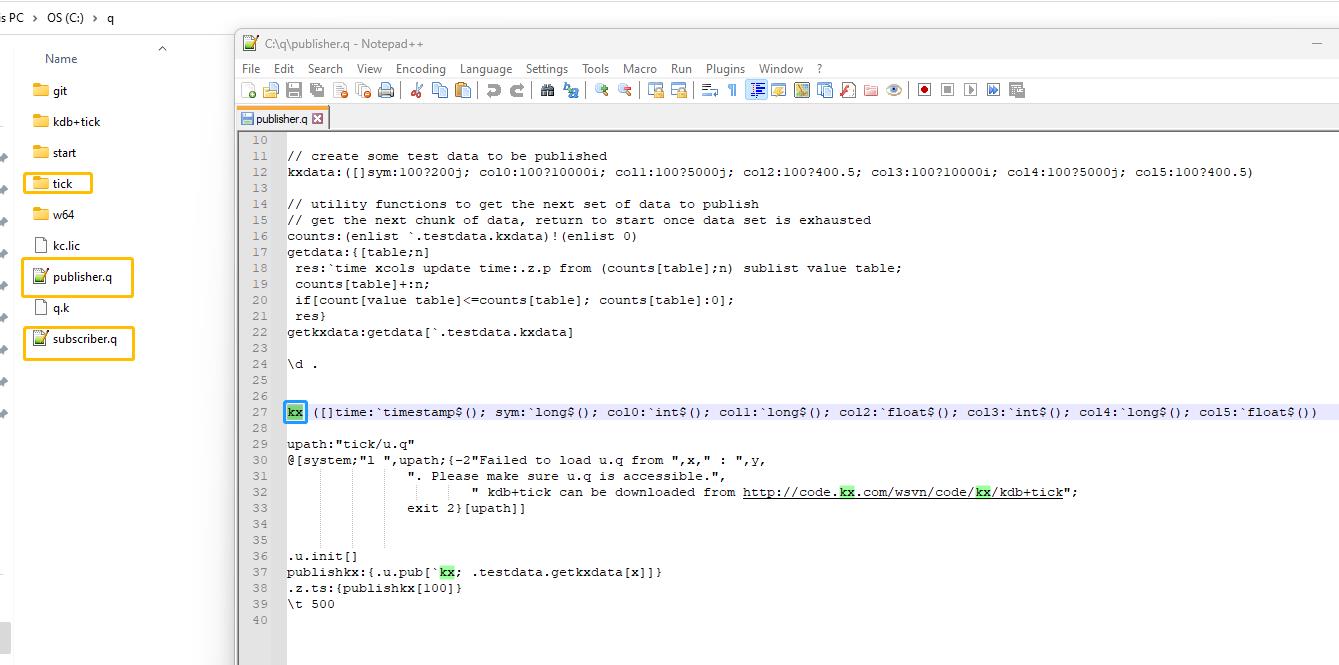
Refer to this link for detailed instructions on how to set up a publisher and a subscriber in kx:
https://code.kx.com/q/kb/publish-subscribe/
2. Launch publisher.q on port 1000 and subscriber.q on port 1001

3. on the Ami side, in the amione/config/local.properties
ami.relay.fh.active=kx1
ami.relay.fh.kx1.start=true
ami.relay.fh.kx1.class=com.f1.ami.relay.fh.AmiKxFH
ami.relay.fh.kx1.props.kxUrl=localhost:1000
ami.relay.fh.kx1.props.amiId=KX_APP_ID2
ami.relay.fh.kx1.props.subscribeQuery=.u.sub[`kx;`];(.u `i`L;.u.t!{0!meta x} each .u.t)

Note here that the kxUrl is the publisher port number and the argument inside u.sub is the kx table name.
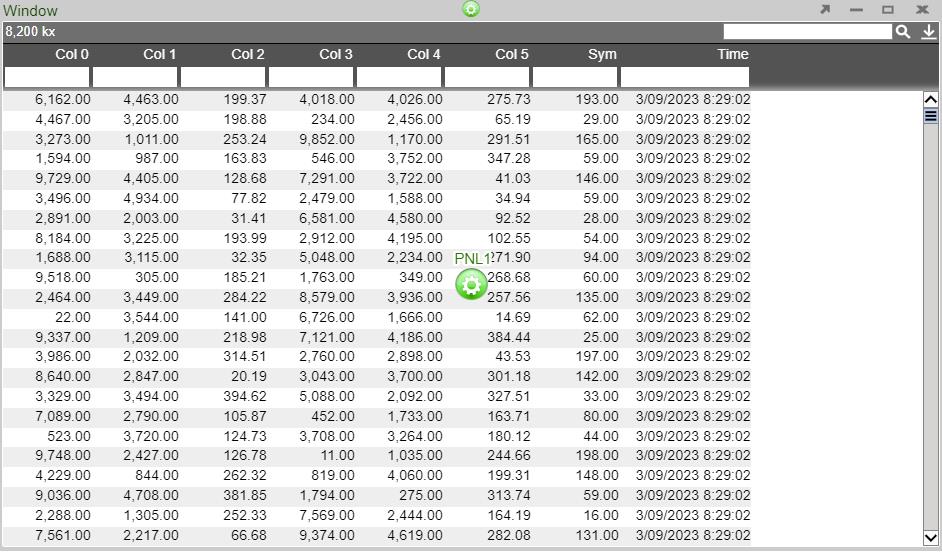
Also note that we don't need to create the table in AMI upfront because the feedhandler will create it for you.
KDB Ticker Plant Recovery Steps
In order to support replay you must startup a KDB replay process that will be used by the AMI Relay feed handler to recover data from the ticker plant log file before resuming processing of real time events from the ticker plant.
IMPORTANT: This KDB process must have read access to the ticker plant log file.
Setup process: Create a script called replay.q with the following contents:
upd:{[t;x] (neg first .z.w)(`upd;t;x)}
replay:{if[null first x;:0];-11!x}
Startup Process: (where server_port matches port in ami.relay.fh.kx1.props.replayUrl):
q replay.q –p server_port
Configuring AMI to stream JSON messages over Kafka
Overview
1. Configure AMI properties to the Kafka server.
2. Add required dependencies for using JSON with AMI.
3. Restart AMI and start streaming data using Kafka.
Step 1: Configure AMI properties to the Kafka server
AMI needs to know where and how to deserialize messages sent over Kafka. The following properties need to be updated to achieve that:
ami.relay.fh.active=ssocket,kafka

ami.relay.fh.kafka.class=com.f1.AmiKafkaFH

# insert the hostname of your kafka server here
ami.relay.fh.kafka.props.bootstrap.servers=<HOSTNAME>:9092

# insert a consumer group id string (in case other processes are consuming from the same topics additionally, use that group id). E.g. test-group
ami.relay.fh.kafka.props.group.id=<GROUP ID>

ami.relay.fh.kafka.props.enable.auto.commit=true

# deserializer configuration to handle json messages
ami.relay.fh.kafka.props.value.deserializer=io.confluent.kafka.serializers.KafkaJsonDeserializer

ami.relay.fh.kafka.props.key.deserializer=org.apache.kafka.common.serialization.StringDeserializer

# insert the hostname of your kafka server running schema registry here
ami.relay.fh.kafka.props.schema.registry=http://<HOSTNAME>:8081

# insert the comma delimited topic names being used for kafka e.g. topic-1,topic-2,topic-3
ami.relay.fh.kafka.props.topics=<TOPIC_NAME(S)>
Custom properties can also be passed to the Kafka Client that you want to connect to using the following format:
ami.relay.fh.kafka.props.<CUSTOM_PROPERTY>=<CUSTOM_VALUE>

# e.g. the security protocol property can be passed in to Kafka
ami.relay.fh.kafka.props.security.protocol=SASL_PLAINTEXT
Step 2: Add required dependencies for using JSON with AMI
AMI needs certain dependencies for interacting with kafka and deserializing JSON messages. The kafkafh_json_deps.zip file contains all the jars required. Unzip it and copy all jar files to the ami/amione/lib/ directory.
Step 3: Restart AMI and start streaming data using Kafka
When AMI starts up, it will automatically connect to the kafka server.
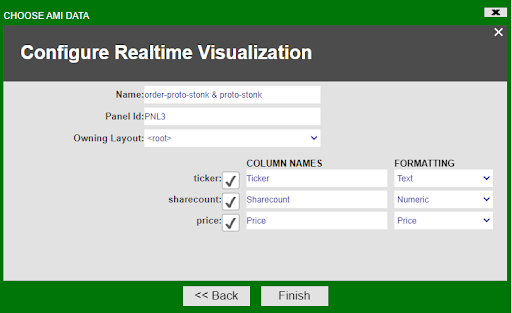
To see the data being streamed, a Realtime Table/Visualization needs to be created:
1. Create a new window: Windows -> New Window
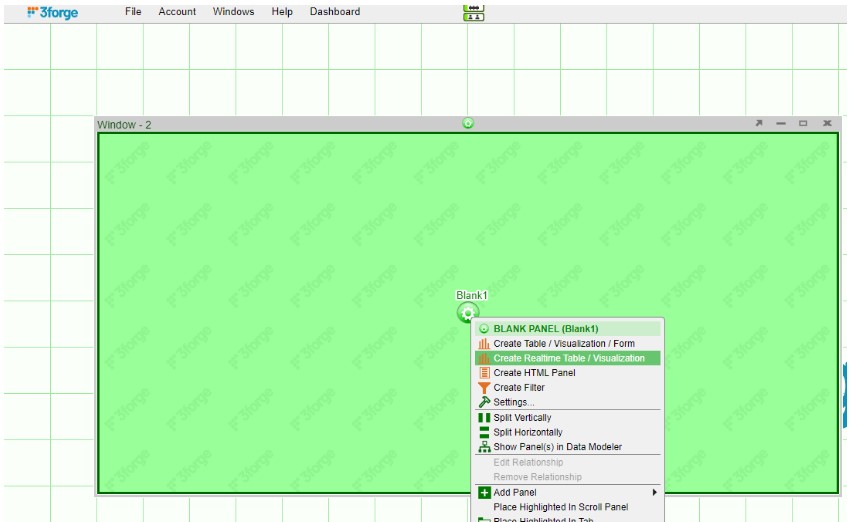
2. Create a new Realtime Table: Click on the green button on the panel just created and select Create Realtime Table/Visualization.
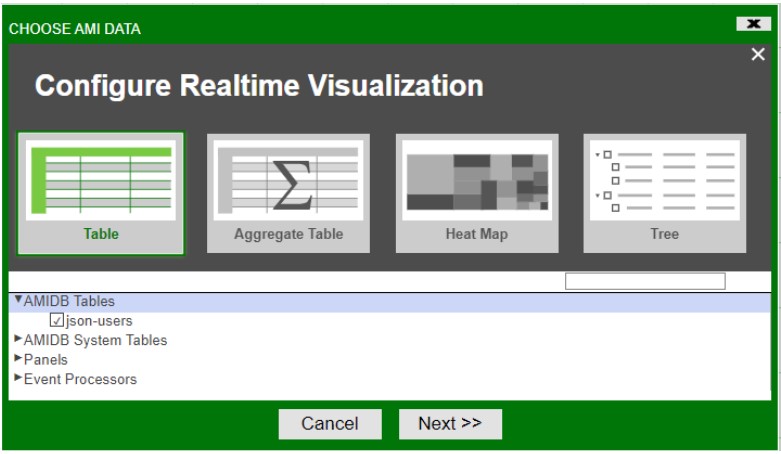
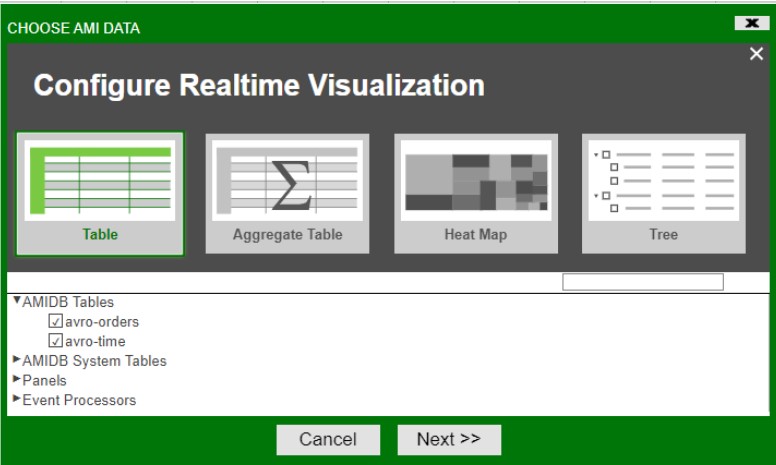
3. Create a Table: Under AMIDB Tables, select the desired table(s) (with the same topic name as defined in the properties file. Each topic has its separate table) and click Next >>.
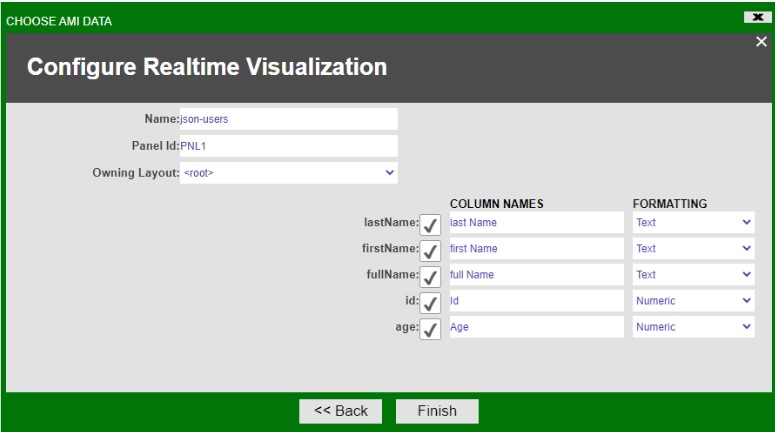
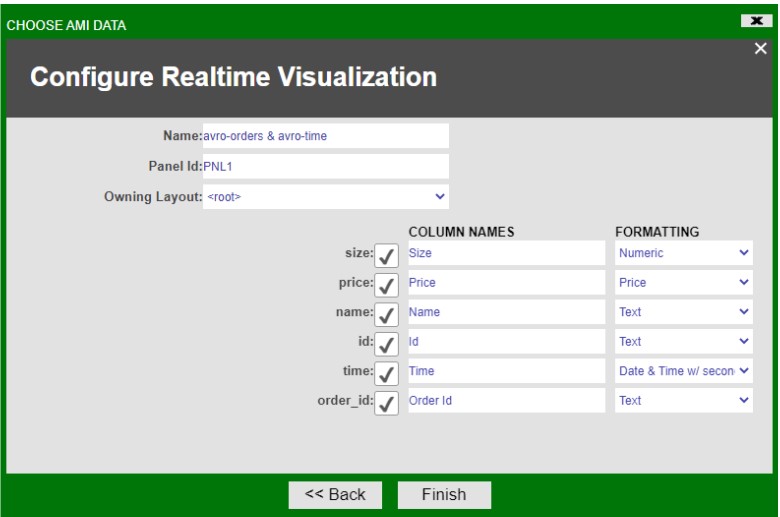
4. Select the desired columns you want to display in the table and select Finish
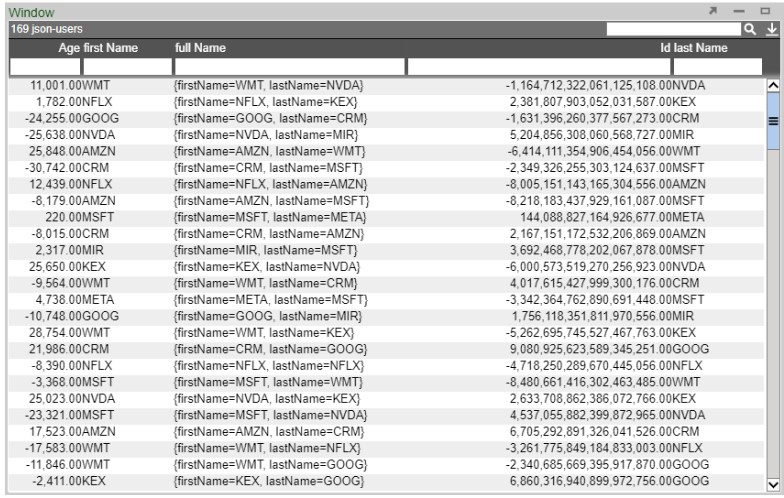
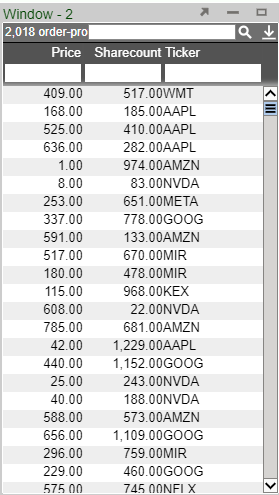
The created Realtime Table:
The Data Modeler can also be used to create data models for the realtime feeds for more customizability.
Configuring AMI to stream Avro messages over Kafka
Overview
1. Configure AMI properties to the Kafka server.
2. Add required dependencies for using Avro with AMI.
3. Restart AMI and start streaming data using Kafka.
Step 1: Configure AMI properties to the Kafka server
AMI needs to know where and how to deserialize messages sent over Kafka. The following properties need to be updated to achieve that:
ami.relay.fh.active=ssocket,kafka

ami.relay.fh.kafka.class=com.f1.AmiKafkaFH

# insert the hostname of your kafka server here
ami.relay.fh.kafka.props.bootstrap.servers=<HOSTNAME>:9092

# insert a consumer group id string (in case other processes are consuming from the same topics additionally, use that group id). E.g. test-group
ami.relay.fh.kafka.props.group.id=<GROUP ID>

ami.relay.fh.kafka.props.enable.auto.commit=true

# deserializer configuration to handle avro messages
ami.relay.fh.kafka.props.value.deserializer=io.confluent.kafka.serializers.KafkaAvroDeserializer

ami.relay.fh.kafka.props.key.deserializer=org.apache.kafka.common.serialization.StringDeserializer

# insert the hostname of your kafka server running schema registry here
ami.relay.fh.kafka.props.schema.registry=http://<HOSTNAME>:8081

# insert the comma delimited topic names being used for kafka e.g. topic-1,topic-2,topic-3
ami.relay.fh.kafka.props.topics=<TOPIC_NAME(S)>
Custom properties can also be passed to the Kafka Client that you want to connect to using the following format:
ami.relay.fh.kafka.props.<CUSTOM_PROPERTY>=<CUSTOM_VALUE>

# e.g. the security protocol property can be passed in to Kafka
ami.relay.fh.kafka.props.security.protocol=SASL_PLAINTEXT
Step 2: Add required dependencies for using avro with AMI
AMI needs certain dependencies for interacting with kafka and deserializing Avro messages. The kafkafh_avro_deps.zip file contains all the jars required. Unzip it and copy all jar files to the ami/amione/lib/ directory.
Step 3: Restart AMI and start streaming data using Kafka
When AMI starts up, it will automatically connect to the kafka server.
To see the data being streamed, a Realtime Table/Visualization needs to be created:
1. Create a new window: Windows -> New Window
2. Create a new Realtime Table: Click on the green button on the panel just created and select Create Realtime Table/Visualization.
3. Create a Table: Under AMIDB Tables, select the desired table(s) (with the same topic name as defined in the properties file. Each topic has its separate table) and click Next >>.
4. Select the desired columns you want to display in the table and select Finish
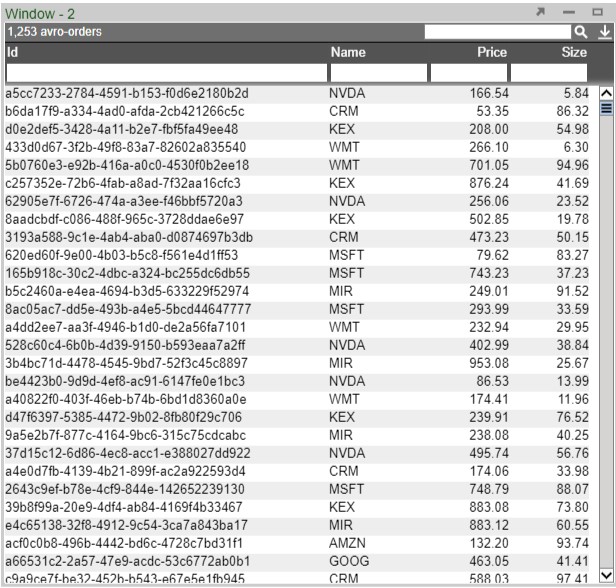
The created Realtime Table:
The Data Modeler can also be used to create data models for the realtime feeds for more customizability.
Configuring AMI to stream Protobuf messages over Kafka
Overview
1. Configure AMI properties to the Kafka server.
2. Add required dependencies for using protobuf with AMI.
3. Restart AMI and start streaming data using Kafka.
Step 1: Configure AMI properties to the Kafka server
AMI needs to know where and how to deserialize messages sent over Kafka. The following properties need to be updated to achieve that:(These can be added to a local.properties file in the ami/amione/config/ directory)
ami.relay.fh.active=ssocket,kafka

ami.relay.fh.kafka.class=com.f1.AmiKafkaFH

# insert the hostname of your kafka server here
ami.relay.fh.kafka.props.bootstrap.servers=<HOSTNAME>:9092


# insert a consumer group id string (in case other processes are consuming from the same topics additionally, use that group id). E.g. test-group
ami.relay.fh.kafka.props.group.id=<GROUP ID>

ami.relay.fh.kafka.props.enable.auto.commit=true

# deserializer configuration to handle protobuf messages
ami.relay.fh.kafka.props.value.deserializer=io.confluent.kafka.serializers.protobuf.KafkaProtobufDeserializer
ami.relay.fh.kafka.props.key.deserializer=org.apache.kafka.common.serialization.StringDeserializer

# insert the hostname of your kafka server running schema registry here
ami.relay.fh.kafka.props.schema.registry=http://<HOSTNAME>:8081

# insert the comma delimited topic names being used for kafka e.g. topic-1,topic-2,topic-3
ami.relay.fh.kafka.props.topics=<TOPIC_NAME(S)>
Custom properties can also be passed to the Kafka Client that you want to connect to using the following format:
ami.relay.fh.kafka.props.<CUSTOM_PROPERTY>=<CUSTOM_VALUE>

# e.g. the security protocol property can be passed in to Kafka
ami.relay.fh.kafka.props.security.protocol=SASL_PLAINTEXT
Step 2: Add required dependencies for using Protobuf with AMI
AMI needs certain dependencies for interacting with kafka and deserializing Protobuf messages. The kafkafh_proto_deps.zip file contains all the jars required. Unzip it and copy all jar files to the ami/amione/lib/ directory.
Step 3: Restart AMI and start streaming data using Kafka
When AMI starts up, it will automatically connect to the kafka server.
To see the data being streamed, a Realtime Table/Visualization needs to be created:
1. Create a new window: Windows -> New Window
2. Create a new Realtime Table: Click on the green button on the panel just created and select Create Realtime Table/Visualization.
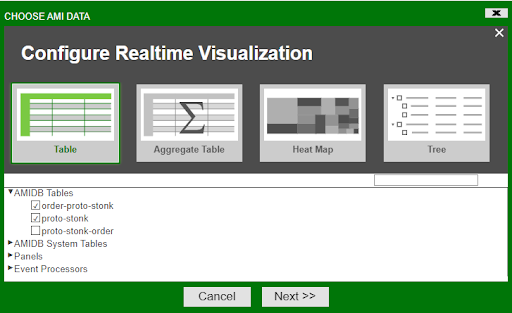
3. Create a Table: Under AMIDB Tables, select the desired table(s) (with the same topic name as defined in the properties file. Each topic has its separate table) and click Next >>.
4. Select the desired columns you want to display in the table and select Finish
The created Realtime Table:
The Data Modeler can also be used to create data models for the realtime feeds for more customizability.
AMI Deephaven Feedhandler
Requirements
1. Docker
2. JDK 17
Getting Started with Deephaven
1. Install sample python-example containers from Deephaven from Quick start Install Deephaven
a. curl
b. docker-compose pull
c. docker-compose up
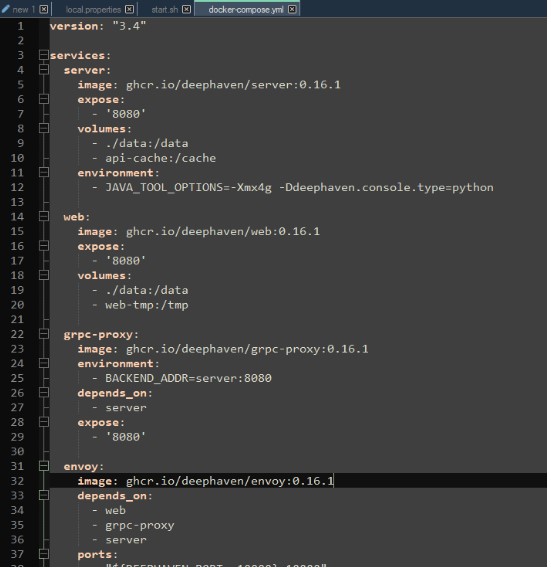
2. If you run into errors with the grpc container, downgrade the containers in the "docker-compose.yml" file to 0.16.1
3. Go to http://localhost:10000/ide/ on the browser
4. Execute the following commands in the deephaven ide
from deephaven import time_table
sample = time_table('00:00:02')
This will create a ticking table that will insert a new timestamp record every 2 seconds.
Installing the feedhandler plugin to AMI
1. Place "DeephavenFH.jar" and all other jar files in the "dependencies" directory under "/amione/lib/"
2. Copy the properties from the local.properties file to your own local.properties
3. For JDK17 compatibility, use the attached start.sh file or add the following parameters to the java launch command
--add-opens java.base/java.lang=ALL-UNNAMED --add-opens java.base/java.util=ALL-UNNAMED --add-opens java.base/java.text=ALL-UNNAMED --add-opens java.base/sun.net=ALL-UNNAMED --add-opens java.management/sun.management=ALL-UNNAMED --add-opens java.base/sun.security.action=ALL-UNNAMED
4. Add the following to the java launch parameters to the start.sh file as well
-DConfiguration.rootFile=dh-defaults.prop
5. Launch AMI
Configuring the feedhandler
There are 3 properties that can be configured from the local.properties file:
1. ami.relay.fh.deephaven.props.url - subscription source url
2. ami.relay.fh.deephaven.props.topics- tables to be subscribed to (delimited by commas)
3. ami.relay.fh.deephaven.props.messagesize - (optional) maximum size of messages from the source. Default is 1000000.
For example, to subscribe to a localhost deephaven server with tables Sample1 & Sample2 with a maximum message size of 2000000:
ami.relay.fh.deephaven.props.url=localhost
ami.relay.fh.deephaven.props.topics=Sample1,Sample2
ami.relay.fh.deephaven.props.messagesize=2000000
FIX Messages
Use this link to access FIX's documentation.
AMPS Feed Handler
The AMI AMPS Realtime feed handler connects to AMPS at startup and begins an AMPS subscription using the AMPS Command interface. The configuration properties are used to configure the AMPS commands’ command id, topic, option, filter, etc.
Properties
The following properties are set in config/local.properties configuration file. As with all feed handlers, add one uniquely named entry for each AMPS feed handler to the ami.relay.fh.active property. Be sure to include the default ssocket feed handler.
For example, if you have one AMPS feed handler, let's name it amps1:
ami.relay.fh.active=ssocket,amps1
Then, for each AMPS feed handler, include the following properties, where amps1 matches the name in the ami.relay.fh.active property.
Available Properties
ami.relay.fh.amps1.class=com.f1.ami.relay.fh.amps.AmiAmpsFH #required, must be exact
ami.relay.fh.amps1.start=true #default is true, set to false to disable this feed handler
ami.relay.fh.amps1.props.amiId=amps1 #overrides the application id that messages coming from this feed handler will be mapped to. Default is the handler name, which in this case is amps1 (See AMI Backend API Manual for explanation on application ids)
ami.relay.fh.amps1.props.url=tcp://flux.3forge.net:9007/amps/nvfix #AMPS URL. Required
ami.relay.fh.amps1.props.topics= #AMPS topic(s) to subscribe to. Required
ami.relay.fh.amps1.props.filters= #AMPS filters(s). One filter per topic
ami.relay.fh.amps1.props.commands=sow_and_delta_subscribe #AMPS command(s) to send on startup. Default is sow_and_delta_subscribe
ami.relay.fh.amps1.props.options=oof #AMPS option(s) for command, oof (out of focus) is default
ami.relay.fh.amps1.props.timeout=60000 #AMPS timeout for commands, default is 60000
ami.relay.fh.amps1.props.batchsize=10000 #AMPS batchsizes, default is 10000
ami.relay.fh.amps1.props.clientname=AMPS2AMIRELAY #client name when logging into AMPS, default is AMPSS2AMIRELAY
ami.relay.fh.amps1.props.sow_key_mappings=I #What should AMPS sow key be mapped to, default is I, use blank string for no mapping
Minimal Config Example
ami.relay.fh.active=ssocket,amps1 ami.relay.fh.amps1.class=com.f1.ami.relay.fh.amps.AmiAmpsFH ami.relay.fh.amps1.props.url=tcp://localhost:9007/amps/json ami.relay.fh.amps1.props.topics=TOPIC1
Multiple Topics with Filters Subscription Example
ami.relay.fh.active=ssocket,amps1
ami.relay.fh.amps1.class=com.f1.ami.relay.fh.amps.AmiAmpsFH
ami.relay.fh.amps1.props.url=tcp://localhost:9007/amps/json
ami.relay.fh.amps1.props.topics=ORDERS,EXECUTIONS
ami.relay.fh.amps1.props.filters=/status=’open’,/MsgType=’fill’
Logs
Search for com.f1.ami.relay.fh.amps.AmiAmpsFH in the log/AmiOne.log file for information regarding configuration, initialization of the adapter, sending of AMPS commands and any errors.
For Example:
grep com.f1.ami.relay.fh.amps.AmiAmpsFH log/AmiOne.log | ami.relay.fh.amps1.class=com.f1.ami.relay.fh.amps.AmiAmpsFH INF 20190704-09:17:32.802 EST5EDT [main] com.f1.ami.relay.AmiRelayServer::initFH Initializing fh - com.f1.ami.relay.fh.amps.AmiAmpsFH@42a3abe9 INF 20190704-09:17:32.964 EST5EDT [amps connector] com.f1.ami.relay.fh.amps.AmiAmpsFH::run executed command=sow_and_delta_subscribe, topic=FIXMSG, filter=null, options=oof, timeout=60000, batchSize=10000, sowkeymap=I
If you’d like to log each message received from AMPS, add the following to your config/local.properties:
speedlogger.stream.com.f1.ami.relay.fh.amps.AmiAmpsFH=BASIC_APPENDER;FILE_SINK;FINE
And you will start seeing message in the format:
FNE 20190704-09:23:57.909 EST5EDT [AMPS Java Client Background Reader Thread 86] com.f1.ami.relay.fh.amps.AmiAmpsFH::invoke AMPS Message received: Message{ … }
Hazelcast Feedhandler
The Hazelcast Feedhandler consists of 3 types of subscription to Hazelcast:
- 1. Maps with Portable class serialization
- 2. Maps (HazelcastJsonValue type map values only)
- 3. Reliable Topic
Subscribing to Hazelcast Maps with Portable class serialization
Properties
Below is an example snippet of the local.properties setup:
ami.relay.fh.active=hazelcast
ami.relay.fh.hazelcast.class=com.f1.AmiHazelcastFHPortable
ami.relay.fh.hazelcast.props.url=localhost:5701
ami.relay.fh.hazelcast.props.maps=hzMap1,hzMap2
ami.relay.fh.hazelcast.props.cluster=dev
#get existing values in Hazelcast map: if true, sets true for all - default false
ami.relay.fh.hazelcast.props.getexistingvalues=false
#get existing values in Hazelcast map: for individual maps
ami.relay.fh.hazelcast.props.hzMap1.getexistingvalues=true
ami.relay.fh.hazelcast.props.hzMap2.getexistingvalues=false
#comma-delimited list of factories and corresponding factory IDs
ami.relay.fh.hazelcast.props.portablefactoryclasses=com.f1.ami.relay.fh.hazelcast.portable.PortableFactory
ami.relay.fh.hazelcast.props.portablefactoryids=333
#table name in AMI (optional - map name will be used if not provided)
ami.relay.fh.hazelcast.props.hzMap1.tablename=hzTable1
#your fully-qualified Hazelcast Portable Serializer class here
ami.relay.fh.hazelcast.props.hzMap1.portableclass=com.f1.ami.relay.fh.hazelcast.portable.PortableSerializer1
#needs to match portable class id
ami.relay.fh.hazelcast.props.hzMap1.portableclassid=1
#needs to match portable factory id
ami.relay.fh.hazelcast.props.hzMap1.portablefactoryid=333
ami.relay.fh.hazelcast.props.hzMap2.tablename=hzTable2
ami.relay.fh.hazelcast.props.hzMap2.portableclass=com.f1.ami.relay.fh.hazelcast.portable.PortableSerializer2
ami.relay.fh.hazelcast.props.hzMap2.portableclassid=2
ami.relay.fh.hazelcast.props.hzMap2.portablefactoryid=333
Additional (Optional) Properties
#Hazelcast credentials - if any
ami.relay.fh.hazelcast.props.username=demo
ami.relay.fh.hazelcast.props.password=demo123
#SSL default=off
ami.relay.fh.hazelcast.props.sslenabled=true
Writing a Hazelcast Portable Serializer class for AMI
Below is an example of a Hazelcast Portable class implementation for deserialization for AMI:
package com.f1.ami.relay.fh.hazelcast.portable;

import java.io.IOException;

import com.f1.ami.relay.fh.hazelcast.AmiHazelcastPortableIDSetter;
import com.hazelcast.nio.serialization.Portable;
import com.hazelcast.nio.serialization.PortableReader;
import com.hazelcast.nio.serialization.PortableWriter;

public class SamplePortable implements Portable, AmiHazelcastPortableIDSetter {

	static int ID = 0;
	static int FACTORY_ID = 0;

	private Integer sampleInt;
	private Double sampleDouble;
	private String sampleString;

	SamplePortable() {
		sampleInt = null;
		sampleDouble = null;
		sampleString = null;
	}

	SamplePortable(Integer sampleInt, Double sampleDouble, String sampleString) {
		this.sampleInt = sampleInt;
		this.sampleDouble = sampleDouble;
		this.sampleString = sampleString;
	}

	@Override
	public void setPortableClassID(int id) {
		SamplePortable.ID = id;
	}

	@Override
	public void setPortableFactoryID(int id) {
		SamplePortable.FACTORY_ID = id;
	}

	@Override
	public int getFactoryId() {
		return FACTORY_ID;
	}

	@Override
	public int getClassId() {
		return ID;
	}

	@Override
	public void writePortable(PortableWriter writer) throws IOException {
		writer.writeInt("sampleInt", this.sampleInt);
		writer.writeDouble("sampleDouble", this.sampleDouble);
		writer.writeString("sampleString", this.sampleString);
	}

	@Override
	public void readPortable(PortableReader reader) throws IOException {
		this.sampleInt = reader.readInt("sampleInt");
		this.sampleDouble = reader.readDouble("sampleDouble");
		this.sampleString = reader.readString("sampleString");
	}
}

