Difference between revisions of "AMI Historical Database"
| Line 588: | Line 588: | ||
==File Directory == | ==File Directory == | ||
*Back to the very first example where we explained how data gets partitioned across different | *Back to the very first example where we explained how data gets partitioned across different | ||
| − | columns, we used the table '''''PartitionDemo(date LONG PARTITION, symbol STRING, qty INTEGER, comments STRING)'''''. <br> | + | columns, we used the table '''''PartitionDemo(date LONG PARTITION, symbol STRING, qty INTEGER, comments STRING)'''''. <br><br> |
In this section, from a file directory perspective, we will take a closer look at how data in each column is stored across different files.<br> | In this section, from a file directory perspective, we will take a closer look at how data in each column is stored across different files.<br> | ||
Revision as of 13:18, 30 May 2023
Introduction to AMI Historical Database
The AMI Historical Table is a columnar-based on-disk table engine with support for partitioning. The introduction section will briefly describe the core concepts of the AMI Historical database: Partitioning, Data storage and optimizations.
Partitioning
Partitioning is used to organize data for performance. To understand why partitioning is critical
for large datasets, let’s first consider a non-partitioned standard table: as the number or rows
increases, the performance (time to insert, update, query and alter) will decline. Partitioning
provides an elegant solution by breaking up rows into separate isolated “virtual tables” called
partitions. Once data is broken into partitions, the row count of one partition will not affect the
performance of other partitions. In order to dictate how rows are organized into partitions, the
AMI Historical Table introduces a special PARTITION column type. The value in the PARTITION
column(s) determines which partition a given row will be assigned to. In other words, all rows for
a given partition will have the same value in the PARTITION column(s).
By way of example, data is often partitioned by a date: Imagine we have the following historical
table, partitioned by the column “date”
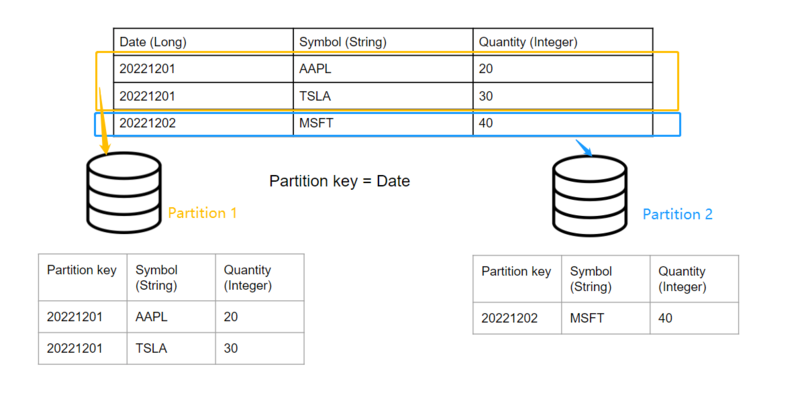
When inserting row(s) whose date match(es) the existing partition key(s), the query engine will automatically navigate to the corresponding partition according to the partition key and append the rows accordingly.
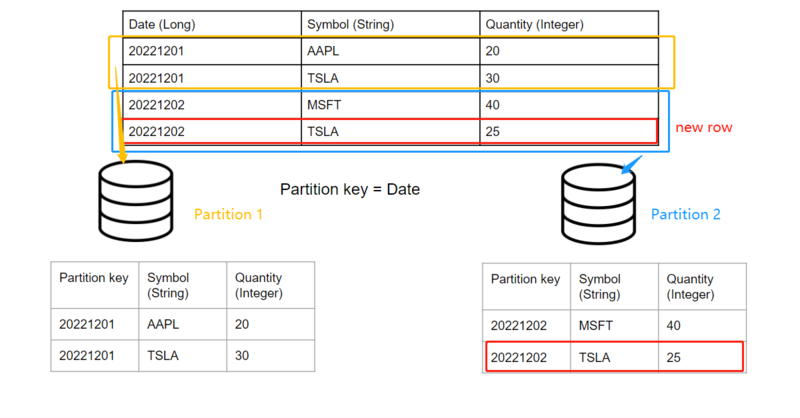
Note that adding another day of data will automatically create a new partition without affecting
existing days’ data: For example, if we want to insert two new rows into the table whose “Date”
== 20221203
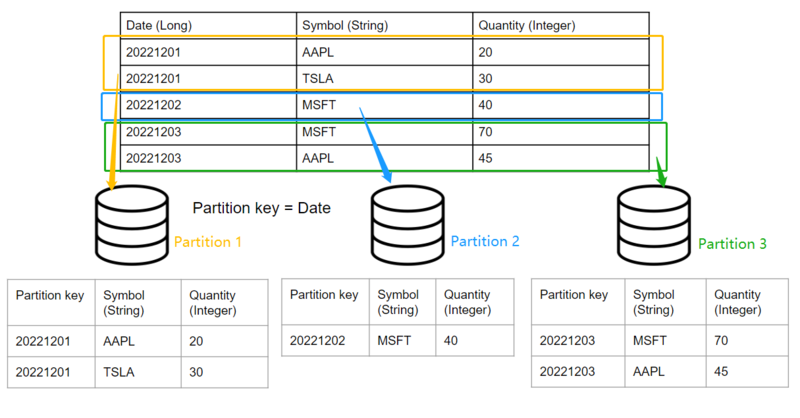
To create a historical table add USE PersistEngine="HISTORICAL" and include the PARTITION keyword after the column(s) that the rows should be partitioned by. Ex:
CREATE PUBLIC TABLE PartitionDemo(date LONG PARTITION, symbol STRING, qty INTEGER, comments STRING) use PersistEngine="HISTORICAL";
The file structure of AMIHDB is such that each table has its own directory and each partition is
assigned its own subdirectory. Each column and index has its own file(s) per partition directory.
<amiroot>/hdb/Table_Name.3fhtab/Partition_Id.dfhpar/<Files within a partition>
- ● Use ami.hdb.root.dir property to override location of hdb root
- ● Use ami.hdb.filehandles.max property to control how many files can be open at a time
- ● Table_Name - is the name of the table
- ● Partition_Id - An auto-incrementing id (starting at 0001)
- ● Files within a partition:
- ○ KEY.3fhkey - This stores the (plaintext) key for this partition
- ○ ColumnName.3fhcol - Stores data for the column
- ○ IndexName.3fhidx - Stores index data
- ○ KEY.3fhkey - This stores the (plaintext) key for this partition
This paradigm is designed for fast bulk INSERTs, fast random SELECTs and fast DELETES of
entire partitions. UPDATES, and sparse DELETES are possible but will operate slower
Optimized for Schema Alterations
Each partition is a self-contained set of data. This means that altering a schema does not
impact the way existing partitions are saved on disk. Instead, AMIHDB will map the “old”
partitions using the “old” schema to the current schema definition at query time. This applies for
ADD, DROP and MODIFY of columns.
Important Note: The PARTITION columns are the only columns that can not be altered after the table is created.
Data storage types and optimizations
The AMI historical database has different data storage types designed for data of various
natures and characteristics, such as length, cardinality and partition keys. While continuously
inserting, the nature of the data in the table is unpredictable so a more flexible but less efficient
strategy is used for storage. Therefore, after the partition is completed, it is important to optimize
the storage strategy to adapt to the existing data to improve query performance and minimize
disk storage. Data storage types and optimizations will be further discussed in Section 2: Data
types and storage types, and Section 4.1:Optimization on existing data.
PARTITION MODES
As a historical database, it is important to have a mode for fast insert-on-demand data. In
AMIHDB, when a new partition is created it will have a status of
IN_APPEND_MODE/NOT_OPTIMIZED. Then, after that table is optimized, the partition will
become optimized for data compression and query times.
There are two ways to force optimize partitions:
(a). By calling CALL __OPTIMIZE_HISTORICIAL_TABLE(“Your_Historical_Table_Name”)
(b). By restarting AMI Center
You can use the DIAGNOSE TABLE <Your_Hitorical_Table_Name> command to view the optimized status of each partition:
Before commit:
![]()
After commit:
![]()
Data Types and Storage Type
AMIHDB supports the same data types as the AMI Real-time database:
BYTE, SHORT, INT, LONG, FLOAT, DOUBLE, CHAR, UTC, UTCN, UUID, COMPLEX, BINARY, STRING, BIGINT, BIGDEC
Each data type has several storage types each suited to optimize storage/retrieval depending
on the cardinality and/or length of data. In AMIHDB, there are four storage types:
FLAT, BITMAP, VARSIZE, PARTITION.
Important Note: Different partitions can have different storage types for the same column.
VARSIZE
VARSIZE is the storage engine for variable-length data types:
STRING,BINARY,BIGINT,BIGDEC
There are three varieties of VARSIZE:
VARSIZE3,VARSIZE4,VARSIZE5 (default is VARSIZE5)
The number at the end indicates the number of bytes of the address pointer. For example,
VARSIZE3 indicates that the pointer has an address size of 3 Bytes, meaning that it can
address up to approximately 16 Megabytes of data (256*256*256).
Here are is the amount of total data that a column can hold depending on the type:
| VARSIZE() | Size |
|---|---|
| VARSIZE3 | 16MB |
| VARSIZE4 | 4GB |
| VARSIZE5 | 1TB |
Note, that if data exceeds the size of a column type, AMIHDB will automatically reconfigure and
extend the VARSIZE type (Note: this will be an expensive operation though). AMIHDB will
default to VARSIZE5, if not explicitly specified in the CREATE TABLE schema.
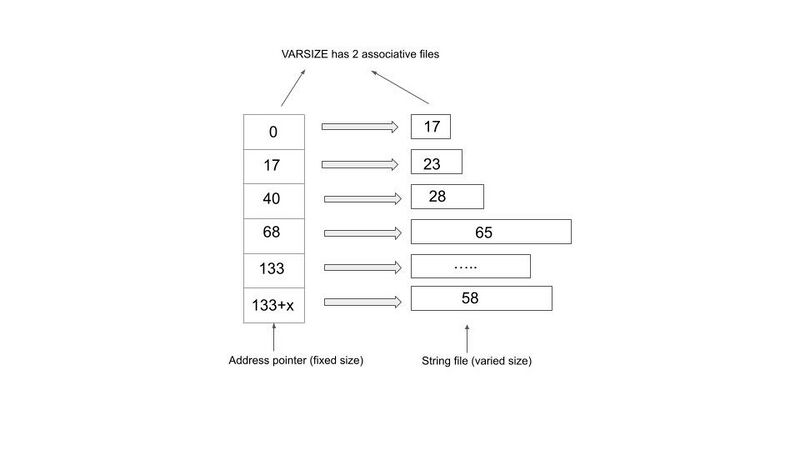
The way AMIHDB stores a variable-length value is to keep an address pointer to point to the
offset position relative to the first string to store each individual new string. As the diagram below
shows, each time we are adding a new string, we are appending it to the end of the preceding
string in the string file. In the example below, each number in the string file block indicates the
number of bytes each string occupies. The first address pointer points to the first string of 17
Bytes long and since there is no preceding string, the offset value the pointer stores is 0. When
we try to add the second string of length 23 Bytes long, we use the second address pointer,
which points to the offset distance relative to the first string, which is 17, to point to the second
string, so on and so forth.
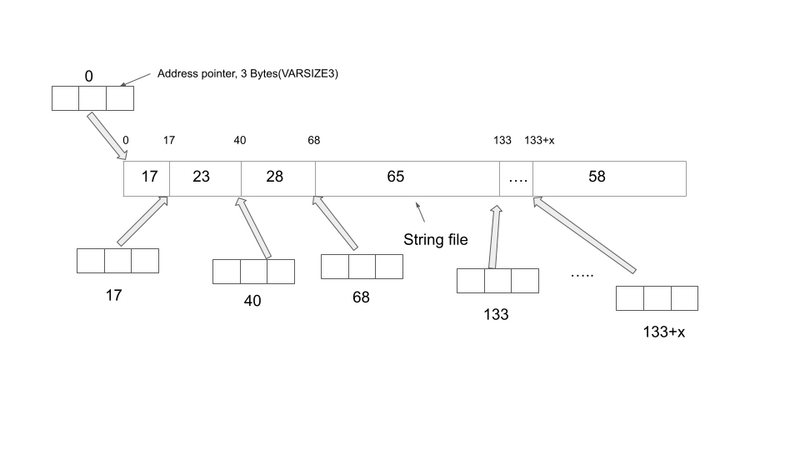
As the diagram below shows, AMIHDB needs 2 files to store the String VARSIZE column. One
file (<column_name>.3fhcol) is the array of offset values for each address pointer and the other
file (<column_name>.3fhdat) stores the actual string payload.
VARSIZE Example
Let’s create a historical table which contains VARSIZE storage types
CREATE PUBLIC table VARSExample(AllNames String, ShortNames String VARSIZE3, MediumNames String VARSIZE4, LongNames String VARSIZE5) USE PersistEngine="HISTORICAL";
Insert into VARSExample values("All the names","abc","abcdef","abcdefghijklmnopqrstuvwxyz");
If we diagnose the table, we can see detailed information for each of the string columns.
Diagnose table VARSExample;

We can see that the AMIHDB by default assigns the string variable to VARSIZE5. So if you are
not declaring a column as " ColumnName String VARSIZE", AMIHDB will assume the
worst case scenario by allocating the maximum memory to the string column (AKA VARSIZE5).
FLAT
FLAT is the storage type for data with a known fixed length. Data types that use FLAT are:
BYTE,SHORT,INT,LONG,FLOAT,DOUBLE,CHAR,UTC,UTCN,UUID,COMPLEX,BOOLEAN
There are three varieties of FLAT:
FLAT, FLAT_NONULL, FLAT_NOMIN (default is FLAT)
- FLAT stores all values and null but uses an extra byte.
- FLAT_NONULL can store all values except null.
- FLAT_NOMIN cat store all values except min value and null
- Note, that if an entry is inserted that does not fit in the column type (for example, inserting null
into a FLAT_NONULL column) AMIHDB will automatically reconfigure and extend the type so the entry will fit. AMIHDB will default to FLAT if not explicitly specified in the CREATE TABLE schema.
Here is an example of storage cost per row for INTEGER, which is 4 bytes:
- INTEGER FLAT: 5 bytes in total, which consists of 4 bytes of data + 1 byte for NULL flag.
- INTEGER FLAT_NONULL: 4 bytes in total (since there is no NULL flag to store)
- INTEGER FLAT_NOMIN: 4 bytes of data in total (the minimum value of that data type is
reserved as a placeholder for null hence its not available)
FLAT Example
First let’s create a historical table with the different FLAT types and insert some rows into it.
If we diagnose the table, we can see that once again, the AMIHDB is assuming the worst case
scenario for the Integer column(FLAT) if you don’t declare the storage type for this column.
CREATE PUBLIC table FlatExample(id int, id2 int FLAT,id3 int FLAT_NOMIN, id4 int FLAT_NONULL) USE PersistEngine="HISTORICAL";
Insert into FlatExample values(1,23,NULL,-2147483648);
Diagnose table FlatExample;
BITMAP
A BITMAP is ideal if the cardinality of the data is relatively low (aka the same values are recurring a lot in the table). The ONLY datatype that supports BITMAP is STRING.
There are 2 options for bitmap:
BITMAP1, BITMAP2 (BITMAP2 is the default)
The number indicates how many bytes are used to identify unique values. For example, a
BITMAP1 stores 255 unique values (and NULL) while a BITMAP2 stores 65,535 unique values
(and NULL). If the row has more than 65,535 unique entries, then a VARSIZE storage must be
used instead.
BITMAP Example
First let’s create a historical table with a String BITMAP column and insert some rows into it.
CREATE PUBLIC table BITMAPExample(symbol1 String BITMAP1,symbol2 String BITMAP2) USE PersistEngine="HISTORICAL";
Insert into BITMAPExample values("IBM","AAPL"),("MSFT","TSLA"),("MSFT","FaceBook");
Diagnose table BITMAPExample;}
PARTITION
PARTITION is a special type of column that needs to be specified by the user in the CREATE
TABLE statement. A partition column aggregates the rows with the same value into a single
partition. For example, if the user defines a ”Date” column as a LONG PARTITION, then all the
rows with the same date value will go into the same partition(essentially stored in the same file
path). One can add more PARTITION columns to the table as needed. For example the user
can declare two PARTITION columns:Date LONG and Region STRING. In this case, the rows
with the same Date and the same Region name will go into the same partition and get stored in
the same file path.
Important Note: It is strongly recommended to have at least one Partition column
otherwise all data for the entire table will be stored in a single partition
Important Note: All partition columns must be declared up front, prior to the insertion of
the data and is immutable. Immutability means that:
(a). Once the column has been declared as a partition column, it cannot be altered afterwards.
(b). Vice versa if the column has been initially declared as a non-partition column, you cannot
convert it into the partition column afterwards.
(c). The data in the PARTITION column CANNOT be updated/deleted
PARTITION Example
To illustrate how the data records are split across different partitions based on a PARTITION
column, the following table PartitionDemo(date LONG PARTITION, symbol STRING, qty INTEGER, comments STRING) is constructed. "PARTITION" keyword is the way we declare a column as PARTITION. In simple terms, the rows with the same column value will be
placed into the same directory if we declare a particular column to be PARTITION. The
details of different storage types will be elaborated in the section “Data types and storage
types”.
create public table PartitionDemo(date LONG PARTITION, symbol STRING, qty INTEGER, comments STRING) use PersistEngine="HISTORICAL";
If there exists a partition storage type in the table, like the example shown below where date is a
LONG PARTITION column, then the rows with the same partition value will be placed into the
same AMI History Partition, uniquely identified by a Partition Index(PID). For example if we have
three data records:
(20161120,"IBM",30,"very good products"),
(20161122,"MSFT",60,"Nice shopping experience")
(20161122,"MSFT",60,"Very positive customer feedback")
insert into PartitionDemo values(20161120,"IBM",30,"very good products");
insert into PartitionDemo values(20161122,"MSFT",60,"Nice shopping experience");
insert into PartitionDemo values(20161122,"MSFT",60,"Very positive customer feedback");
Since “date” is declared as a LONG PARTITION column, the rows with the same “date” value
will get clustered into one partition. In the case above, The first row and the second row with the
same “date” value of 20161122 will be placed into the same partition. The third row will be
placed into a separate “AMI History Partition”. If we enter the command “Diagnose table”, we
can see detailed information about the AMI History Table.
Diagnose table PartitionDemo;
We can see that there are two “AMI History Partitions” created, each uniquely identified by the
Partition index. In the table diagnosis diagram above, we have the first “AMI History Partition”,
uniquely identified by PID=1, and second uniquely identified by PID=2.
Note that all the rows are currently in append mode, meaning the rows can still be modified. But
once we commit the data, those become read-only (AKA historical).
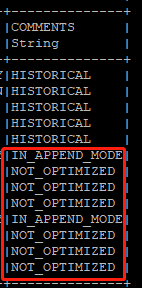
Once committed (let’s say we have just restarted the AMI ), in the comments section, the
IN_APPEND_MODE and NOT_OPTIMIZED keywords will disappear.

Now let’s insert some more rows into the table and check the table status again.
insert into PartitionDemo values("20161120","AAPL",40,"big blockbuster");
insert into PartitionDemo values("20161124","IBM",100,"extremely user-friendly");
insert into PartitionDemo values("20161124","MSFT",50,"enjoyable experience");
Diagnose table PartitionDemo;
Although the first row in the second insertion has exactly the same date value ”20161120” as
the value in the AMI History Partition 1, AMIHDB will create a separate partition to store these
rows (in this case stored in AMI History Partition 3, uniquely identified by PID=3).
Now if you commit the data (either by restarting AMI or calling Optimization procedure), the data
will be written to disk and become historical. AMIHDB will check if the rows you want to commit
contain the same partition value in the historical partitions and collapse them into one partition
accordingly.

After the second commit, since partition 3 and partition 1 have the same partition value of
“20161120”, we can see that they collapse into one partition, (AKA partition 3 has been merged
into partition 1 and thereby increasing the COUNT by 1). Every time we commit the partition, in
the “COMMENTS” field, they will appear as “HISTORICAL”, meaning that all the data has been
properly written to disk and become read-only.
PARTITION Summary
To summarize:
(a). Each AMI History Partition is uniquely identified by one AMI History Partition Index, also
known as PID.
(b). Historical data and data to be committed will live in separate AMI History Partitions.
If the historical table contains a PARTITION column:
(a). Rows with different PARTITION values will be placed into different AMI History Partitions.
(b). Before the commit, the new rows with the same PARTITION value as the historical rows
will be placed in a separate AMI History Partition.
(c). Once we commit the data, AMI History Partitions with the same PARTITION value will
collapse into one single AMI History Partition.
If the historical table does not contain a PARTITION column:
(a). All historical rows will live in one AMI History Partition and all rows to be committed will live
in another AMI History Partition. In other words, there can be at most 2 AMI History Partitions.
Choosing the Best Column Type For Your Variable
There are some general rules of thumb for choosing your optimal storage type for each column
based on the nature of your data. The detailed guidelines for a string variable and an integer
variable are given as below. These are explained further in the section “Optimization of existing
data”.AMIHDB will dynamically adjust the storage type for you to make sure your existing data
follows the best practices and assigns the optimal storage type to each of the columns.
Choosing the Best Column Type For a String Variable
Below is a general comparison of different VARSIZE options when declaring a string column.
| Type | Storage Method | Address pointer size | Max File Size | Advantage | Disadvantage | Usage Scenario |
|---|---|---|---|---|---|---|
| String VARSIZE3 | Each address pointer has 3 bytes of storage, resulting in max file size of 16777216 Bytes | 3 Bytes = 24 Bits | Maximum file size = 2^24 Bytes = 16777216 Bytes = 16MB | Takes up least amount of storage | Cannot store strings over 16MB total size | To store strings not too long in total size |
| String VARSIZE4 | Each address pointer has 4 bytes of storage, resulting in max file size of 4096 MegaBytes | 4 Bytes = 32 Bits | Maximum file size = 2^32 Bytes = 4294967296 Bytes = 4096MB | Takes up medium amount of storage | Cannot store strings over 4096MB total size. There is some memory overhead | To store strings whose total size does not exceed 4096MB |
| String VARSIZE5 | Each address pointer has 5 bytes of storage, resulting in max file size of 1024 GigaBytes | 5 Bytes = 40 Bits | Maximum file size = 2^40 Bytes = 1099511600000 Bytes = 1024GB | Can store a huge amount of strings up to 1024GB | Takes up most amount of storage and therefore a lot of memory overhead | To store strings that can be astronomically long in size(up tp 1TB in size) |
| String (By Default) | Assume the worst case scenario, allocating the maximum space to each address pointer (i.e.VARSIZE5) | 5 Bytes = 40 Bits | Maximum file size = 2^40 Bytes = 1099511600000 Bytes = 1024GB | Can store a huge amount of strings up to 1024GB | Takes up most amount of storage and therefore a lot of memory overhead | To store strings that can be astronomically long in size(up tp 1TB in size) |
| String BITMAP1 | If the number of unique strings is between 1-255 | NOT relevant | NOT relevant | Very memory efficient and fastest retrieval | NAN | For example we only have 10 unique strings out of a large number of rows |
| String BITMAP2 | If the number of unique strings is between 255-65,535 | NOT relevant | NOT relevant | Very memory efficient and fastest retrieval | NAN | For example we have 10,000 unique values in the column |
Choosing the Best Column Type For an Integer Variable
The similar principles can also be applied to BYTE, SHORT, LONG and BOOLEAN columns
that have fixed size.
| Type | Storage | Advantage | Disadvantage |
|---|---|---|---|
| Integer FLAT | Can store NULL+MINVALUE | Big memory space. Can store both NULL and MINVALUE | Can be memory inefficient if the actual data set does not actually need this much memory space. |
| Integer FLAT_NOMIN | Can store NULL | Can store NULL flag | Cannot store MINVALUE |
| Integer FLAT_NONULL | Can store MINVALUE | Can store MINVALUE | Cannot store NULL flag |
| Integer (By default) | Default setting for Integer. Assume worst case scenario, same as "Integer FLAT" | Big memory space. Can store both NULL and MINVALUE | Can be memory inefficient if the actual data set does not need both min and null values. |
Advanced
This section will go more in-depth into how AMI historical database optimizes itself for more efficient data storage, how the table schema can be altered, how the index can be created as well as how to perform update/delete operations.
Optimization on Existing Data
New partitions are, by default, optimized for flexible insertion of data. After all data has been
added for a partition, the partition can be “Optimized” which will reorganize the partition data to
improve read performance and minimize disk storage. Additionally, the table’s schema can
provide “hints” on how to optimize columns ahead of time, avoiding the cost of optimization later.
The AMIHDB dynamically adjusts the storage type according to how much space your existing
data needs for each of your data columns. One could specify the schema of the table at the very
beginning, for example we have a column manually specified as quantity Integer FLAT_NONULL. Later on while we are inserting data, if we suddenly need to insert a NULL
flag to the table, although the schema says FLAT_NONULL, the AMIHDB is smart enough to
alter the schema to FLAT_NOMIN so that we can store the NULL flag in the table. There are
other optimization examples that will elaborate how optimization works in various scenarios.
FLAT Optimization Example
First let’s create a historical table with an integer id column.
CREATE PUBLIC TABLE test(id int) USE PersistEngine="HISTORICAL";
Insert into test values(1),(2),(3);
- By default, because we did not specify a storage type before we optimized the table, AMIHDB
will assume the worst case scenario for data storage and assign FLAT to the integer column. If we diagnose the table, we will see that their id storage type is Flat.
- Next, let’s optimize the table and DIAGNOSE TABLE again to see how the storage type for the
id column will change. We optimize the historical table by calling the
__OPTIMIZE_HISTORICAL_TABLE(TableName) stored procedure. We see the storage type for
the id column has changed to FLAT_NOMIN since AMIHDB scans and confirms that a
minimum value to store does not exist.
CALL __OPTIMIZE_HISTORICAL_TABLE("test");
DIAGNOSE TABLE test;
- Then let’s truncate the table and try inserting the minimum value. Let’s see how the storage type
changes accordingly. Since the minimum value -2147483648 exists, which is the most negative value Java can store, the storage type will change to FLAT_NONULL to adapt to the data size in the table.
TRUNCATE TABLE test;
INSERT INTO test VALUES(1),(-2147483648);
CALL __OPTIMIZE_HISTORICAL_TABLE("test");
DIAGNOSE TABLE test;
- Finally, let’s truncate the table again and try inserting the NULL value. Since a NULL value
exists, the storage type is optimized to FLAT_NOMIN.
TRUNCATE TABLE test;
INSERT INTO test VALUES(1),(NULL);
CALL __OPTIMIZE_HISTORICAL_TABLE("test");
DIAGNOSE TABLE test;
VARSIZE Optimization Example
- First let’s create a testing table with a string column. Before optimization, once again the
AMIHDB will assume the greatest storage type requirement by assigning VARSIZE5 to the string
variable
CREATE PUBLIC TABLE varTest(name STRING) USE PersistEngine="HISTORICAL";
INSERT INTO varTest VALUES("test1"),("test2"),("test3");
DIAGNOSE TABLE varTest;
- Now, let’s optimize the table. We can see that the storage type for the string variable name
has been changed to VARSIZE3 because the database realizes that VARSIZE3 is
sufficient to store all the strings test1, test2, test3
CALL __OPTIMIZE_HISTORICAL_TABLE("varTest");
DIAGNOSE TABLE varTest;
- Next, let’s insert some more strings into the table and optimize it to see how the storage
type will change. As we insert 1 million rows into the table and do the optimization, we can
see that the storage type has been changed from VARSIZE3 to VARSIZE4.
for (int i =0;i<1000000;i++) {INSERT INTO varTest VALUES("test"+rand());}
DIAGNOSE TABLE varTest;
BITMAP Optimization Example
- Let’s create a table with a string column and insert 10,000 rows into the table. Before we do the
optimization, we can see the storage type for the string is VARSIZE5
CREATE PUBLIC TABLE BmapTest(name string) USE PersistEngine="HISTORICAL";
For (int i =0;i<10000;i++) {INSERT INTO BmapTest VALUES("test"+rand(10));}
DIAGNOSE TABLE BmapTest;
- After the optimization, the AMIHDB realizes that there are only 10 unique values in the table for the string and adjusts the storage type to BITMAP1 accordingly.
CALL __OPTIMIZE_HISTORICAL_TABLE("BmapTest");
DIAGNOSE TABLE BmapTest;
PARTITION Optimization Example
- Now let’s create a historical table with one column as a string partition and another column as
an integer. We can see that the rows with the same value are placed into the same partition. All
rows with the string value equal to test1 are placed into one partition and all rows with the
string value equal to test2 are placed into the other partition.
CREATE PUBLIC TABLE PTest(name string partition, qty int) USE PersistEngine="HISTORICAL";
INSERT INTO PTest VALUES("test1",20),("test1",30),("test1",40),("test2",20),("test2",120);
DIAGNOSE TABLE PTest;
- If we do the optimization on the table, all the rows that we inserted will get optimized and be in
read-only mode. This is confirmed by the lack of IN_APPEND_MODE and NOT_OPTIMIZED
in the comments section. This means that all data records are properly written to disk and
marked as HISTORICAL. The optimization automatically happens after the session has been
closed, which results in all data writing to disk.
CALL __OPTIMIZE_HISTORICAL_TABLE("PTest");
DIAGNOSE TABLE PTest;
- If the user wants to insert more data into the historical database afterwards in a new session
(Here calling optimization procedure is equivalent to starting a new session). We can see from
diagnosing the table that, instead of appending the new data records into the historical partition
columns, we create brand new partitions for them.
INSERT INTO PTest VALUES("test1",60),("test2",35),("test2",25),("test2",10);
DIAGNOSE TABLE PTest;
- Now if we call the optimization procedure against the historical table, the AMIHDB will look to
see if there are partitions with the same partition keys that can be merged with the historical
partitions and will do so if there are. Here we can see the new partition with the partition key of
test1 and test2 get merged with the historical partitions with the same keys.
CALL __OPTIMIZE_HISTORICAL_TABLE("PTest");
DIAGNOSE TABLE PTest;
File Directory
- Back to the very first example where we explained how data gets partitioned across different
columns, we used the table PartitionDemo(date LONG PARTITION, symbol STRING, qty INTEGER, comments STRING).
In this section, from a file directory perspective, we will take a closer look at how data in each column is stored across different files.
CREATE PUBLIC TABLE PartitionDemo(date LONG PARTITION, symbol STRING, qty INTEGER, comments STRING) USE PersistEngine="HISTORICAL";
- In the table PartitionDemo,we have these rows:
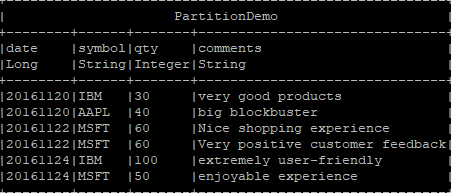
And we have 3 Partitions, each uniquely identified by a PID.
- If we go to /ami/amione/hdb directory, we will see all the folders, named as
Your_Historical_Table_Name.3fhtab , where all the rows from the table are stored.
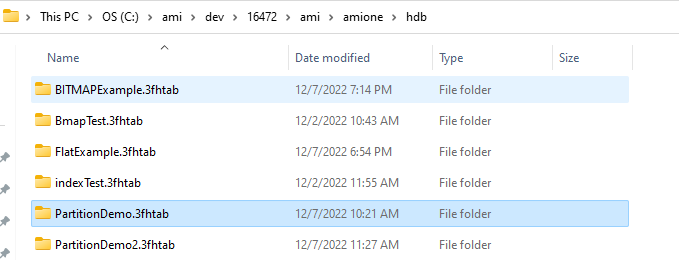
- If we go to the folder that corresponds to our PartitionDemo historical table, we will see all
the partition folders that store the rows for each partition
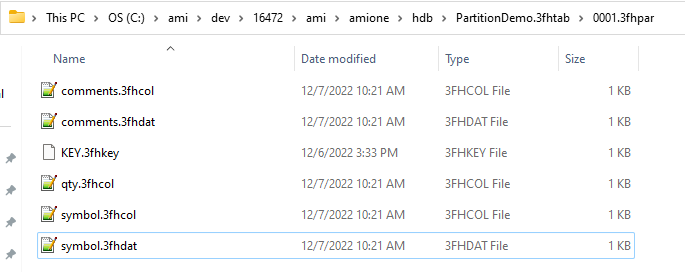
- Next if we go to one of the partition folders, 0001.3fhpar, we can see different binary data
files that store the actual values from each column in the corresponding partition.
Alter Table Schemas
Oftentimes, we might want to change the schema of our historical database if the nature of the
data changes from a particular point onwards. For example, we may want to add a new column
to the original table schema because the new data has an extra column. We can go ahead and
do so in AMIHDB and set the entries for the old data to be the NULL flag. This section will
elaborate on several use cases where the user may want to change the table schema to cater
for the need to store new data.
Adding a Column
- Let’s create a historical table called AddColDemo,with (date LONG, symbol STRING) as the original schema.
CREATE PUBLIC TABLE AddColDemo(date LONG, symbol STRING) USE PersistEngine="HISTORICAL";
INSERT INTO AddColDemo values(20221209,"IBM"),(20221208,"MSFT");
CALL __OPTIMIZE_HISTORICAL_TABLE("AddColDemo");
- Let’s say a few days later, we have a new column "qty int" from our new data. So we
need to add this column to our existing table schema.
ALTER TABLE AddColDemo ADD qty INT;
DIAGNOSE TABLE AddColDemo;
- When we diagnose the table, we will see that it does not create a new file directory for "qty
int" immediately after we alter the schema

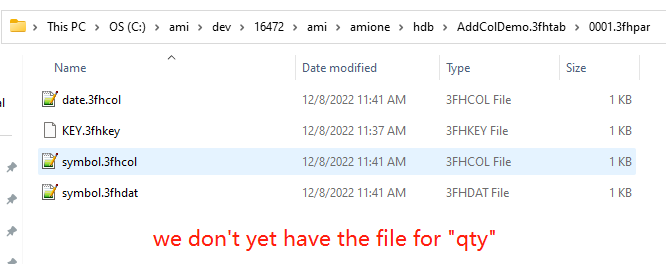
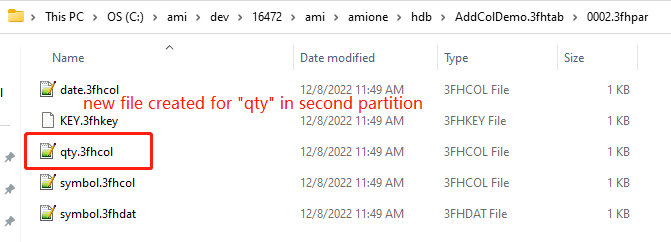
- Let’s now try inserting some rows into the altered table. We can see after we alter the schema,
AMIHDB does not create a new file directory in the original partition. Instead, it will create a
brand new partition and create a new file directory for qty INT there. When AMIHDB goes
to the original partition and does not find the file that stores "qty int", it will just assign the
NULL flag to these entries.
INSERT INTO AddColDemo VALUES(20221212,"IBM",40),(20221228,"MSFT",50);
DIAGNOSE TABLE AddColDemo;
Modify Existing Data: DELETE/UPDATE
There are times when we want to modify specific data records using the “where” clause, either
with DELETE or UPDATE. In this section, we are going to demonstrate how to update and
delete rows using UPDATE … WHERE and DELETE … WHERE clauses.
UPDATE Clause
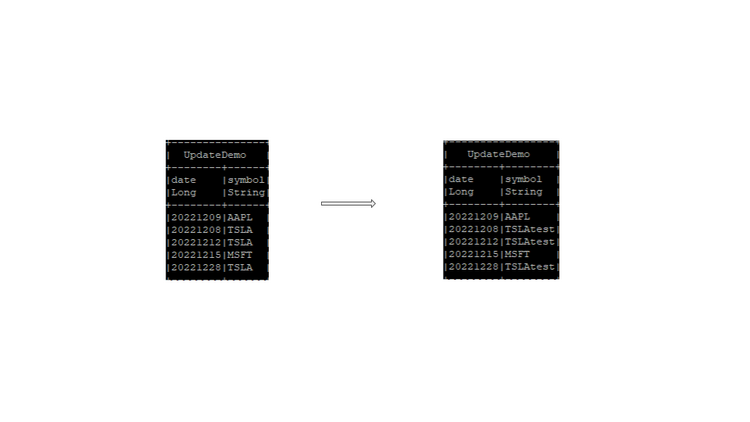
First let’s create a table UpdateDemo(date LONG, symbol STRING) and insert some data records into it. We optimize the table and perhaps a few days later we decide to change the symbol name from TSLA to TSLANew.
CREATE PUBLIC TABLE UpdateDemo(date LONG, symbol STRING) USE PersistEngine="HISTORICAL";
INSERT INTO UpdateDemo VALUES(20221209,"AAPL"),(20221208,"TSLA"),(20221212,"TSLA"),(20221215,"MSFT"),(20221228,"TSLA");
CALL __OPTIMIZE_HISTORICAL_TABLE("UpdateDemo");
DIAGNOSE TABLE UpdateDemo;
UPDATE UpdateDemo SET symbol = symbol+"test" WHERE symbol=="TSLA";
SELECT * from UpdateDemo;
DIAGNOSE TABLE UpdateDemo;
We can see that after performing an update on the rows where sym==”TSLA, this process
automatically un-optimizes the AMI History partition columns from which the values are being
modified. The AMI History partition columns that don’t participate in the UPDATE ... WHERE
clause will remain intact (AKA the optimization status will not change).
Important Note: Values in a PARTITION column CANNOT be updated
If we create the same table except that we declare the "symbol" to be a "String
PARTITION" column, we cannot update the values in the "symbol" column. If we do so, it will
throw us an exception:

DELETE Clause
Let’s stick with the same example above and create a table DeleteDemo(date LONG,
symbol STRING)and insert some data records into it.
CREATE PUBLIC TABLE DeleteDemo(date LONG, symbol STRING) USE PersistEngine="HISTORICAL";
INSERT INTO DeleteDemo VALUES(20221209,"AAPL"),(20221208,"TSLA"),(20221212,"TSLA"),(20221215,"MSFT"),(20221228,"TSLA");
CALL __OPTIMIZE_HISTORICAL_TABLE("DeleteDemo");
DIAGNOSE TABLE DeleteDemo;
If later, we decide to delete all the row records where symbol is equal to "TSLA". We can use the 'DELETE FROM ... WHERE clause to achieve this.
DELETE FROM DeleteDemo WHERE symbol=="TSLA";
SELECT * FROM DeleteDemo;
DIAGNOSE TABLE DeleteDemo;
We can see that because the modification of the data takes place at a row level, which means all AMI History Partition Columns are participating in the DELETE FROM … WHERE clause. As a result, all AMI History Partition Columns in that partition will get affected and get un-optimized.
Summary
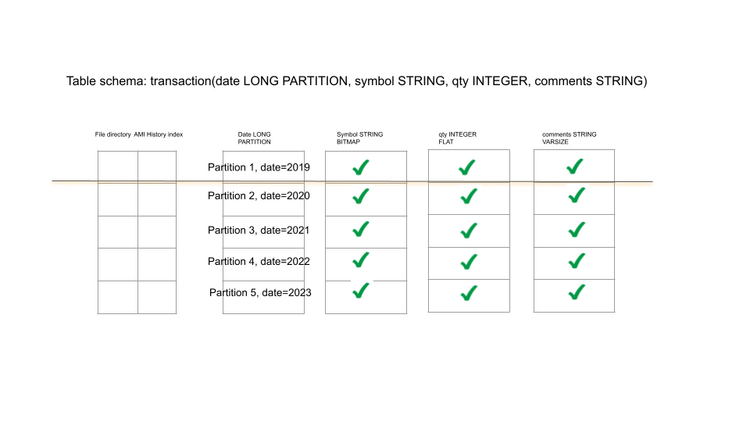
To summarize, updating or deleting certain row records in the historical table causes the table to
un-optimize. The AMI History Partition Columns that participate in the updating/deleting clause
will get un-optimized. Below is an illustrative diagram that shows what happens with the
optimization status before and after the clause is applied.
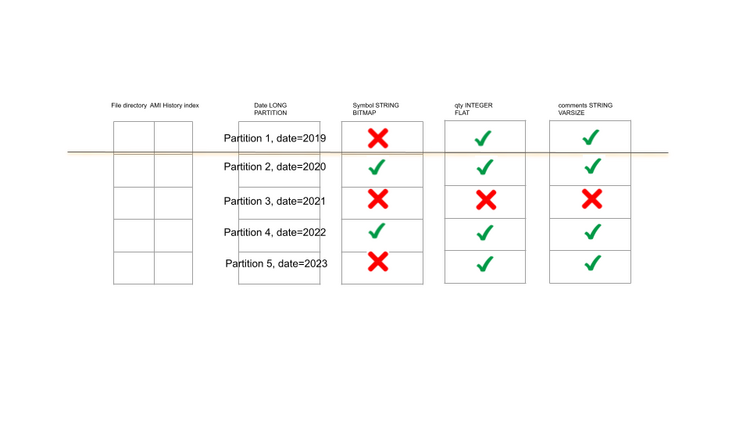
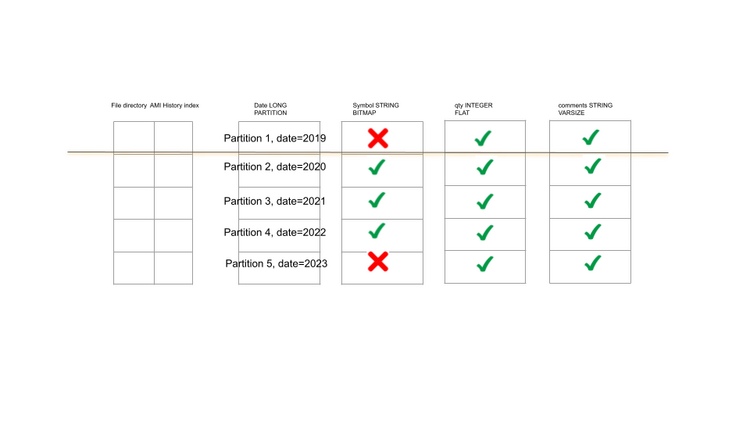
Let’s say we have a table transaction(date LONG PARTITION, symbol STRING, qty INTEGER, comments STRING),and this table is fully optimized. We use the green tick to mark each individual AMI History Partition Column as Optimized and red cross as un-optimized.
Now, let’s say we want to update the symbol and set the symbol to "Deprecated" for
partition 1 and partition 5. We can do this:
UPDATE transaction SET symbol = "Deprecated" WHERE date==2019 OR date==2023;
Since only the symbol AMI History Partition Column from Partition 1 and Partition 5 are
participating in the clause, they will get un-optimized, marked as red cross.
Next, we will delete some rows from the table:
DELETE FROM transaction WHERE date==2021;
Since the DELETE FROM clause performs a row-wise deletion, all the AMI History partition columns in Partition 3 are participating in the clause. They will be marked as un-optimized.
Create Index on a Particular Column
We can create indexes on the historical table to enhance query performance. For AMIHDB, the
only type of index supported is SORT, which creates a b-tree to sort the data. The example
below shows how to create an index on a specific column.
First let’s create a historical table indexTest and create an index on the “date” column. We can
see as we insert more data into the table, the index is kept in memory but the columns are
stored on disk.
CREATE PUBLIC TABLE indexTest(name string, date long, qty int) USE PersistEngine="HISTORICAL";
INSERT INTO indexTest VALUES("AAPL",20221023,20),("AAPL",20221011,30),("TSLA",20221030,40),("MSFT",20220930,24),("MSFT",20220925,120);
CREATE INDEX i on indexTest(date);
DIAGNOSE TABLE indexTest;
After we do the optimization and commit the partition, the AMIHDB then builds the index and
writes it to disk.
CALL __OPTIMIZE_HISTORICAL_TABLE("indexTest");
DIAGNOSE TABLE indexTest;
Restrictions
The AMIHDB is very versatile and flexible in terms of dynamic optimization of the storage type
and is efficient on how the data is partitioned across different file directories for faster query
execution and retrieval of data. However, no database is perfect and there are some restrictions
for AMIHDB.
Immutability of PARTITION Column
A PARTITION column is the core of how the rows are partitioned across different partition file
directories and therefore must be declared upfront upon creating the schema of the historical
table. Once a PARTITION column has been declared, there is no way to alter it by any means.
Similarly, a non-PARTITION column cannot be altered to a PARTITION column afterwards
because mutating PARTITION columns requires us to change the whole structure of the file
system and therefore is very expensive. Thus, the users are strongly advised to plan wisely on
how they intend to partition their database.
Index Support
For the time being, the AMIHDB does not support composite indexes. The only type of index we support is a sort index over a particular column, which employs a B tree to sort the entire column of data for faster search and retrieval.
