Difference between revisions of "AMI Set Up"
Robert Cooke (talk | contribs) |
Robert Cooke (talk | contribs) |
||
| Line 9: | Line 9: | ||
| '''RAM''' || 4GB | | '''RAM''' || 4GB | ||
|- | |- | ||
| − | | '''DISK''' || | + | | '''DISK''' || 20GB |
|- | |- | ||
| '''PROCESSOR''' || 2GHZ CPU (Intel & AMD Certified) | | '''PROCESSOR''' || 2GHZ CPU (Intel & AMD Certified) | ||
Revision as of 17:09, 9 January 2022
AMI Installation Instructions
Minimum Operating Environment
| OPERATING SYSTEM | Ubuntu, Fedora/Red Hat, CentOS, Mac OS X, Windows Certified (Full support for Java 1.7 or later) |
| RAM | 4GB |
| DISK | 20GB |
| PROCESSOR | 2GHZ CPU (Intel & AMD Certified) |
| CLIENT BROWSER | Up-to-date version of: Microsoft Edge, Chrome, Firefox or Safari |
| ACCESS | Must have permissions to install software |
| NETWORK | Server must have access to data sources. Firewalls should also be enabled to allow connections to port 33332 |
Suggested Operating Environment
| OPERATING SYSTEM | Unix environment with Java 1.7 or later |
| RAM | 32GB or more |
| DISK | 100GB or more |
| PROCESSOR | 2GHZ CPU, 8 cores or more |
| ACCESS | Must have permissions to install software (often requiring Admin rights on Windows) |
| NETWORK | Server must have access to data sources. Firewalls should also be enabled to allow connections to port 33332 |
How to Install
1. Visit https://3forge.com/signup.html to create an account
2. Once you receive a separate email informing you that the account has been enabled for downloading the software, please re-login at https://3forge.com/login.html
3. Click on the Files link to the left and download the version appropriate for your operating system:
- For Mac: ami_macos_some_version.dmg
- For Windows: ami_windows-x64_some_version.exe
- For Unix: ami_unix_some_version.sh
4. If installing on a server, copy the downloaded file from step 3 onto the server and logon to that server
5. Run the downloaded file from step 3 and follow the installation wizard instructions
6. After startup is complete visit http://localhost:33332 on browser, (if installed on separate server replace "localhost" with the server's hostname or ip address)
- The default login for username & password is: demo & demo123
To Stop and Start AMI
- Unix or Mac: Run the amione/scripts/stop.sh and amione/scripts/start.sh script files
- Windows: Run the amione/scripts/stop.bat and amione/scripts/start.bat script files
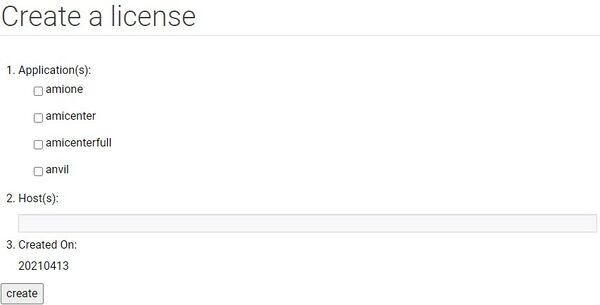
Creating a License from the Website
1. Visit https://3forge.com/secure_licenses
2. Check the AMIone checkbox
3. Enter the hostname in the Host(s) field (you can determine the hostname by reading the red warning below the AMI login page)
4. Click create
5. Copy and paste the contents into your clipboard
6. Create a file under the amione folder called f1license.txt and paste the content inside the file.
Next Steps: Getting Started and Additional Information
- Visit https://3forge.com/videos.htm and check out the video tutorials
- Visit http://docs.3forge.com/mediawiki/GUI to get started using AMI
- Email support@3forge.com for questions or other support related issues
Creating a License from AMI
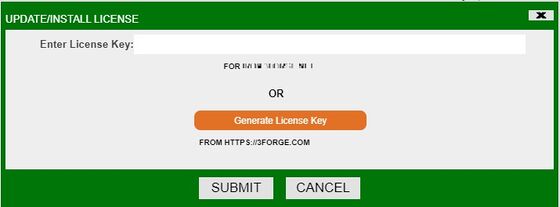
In addition to creating licenses from the 3Forge website (as mentioned above in the installation instructions), new licenses can be created/updated from AMI itself. To use this feature, please make sure the account is enabled for creating licenses.
to open up the license prompt:
1. Click Help in the top menu bar and select Enter/Update License
2. If you already have a license key generated and copied from the 3Forge website, paste the key onto the Enter License Key field. Click on the submit button and restart AMI for the new license to take effect. Continue onto step 3 if you want to generate a new license key.
3. To generate a new license key, click on the Generate License Key button.
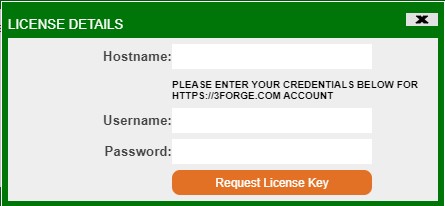
4. A login form will appear which asks for your 3Forge website credentials.
5. Enter the credentials and request a license key by clicking on the Request License Key button.
6. A dialog box with the new license key will appear. Click on the Update License Key button to apply the newly generated key.
7. Finally, click on the submit button to finish the license creation process.
Remember to restart AMI for the new license to take effect.
Any questions regarding licensing can be directed to support@3forge.com
Instructions for Secure Socket
- You'll need to start by creating the certificates. To do this, keytool must be in your PATH.
- First we create a server.jks file and a server.cer file which we will keep with the server. Note, replace serverpass with a password
keytool -genkeypair -deststoretype pkcs12 -keyalg RSA -alias 3forge_server -keystore server.jks -validity 1000 -keysize 2048 -
keypass serverpass -storepass serverpass -dname "cn=3Forge Client"
keytool -export -alias 3forge_server -storepass serverpass -file server.cer -storetype pkcs12 -keystore server.jks
- Now lets create a client.jks file using the server's certificate, if you have multiple clients you should run this for each client (such that each time the client.jks file is unique for that client). Note, replace clientpass with a password
keytool -genkey -deststoretype pkcs12 -alias 3forge_client -keyalg RSA -keypass clientpass -storepass clientpass -
keystore client.jks -dname "cn=3Forge Client"
keytool -import -v -trustcacerts -alias 3forge_server -file server.cer -keystore client.jks -keypass clientpass -storepass clientpass -noprompt
- To configure the server, copy the server.jks file to the server, and add the following properties to your local.properties of AMI:
ami.port.keystore.file=/path/to/server.jks
ami.port.keystore.password=serverpass
- To configure the client, copy the client.jks file to the client and instead of calling the function AmiClient::start(host, port, loginId, options) call:
AmiClient client=new AmiClient();
...
client.start(host, port, loginId, options,new File("/path/to/client.jks"),"clientpass");
Instructions for Running Center & Relay Independently
The same AMI binary is configured to run as a center, relay, web or a combination of the three. Add one of the following configuration blocks to your amione/config/local.properties to control what is run. If the local.properties file does not exist, please create it. Note, that 3270 is the default port but can be changed.
Finally, keep in mind that the center starts up the server port and multiple clients (relays/web) can connect to a single center.
- Default: Run the center,relay,web
ami.components=relay,center,web
ami.center.port=3270
ami.center.host=localhost
- Run the center
ami.components=center
ami.center.port=3270
- Run the relay
ami.components=relay
ami.center.port=3270
ami.center.host=host.running.center
- Run the web
ami.components=web
ami.center.port=3270
ami.center.host=host.running.center
- Run the center,web
ami.components=center,web
ami.center.port=3270
ami.center.host=localhost
- Run the center,relay
ami.components=center,relay
ami.center.port=3270
ami.center.host=localhost
- Run the web,relay
ami.components=web,relay
ami.center.port=3270
ami.center.host=host.running.center


