Difference between revisions of "Guides"
(update log viewer file) |
|||
| (109 intermediate revisions by 7 users not shown) | |||
| Line 354: | Line 354: | ||
<span style="font-family: courier;">ami.</span><span style="font-family: courier;color: red;">components</span> | <span style="font-family: courier;">ami.</span><span style="font-family: courier;color: red;">components</span> | ||
| + | |||
| + | <span style="font-family: courier;"># If true, file requests to parent directories are rejected</span> | ||
| + | |||
| + | <span style="font-family: courier;">ami.</span><span style="font-family: courier;color: red;">webmanager.mapping.strict</span><span style="font-family: courier;">=true</span> | ||
| + | |||
| + | <span style="font-family: courier;"># Assign port number</span> | ||
| + | |||
| + | <span style="font-family: courier;">ami.</span><span style="font-family: courier;color: red;">webmanager.port</span><span style="font-family: courier;">=WEBMANAGER_PORT</span> | ||
| + | |||
| + | 4. Additional configuration properties are: | ||
| + | |||
| + | <span style="font-family: courier;"># Working directory for the WebManager</span> | ||
| + | |||
| + | <span style="font-family: courier;"># Default is </span><span style="font-family: courier;color: red;">amione directory</span> | ||
| + | |||
| + | <span style="font-family: courier;">ami.</span><span style="font-family: courier;color: red;">webmanager.mapping.pwd</span><span style="font-family: courier;">=WORKING_DIR</span> | ||
| + | |||
| + | <span style="font-family: courier;"># Maps alias/logical name to directory</span> | ||
| + | |||
| + | <span style="font-family: courier;"># Key=value comma-delimited list</span> | ||
| + | |||
| + | <span style="font-family: courier;">ami.</span><span style="font-family: courier;color: red;">webmanager.mapping.roots</span><span style="font-family: courier;">=/ALIAS=PATH,[…]</span> | ||
| + | |||
| + | For more details on the configuration properties, refer to the [[AMI_Configuration_Guide#WebManager_Configuration_Properties|WebManager Configuration Properties]]. | ||
| + | |||
| + | ==Required Configuration for AMI Web Servers== | ||
| + | |||
| + | Establishing a connection between an AMI Web Server and AMI WebManager will require additional configuration properties. To do so, | ||
| + | |||
| + | 1. Navigate to the AMI Web Server installation directory and open | ||
| + | <span style="color: red;">amione/config/local.properties</span> | ||
| + | |||
| + | 2. Add the following properties: | ||
| + | |||
| + | <span style="font-family: courier;"># Default host is localhost</span> | ||
| + | |||
| + | <span style="font-family: courier;">ami.</span><span style="font-family: courier;color: red;">webmanager.host</span><span style="font-family: courier;">=WEBMANAGER_HOST</span> | ||
| + | |||
| + | <span style="font-family: courier;">ami.</span><span style="font-family: courier;color: red;">webmanager.port</span><span style="font-family: courier;">=WEBMANAGER_PORT</span> | ||
| + | |||
| + | =AMI WebBalancer User Guide= | ||
| + | The AMI WebBalancer is a server that routes users to various AMI Web Servers. The purpose of using the AMI WebBalancer is to distribute the web load across multiple AMI Web Servers. The AMI WebBalancer is usually setup along with an AMI WebManager, see the AMI WebManager User Guide for more information. | ||
| + | |||
| + | ==Setup== | ||
| + | |||
| + | 1. Download and Install AMIOne | ||
| + | |||
| + | 2. Navigate to the installation directory and open amione/config/local.properties | ||
| + | |||
| + | *If not found local.properties, manually create it in amione/config | ||
| + | |||
| + | 3. Add the following properties: | ||
| + | |||
| + | <span style="font-family: courier;"># Starts up AMI WebBalancer</span> | ||
| + | |||
| + | <span style="font-family: courier;">ami.</span><span style="font-family: courier;color: red;">components</span><span style="font-family: courier;">=webbalancer</span> | ||
| + | |||
| + | <span style="font-family: courier;"># Routing file for AMI WebBalancer</span> | ||
| + | |||
| + | <span style="font-family: courier;"> # Default path is</span><span style="font-family: courier;color: red;">data/webbalancer.routes</span> | ||
| + | |||
| + | <span style="font-family: courier;">ami.</span><span style="font-family: courier;color: red;">webbalancer.routes.file</span><span style="font-family: courier;">=FILE_NAME</span> | ||
| + | |||
| + | The routing file contains a list of rules for mapping IP addresses to AMI Web Servers. | ||
| + | |||
| + | Above is the minimal configuration for the AMI WebBalancer. For more details on configuration properties, refer to the '''WebBalancer Configuration Properties'''. | ||
| + | |||
| + | For more details on routing, refer to the '''WebBalancer.routes''' documentation. | ||
| + | |||
| + | ===Reference Links=== | ||
| + | |||
| + | [[AMI_Configuration_Guide#WebBalancer_Configuration_Properties_.28Applies_to_Components:_WebBalancer.29|WebBalancer Configuration Properties]] | ||
| + | |||
| + | [[AMI_Configuration_Guide#WebBalancer.routes|WebBalancer.routes]] | ||
=Instructions for Using Python with AMI Script= | =Instructions for Using Python with AMI Script= | ||
| Line 415: | Line 489: | ||
final Connection conn = DriverManager.getConnection(url); | final Connection conn = DriverManager.getConnection(url); | ||
try { | try { | ||
| − | final ResultSet rs = conn. createStatement().executeQuery("select * from __TABLE"); | + | final ResultSet rs = conn.createStatement().executeQuery("select * from __TABLE"); |
System.out.println(resultSetToString(rs)); | System.out.println(resultSetToString(rs)); | ||
} finally { | } finally { | ||
| Line 434: | Line 508: | ||
} | } | ||
</syntaxhighlight> | </syntaxhighlight> | ||
| + | |||
| + | ==Example: Connection to AMI Center from DBeaver == | ||
| + | 1. Add driver configuration in DBeaver<br> | ||
| + | (a). Go to '''Database''' -> '''Driver Manager''', Open driver manager dialogue and click '''New''' <br> | ||
| + | [[File:Database-menu.png]] | ||
| + | [[File:Dbeaver2.png]]<br> | ||
| + | |||
| + | (b). Configure the AMIDbJdbcDriver <br> | ||
| + | [[File:Dbeaver3.png]]<br> | ||
| + | {| class="wikitable" | ||
| + | !Parameter | ||
| + | !Description | ||
| + | !Example | ||
| + | |- | ||
| + | |Driver Name | ||
| + | |Name of your driver. It can be any name you like | ||
| + | |AmiDbJdbcDriver | ||
| + | |- | ||
| + | |Driver Type | ||
| + | |Driver Provider | ||
| + | |Generic | ||
| + | |- | ||
| + | |Class Name | ||
| + | |JDBC driver class name | ||
| + | |com.f1.ami.amidb.jdbc.AmiDbJdbcDriver | ||
| + | |- | ||
| + | |URL Template | ||
| + | |Template of driver URL, should follow the format like: '''jdbc:amisql:<host>:<jdbc port><login details>''' | ||
| + | |jdbc:amisql:localhost:3280?username=demo&password=demo123 | ||
| + | |- | ||
| + | |Default Port | ||
| + | |Default AMI JDBC port is 3280 | ||
| + | |3280 | ||
| + | |- | ||
| + | |Default Database | ||
| + | |Default database is AMI | ||
| + | |AMI | ||
| + | |- | ||
| + | |Default User | ||
| + | |Default user name is demo | ||
| + | |demo | ||
| + | |- | ||
| + | |Description | ||
| + | |Description of the driver | ||
| + | |driver for connection to AMIDB | ||
| + | |} | ||
| + | |||
| + | (c). Go to '''Libraries''' tab and add the '''out.jar''' file(/amione/lib/out.jar) into it and hit ok<br> | ||
| + | [[File:Dbeaver4.png]]<br> | ||
| + | |||
| + | 2. Establish Database Connection With the AMIDbJdbc Driver<br> | ||
| + | (a). Go to '''Database''' -> '''New Database Connection''' and select the '''AMIDbJdbc''' driver we just configured<br> | ||
| + | [[File:Dbeaver5.png]]<br> | ||
| + | (b). Enter the URL and your login information. <br> | ||
| + | Your AMI Database is ready to go.<br> | ||
| + | [[File:Dbeaver6.png]] | ||
=Using JayDeBeApi - Python JDBC Adapter for AMI= | =Using JayDeBeApi - Python JDBC Adapter for AMI= | ||
| Line 491: | Line 621: | ||
<span style="font-family: courier;">result = curs.fetchall()</span> | <span style="font-family: courier;">result = curs.fetchall()</span> | ||
| − | = AMI Git Adapter User | + | = AMI Git Adapter User Guide = |
| − | 1. Setup <br> | + | '''1. Setup <br>''' |
| − | (a). Create an account | + | (a). Create an account on any git-based code hosting framework and initialize a git repository.<br> |
| − | (b). Download and unzip the git adapter, then copy and paste its contents into <span style="color: red;">amione/lib | + | (b). Download and unzip the git adapter, then copy and paste its contents into <span style="color: red;">amione/lib </span>. <br> |
| − | (c). Inside <span style="color: red;">local.properties </span>, add the following property: <br> | + | (c). Inside <span style="color: red;">local.properties</span>, add the following property: <br> |
| − | <pre> ami.scm.plugins=com.f1.ami.plugins.git.AmiGitScmPlugin </pre | + | <pre>ami.scm.plugins=com.f1.ami.plugins.git.AmiGitScmPlugin</pre> |
| − | ( | + | (d). Start/Restart AMI and verify that you can now see the Source Control settings at <span style="font-family: Courier New;color: black;"> Account > My Source Control Settings </span> .<br> |
| + | (e). Please follow either the '''HTTPS Connection guide''' or '''SSH Connection guide''' below depending on your repository’s security configuration.<br> | ||
| − | + | '''2. HTTPS Connection <br>''' | |
| + | [[File:Git Adapter Https2.png|(small)px]] | ||
| − | |||
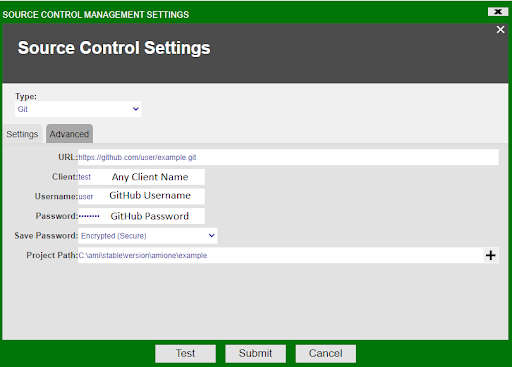
(a). In AMI, open the Source Control Settings <br> | (a). In AMI, open the Source Control Settings <br> | ||
| − | ( | + | <span class="nowrap"> </span> (i). Select <span style="font-family: Courier New;color: black;"> Account > My Source Control Settings > Type > Git </span> .<br> |
| − | (c). | + | <span class="nowrap"> </span> (ii). Then, fill in the following: <span style="font-family: Courier New;color: black;"> URL, Client, Username, Password (Personal Access Token), and Project Path. </span> To obtain the respective information, please refer to the clone information from your respective git provider. <br> |
| − | ( | + | <span class="nowrap"> </span> (iii). To specify a branch, go to <span style="font-family: Courier New;color: black;"> Advanced > Branch </span> and enter the branch name. Please note that the default branch the adapter will use is the '''master''' branch. <br> |
| − | ( | + | <span class="nowrap"> </span> (iv). For more information on each field, see '''Source Control Properties''' below. <br> |
| + | (b). Press Submit to clone and connect to the repository. <br> | ||
| + | |||
| + | |||
| + | '''3. SSH Connection<br>''' | ||
| + | |||
| + | [[File:Git Adapter ssh 1.png|(small)px]] | ||
| + | [[File:Git Adapter ssh 2.png|(small)px]] <br> | ||
| + | |||
| + | (a). Generate a SSH key pair file in your SSHKey directory. <br> | ||
| + | <span class="nowrap"> </span> (i).Please follow your git repository’s guide on creating a key pair. The default key name <span style="color: red;">id_rsa </span> is no longer supported. <span style="color: red;"> Please use ed25519. </span> <br> | ||
| + | (b). Upload the public key data to your git-based framework. Please refer to your provider’s setup instructions.<br> | ||
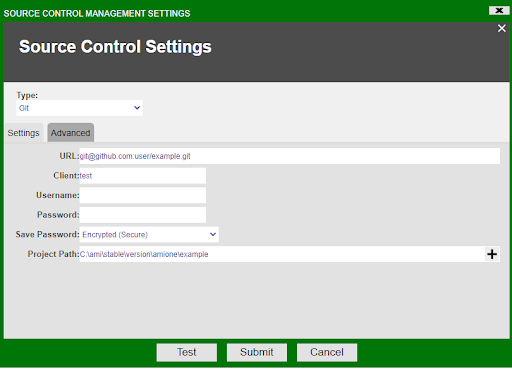
| + | (c). In AMI, open the Source Control Settings <br> | ||
| + | <span class="nowrap"> </span> (i). Select <span style="font-family: Courier New;color: black;"> Account > My Source Control Settings > Type > Git.</span> <br> | ||
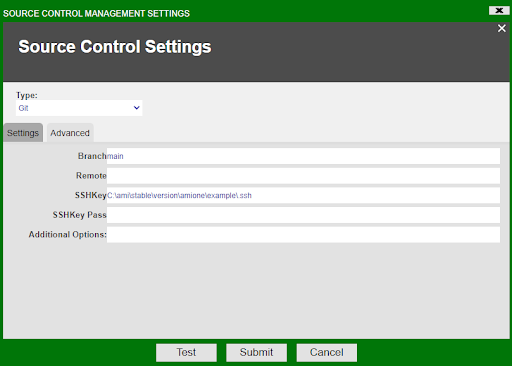
| + | <span class="nowrap"> </span> (ii). Then, fill in the following <span style="font-family: Courier New;color: black;">: URL, Client, Project Path, SSHKey,</span> and <span style="font-family: Courier New;color: black;"> SSHKey Pass </span>. To obtain the respective information, please refer to the clone information from your respective git provider.<br> | ||
| + | <span class="nowrap"> </span> (iii). To specify a branch, go to <span style="font-family: Courier New;color: black;"> Advanced > Branch </span> and enter the branch name. Please note that the default branch the adapter will use is the '''master''' branch.<br> | ||
| + | <span class="nowrap"> </span> (iv). For more information on each field, see Source Control Properties below. <br> | ||
| + | (d). Click on <span style="font-family: Courier New;color: black;"> Submit </span> to clone and connect to the repository.<br> | ||
| + | |||
| + | |||
| + | '''4. Adding & Committing Layouts <br>''' | ||
| + | [[File:Git adapter1.png]] | ||
| + | {| class="wikitable" style="margin:left" | ||
| + | |- | ||
| + | ! Status !! Tracked !! Modified !! Changed | ||
| + | |- | ||
| + | | || All changes to the layout have been '''tracked''' in the repository || Changes to the layout have been tracked '''locally''', but not in the repository || The layout has been '''added''' to the commit stage and is ready to be '''committed''' to the repository | ||
| + | |} | ||
| + | |||
| + | (a). To commit a layout, go to AMI. Select <span style="font-family: Courier New;color: black;"> Dashboard > Included Layouts</span>.<br> | ||
| + | (b). Right click on the layout and select <span style="font-family: Courier New;color: black;">Source Control > Mark For Add.</span> <br> | ||
| + | <span class="nowrap"> </span> (i). To revert this, right click and select <span style="font-family: Courier New;color: black;">Source Control > Revert.</span> <br> | ||
| + | <span class="nowrap"> </span> (ii). If the Source Control option is grayed out, ensure that your layout is saved within the git directory. <br> | ||
| + | (c). Right click and select <span style="font-family: Courier New;color: black;"> Source Control > Commit.</span> <br> | ||
| + | <span class="nowrap"> </span> (i). Enter a commit message into <span style="font-family: Courier New;color: black;"> Comment </span> and press <span style="font-family: Courier New;color: black;"> Commit</span>. Doing so will commit and push changes to the connected repository.<br> | ||
| + | [[File:Git adapter2.png]] | ||
| + | {| class="wikitable" style="margin:left" | ||
| + | |- | ||
| + | ! Property !! Description | ||
| + | |- | ||
| + | | URL || HTTPS / SSH URL to the git repository. | ||
| + | |- | ||
| + | | Client || Client name, e.g. <span style="font-family: Arial;color: black;font-size: 11;"> ''John Smith'' </span> | ||
| + | |- | ||
| + | | Username || Username generated by Repos > Files > Clone > Generate Git Credentials. | ||
| + | |- | ||
| + | | Password || Please use the personal access token generated from Github. | ||
| + | |- | ||
| + | | Save Password || Method used to store the password (personal access token). | ||
| + | |- | ||
| + | | Project Path || Directory to store and modify the git repository. | ||
| + | |- | ||
| + | |} | ||
| + | |||
| + | |||
| + | '''5. Advanced Control Properties <br>''' | ||
| + | [[File:Git adapter3.png]] | ||
| + | {| class="wikitable" style="margin:left" | ||
| + | |- | ||
| + | ! Property !! Description | ||
| + | |- | ||
| + | | Branch || Name of the branch to connect to. Default is '''master''' | ||
| + | |- | ||
| + | | Remote || URL to remote git repository. | ||
| + | |- | ||
| + | | SSHKey || Absolute path to the directory where the key pair is stored | ||
| + | |- | ||
| + | | SSHKey Pass || Passphrase for the private key | ||
| + | |- | ||
| + | | Additional Options || | ||
| + | |} | ||
| + | |||
| + | = Super Filter Layout = | ||
| + | 1. overview <br> | ||
| + | The Super Filter layout provides a simple method for filtering common column values across multiple tables. <br> | ||
| + | |||
| + | 2.Setup<br> | ||
| + | (1). In the layout which you want to use the super filter layout, include the '''SuperFilter.layout''' file through the Included Layouts panel.<br> | ||
| + | (2). Open the '''SuperFilter.layout''' file, and use the '''SuperFilter''' window to pass in a mapping json (see JSON reference) and its corresponding mapping id.<br> | ||
| + | (3). Open your layout and attach a new data model with the following script:<br> | ||
| + | <syntaxhighlight lang="java"> spr_fltr_initTable("PANELNAME", "MAPPINGID", null); </syntaxhighlight> | ||
| + | Where '''PANELNAME''' is the name of the panel containing the super filter and '''MAPPINGID''' is the earlier created id. | ||
| + | (4). Create a new panel in your layout with the name '''PANELNAME''', and attach a table visualization on top of the previously created data model. If everything has been setup correctly, you should see a table '''`SEARCH FIELDS`''' containing your column names.<br> | ||
| + | (5). Finish creating the panel and open the '''AMISCRIPT callbacks''', on the '''onFilterChanging()''' tab, add the following line:<br> | ||
| + | <syntaxhighlight lang="java">spr_fltr_tableFilterSearch(this,null); </syntaxhighlight> | ||
| + | (6). Submit your changes and the filters on the super filter should affect the target tables.<br> | ||
| + | |||
| + | 3. JSON Config<br> | ||
| + | <syntaxhighlight lang="json"> | ||
| + | { | ||
| + | |||
| + | "DmMapping": { | ||
| + | //Table name should correspond to the data model name | ||
| + | "TABLE_A": { | ||
| + | "ColMapping": { | ||
| + | //Column name on the Super Filter | ||
| + | "A": { | ||
| + | //Column name on the table | ||
| + | "ColName": "TABLE_A_A", | ||
| + | //Supported types are: string, long, int, integer (non case sensitive) | ||
| + | "ColType": "String" | ||
| + | }, | ||
| + | "B": { | ||
| + | //Full name on the table if using a JOIN | ||
| + | "ColName": "JOINED_TABLE.B", | ||
| + | "ColType": "String", | ||
| + | } | ||
| + | }, | ||
| + | "TABLE_B": { | ||
| + | "ColMapping": { | ||
| + | "A": { | ||
| + | "ColName": "TABLE_B_A", | ||
| + | "ColType": "String" | ||
| + | } | ||
| + | }, | ||
| + | "TABLE_C": { | ||
| + | "ColMapping": { | ||
| + | "B": { | ||
| + | "ColName": "TABLE_C_B", | ||
| + | "ColType": "String" | ||
| + | } | ||
| + | } | ||
| + | }, | ||
| + | "FormFilterBys": [ | ||
| + | { | ||
| + | //Super Filter column | ||
| + | "FltrDisplay": "A" | ||
| + | }, | ||
| + | { | ||
| + | "FltrDisplay": "B" | ||
| + | |||
| + | //Use Java SimpleDateFormat to parse string into long values | ||
| + | "FormatDate": "dd/MM/yyyy HH:mm:ss", | ||
| + | //Optionally specify timezone, otherwise session default will be used | ||
| + | "FormatTimezone": "UTC" | ||
| + | } | ||
| + | ] | ||
| + | |||
| + | } | ||
| + | |||
| + | </syntaxhighlight> | ||
| + | |||
| + | 4. Supported Usage<br> | ||
| + | On all column types, you can use any of the following syntax for searches<br> | ||
| + | |||
| + | {| class="wikitable" style="margin:left" | ||
| + | |- | ||
| + | ! Input !! Check | ||
| + | |- | ||
| + | | 100 || Equality check | ||
| + | |- | ||
| + | | word || Equality check | ||
| + | |- | ||
| + | | >100 || >=100 numerical check | ||
| + | |- | ||
| + | | >=100 || >=100 numerical check | ||
| + | |- | ||
| + | | <100 || <=100 numerical check | ||
| + | |- | ||
| + | | <=100 || <=100 numerical check | ||
| + | |- | ||
| + | | 100-200|| >= 100 && <= 200 numerical check | ||
| + | |- | ||
| + | | <nowiki>a|b|c</nowiki> || string in “a” “b”, or “c” check | ||
| + | |- | ||
| + | |} | ||
| + | |||
| + | =Managing 3forge AMI for Multiple Environments= | ||
| + | |||
| + | ==Introduction== | ||
| + | 3forge AMI refines the software development life cycle and improves on developers ability to write high impact code. It allows you to make rapid changes and see iterative improvements which need to be maintained overtime. This document provides a general template to manage and ensure that the development of dashboards is properly maintained for multiple environments. | ||
| + | |||
| + | The following components of 3forge AMI will need to be managed: AMI Layouts, the AMI DB Schemas, AMI Config Properties, AMI Datasources, Aeskey, Scripts, AMI Libraries. There are also additional sections in this document which may be useful such as Source Control, and AMI Database persist data files. | ||
| + | |||
| + | ==Environments== | ||
| + | |||
| + | We recommend that development teams create multiple environments as necessary when working with AMI. Here's a recommendation, modify as necessary. | ||
| + | |||
| + | '''DEV''' - This environment is for day to day rapid changes. | ||
| + | |||
| + | '''QA''' - This environment is for promoting DEV changes for testing. | ||
| + | |||
| + | '''UAT''' - This environment should be set up with testing data but production volumes, it is for pre-production testing. | ||
| + | |||
| + | '''PROD''' - This is your production environment. | ||
| + | |||
| + | For each environment you should configure a custom properties file. | ||
| + | |||
| + | Note: You may want to set up a failover production environment to provide a backup server if a production change is not performing as expected. | ||
| + | |||
| + | ===Alternative Folder Structure=== | ||
| + | |||
| + | ''Note: You may to set up the environment folders at the top level, in this document we set up the environment folders at section to show developers how to manage important files.'' | ||
| + | |||
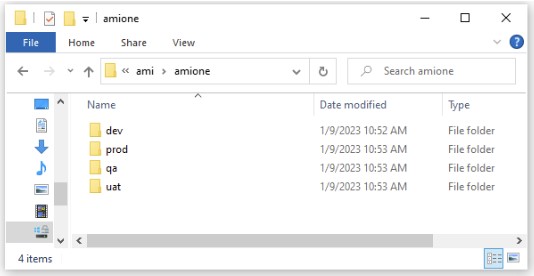
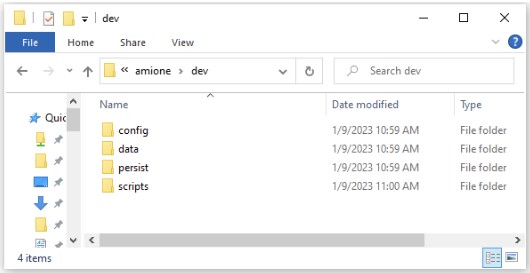
| + | At the root level make as many environment folders as you need. | ||
| + | |||
| + | [[File:Multiple Environments.01.jpg]] | ||
| + | |||
| + | Inside each environment folder, you should create the following subfolders that need to be managed and any additional ones you need. The below is an example. | ||
| + | |||
| + | [[File:Multiple Environments.02.jpg]] | ||
| + | |||
| + | ==Layouts== | ||
| + | |||
| + | One of the key files you need to maintain are the dashboard layouts. These layouts are json files that define how a layout is constructed in the 3forge AMI frontend. | ||
| + | |||
| + | For the purposes of managing multiple environments we will only be using the cloud layouts. | ||
| + | |||
| + | There are three main ways 3forge AMI supports saving files: a local user file, an absolute file, and as a file in your local cloud directory. Local files are where 3forge AMI developers can make and test changes that are only visible to them. Absolute layouts can be saved anywhere on the server's file system. Cloud layouts are shared layouts available to users who have access to them. | ||
| + | |||
| + | ===How to Manage Layout Files for Multiple Environments=== | ||
| + | |||
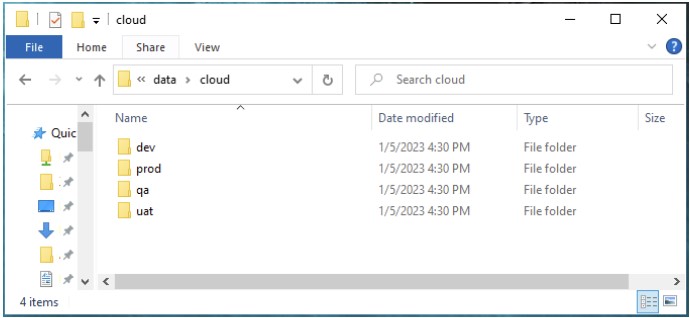
| + | By default cloud layouts are stored in your data/cloud directory. We recommend making a cloud directory for each environment and configuring your AMI instance to use the cloud directory for that environment. | ||
| + | |||
| + | ===Example: Cloud directory structure=== | ||
| + | |||
| + | [[File:Multiple Environments.03.jpg]] | ||
| + | |||
| + | ===Properties=== | ||
| + | |||
| + | ami.cloud.dir=path/to/cloud | ||
| + | |||
| + | ==AMI Database Schemas== | ||
| + | |||
| + | The AMI Database (AMIDB) is a core component of 3forge AMI, it allows you store and cache data for aggregations and analytics. The files that define the schema of AMIDB are amisql files. | ||
| + | |||
| + | There are two types of schema files, one is managed by 3forge AMI which allows the addition of new tables, procedures, triggers, and timers while AMI is running. The other schema files are preconfigured and any tables, procedures, triggers and timers defined in these files cannot be modified. | ||
| + | |||
| + | By default 3forge AMI only starts with the managed schema file located in | ||
| + | |||
| + | <span style="font-family: courier;">data/managed_schema.amisql</span> | ||
| + | |||
| + | ===Schema Structure=== | ||
| + | |||
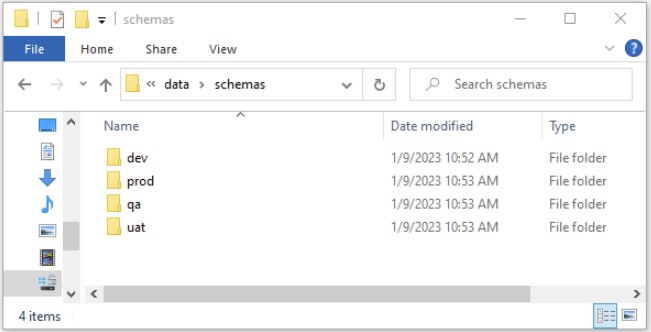
| + | We recommend creating a folder structure like below for managing your schema files across deployments. You should place your managed schemas and config schemas in these folders. | ||
| + | |||
| + | [[File:Multiple Environments.04.jpg]] | ||
| + | |||
| + | ===Properties=== | ||
| + | |||
| + | ami.db.schema.config.files=path/to/configSchema.amisql,path/to/configSchema2... | ||
| + | ami.db.managed.file=path/to/managed_schema.amisql | ||
| + | |||
| + | Note: When defining config files, use a comma delimited format without spaces. | ||
| + | |||
| + | ==Configuration Properties== | ||
| + | |||
| + | Configuration properties are located in your config directory. Each install contains the following default property files, these files should NOT be modified: | ||
| + | |||
| + | <span style="font-family: courier;">root.properties - contains the default included property files | ||
| + | </span> | ||
| + | |||
| + | <span style="font-family: courier;">defaults.properties - contains the default properties</span> | ||
| + | |||
| + | <span style="font-family: courier;">speedlogger.properties - contains the default logging properties</span> | ||
| + | |||
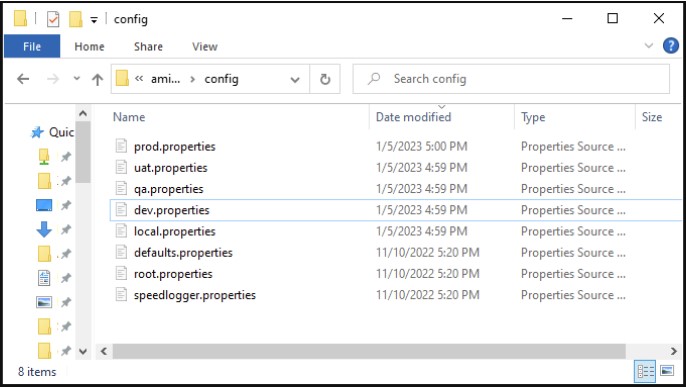
| + | By default 3forge AMI developers should create a local.properties file and place custom properties in it. To configure properties for each environment, they can make separate property files for each environment. | ||
| + | |||
| + | To use those property files they can use the #INCLUDE directive to include that property file. | ||
| + | |||
| + | ===Example: Properties Files=== | ||
| + | |||
| + | [[File:Multiple Environments.05.jpg]] | ||
| + | |||
| + | Note: Using folders is a good way to organize properties by environment | ||
| + | |||
| + | [[File:Multiple Environments.06.jpg]] | ||
| + | |||
| + | ===Properties=== | ||
| + | |||
| + | <pre> | ||
| + | #INCLUDE path/to/env.properties | ||
| + | </pre> | ||
| + | |||
| + | ==Datasources.dat and amikey.aes== | ||
| + | |||
| + | The <span style="font-family: courier;">__DATASOURCE.dat</span> file contains datasource connection properties that 3forge AMI is connected to. Datasource connection details may differ in each environment. That is why datasources are accessed through its name and are pointers to the datasource configuration which contains details such as datasource connection url. | ||
| + | |||
| + | ===Example __DATASOURCE.dat file=== | ||
| + | |||
| + | For example, if the dashboard is connected to a Mysql and a Kdb database, the file will contain two entries containing the connection details. | ||
| + | |||
| + | To make sure 3forge AMI connects to the intended datasources depending on the environment we recommend creating a folder for each environment and place the __DATASOURCE.dat file in them. Lastly we need to edit the environment specific property file to indicate the location of it. | ||
| + | |||
| + | Based on the screenshot below, the property for the dev environment would be: | ||
| + | |||
| + | <pre> | ||
| + | # //Inside dev.properties | ||
| + | ami.db.persist.dir.system.table.__DATASOURCE=persist/dev | ||
| + | </pre> | ||
| + | |||
| + | For prod it would be: | ||
| + | |||
| + | <pre> | ||
| + | # //Inside prod.properties | ||
| + | ami.db.persist.dir.system.table.__DATASOURCE=persist/prod | ||
| + | </pre> | ||
| + | |||
| + | [[File:Multiple Environments.07.jpg]] | ||
| + | |||
| + | ===Amikey.aes=== | ||
| + | It is very important you manage your amikey.aes properly. This key is used for encrypting the connection details for your 3forge AMI datasources. It is recommended you have different amikey.aes keys for each environment. By default the key is located in your persist directory. | ||
| + | |||
| + | This key can be configured through the property: | ||
| + | |||
| + | <span style="font-family: courier;">ami.aes.key.file=path/to/amikey.aes</span> | ||
| + | |||
| + | [[File:Multiple Environments.08.jpg]] | ||
| + | |||
| + | ===Properties=== | ||
| + | <pre> | ||
| + | ami.db.persist.dir.system.table.__DATASOURCE=path/to/datasourcesfolder | ||
| + | ami.aes.key.file=path/to/amikey.aes | ||
| + | </pre> | ||
| + | |||
| + | ==Scripts== | ||
| + | |||
| + | The scripts folder contains the startup scripts for 3forge AMI. We recommend managing your start script in source control if you change or customize the start script. Some examples of why you may modify the start script: change the amount of memory 3forge AMI reserves and change the Java Garbage collector. | ||
| + | |||
| + | ==Libraries (Optional)== | ||
| + | |||
| + | 3forge provides many plugins for connecting to datasources and interfacing with other technologies. By default these libraries get stored in the lib directory. It may be a good practice to enable revision control on the 3forge AMI lib directory especially for production environments if it is necessary to conduct a rollback. | ||
| + | |||
| + | ==Source Control for Layouts== | ||
| + | |||
| + | 3forge provides a source control plugin for AMI layouts. This is set up on the AMI server. We recommend each 3forge AMI Developer to create a separate branch with the developer's userid as the branch name. They should pull from the main branch and merge into the main branch when submitting change | ||
| + | |||
| + | ==Persist Data== | ||
| + | 3forge stores the AMI Database data files by default in the persist folder. This can be configured through the property: <span style="font-family: courier;">ami.db.persist.dir=path/to/your/persist</span>. You do not want to check this into version control as these files can be very large. | ||
| + | |||
| + | ===Properties=== | ||
| + | |||
| + | ami.db.persist.dir=path/to/your/persist | ||
| + | |||
| + | =Log Viewer Layout= | ||
| + | [[File:LogViewer.png|1300px]] | ||
| + | |||
| + | ==Introduction== | ||
| + | 3forge has a log viewer layout that allows developers to quickly understand resource usage across a single session and can also be extremely helpful with diagnosing performance or memory issues. The layout provides charts detailing the following areas: Messages, Memory, Threads, Events, Objects, Web, Web Balancer, Timers, Triggers, and Procedures. | ||
| + | |||
| + | [[File:LogViewer V4-2.txt]] | ||
| + | |||
| + | == How to Use == | ||
| + | |||
| + | 1. download and load this layout via File -> Import (copy and paste the text) OR File -> Upload (file) | ||
| + | |||
| + | 2. Go to Dashboard -> Data Modeler | ||
| + | |||
| + | 3. Edit the existing datasource titled '''AmiLogFile''', give the path to a directory that contains the log files. You can use absolute path or relative path (relative to AMI's root directory) | ||
| + | |||
| + | 5. Click Update Datasource. If successful, it will tell you the number of tables, or files in this case, in the directory. | ||
| + | <br><br> | ||
| + | |||
| + | |||
| + | |||
| + | ===Using '''AmiOne.amilog''' file to see overall diagnostics on AMI=== | ||
| + | |||
| + | 1. In the top left corner, click on the down arrow as seen in the screenshot below. In the drop down, select the .amilog file that you wish to use. | ||
| + | |||
| + | [[File:FileNameArrow.png]] | ||
| + | |||
| + | 2. Feel free to switch between tabs to see different information. You can also adjust the size of the plot/legend by dragging the edge out. | ||
| + | <br><br> | ||
| + | |||
| + | |||
| + | ===Using '''AmiOne.log''' file to view query performance on AMI=== | ||
| + | |||
| + | 1. Go to Windows -> AmiQueriesPerformance | ||
| + | |||
| + | 2. type in the file name that ends in .log, e.g. AmiOne.log | ||
| + | |||
| + | 3. Click on Run Analytics on the right side of the field. | ||
| + | |||
| + | 4. Go to the Performance Charts tab. | ||
| + | |||
| + | 5. You can change the Legends' grouping in the top left panel; filter the chart dots with the bottom left panel. Feel free to sort the table on the bottom panel to suit your needs. | ||
Latest revision as of 18:45, 28 February 2024
Source Control Management
Key Features
Source Control Management (SCM) Integration & Tooling
Integration with GIT and Perforce. Conveniently check-in/out, diff history within the AMI web-based dashboard builder.
Multi-file Linker
Dashboards can be comprised of multiple files meaning components can be logically separated for independent management/version control.
Abstraction
Functionality can be marked virtual and overridden in another file, allowing for dashboard designers to abstract out functionality for custom implementation.
Refactoring Tool
Components can safely be renamed and/or moved between files. The tool automatically updates and moves dependencies as necessary with naming conflict resolution.
Dashboard File Stabilization
Changes to a dashboard result in minimum/localized changes to the underlying file. Components can be set to defaults to avoid noisy/unintended changes.
Benefits
Team Collaboration
By logically dividing a dashboard across files, Teams can simultaneously work on sub-components of the dashboard.
Reusable Components
Scripts, datamodels, widgets and entire dashboards can be written once and then reused across dashboards.
Dashboard Tracking, Versioning, Branching
As AMI files are managed by source control, they can be used to label versions of a dashboard, compare versions and manage branching.
Merging Independent Projects
Existing dashboards can be incorporated into new dashboards making it easy to build super-dashboards cross-incorporating functionality
Enterprise Deployment Strategy
Treat AMI files just like any other resources that are managed through deployment strategies, such as uDeploy, TeamCity, etc.
Dashboard Extension
Extend existing dashboards for regional/business line specific usage without needing to maintain multiple near duplicate dashboards.
Full Backwards Compatibility
File
Loads existing dashboards and automatically converts to the new format. Note: files are still json with the same general structure, just less clutter/redundancy.
Usage
Users & dashboard developers can continue to develop/maintain dashboards without change. Changes are purely additive, existing functionality has not been changed nor removed.
Split Dashboards
Split existing dashboards into separate files for better SCM management.
Combine Dashboards
Utilize multiple existing dashboards to create a single super-dashboard.
Key Concepts
Dashboards vs. Layout
Prior to Source Control Management (SCM), a Dashboard was backed by a single Layout file, so the terms were interchangeable. With SCM, a Dashboard can be an amalgamation of multiple Layout files so the distinction matters:
- Layout: an individual .ami file which contains a set of source definitions such as Panels, Datamodels, Relationships, AmiScript, etc.
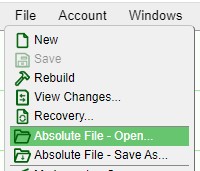
- Dashboard (Root Layout): the .ami file that is directly opened (ex: File > Absolute File - Open) is considered a Dashboard, or more specifically the Root Layout
Included Layouts
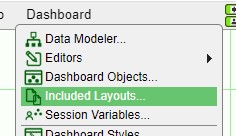
A layout file can also include pointers to other .ami Layout FIles (Dashboard > Included Layouts). This forms a Parent Layout/Child Layout Relationship.
Hidden Panels
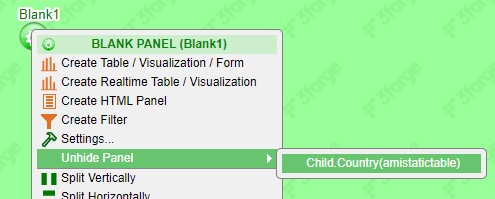
A layout file can define panels that are not directly referenced in the dashboard. If a layout includes a child layout, all of the child layout's panels are hidden by default. In order to make a child layout's panel(s) visible, you need to specifically unhide it (Blank Window > Green Button > Unhide Panel). In effect, this is how linking a panel from one layout to another is achieved.
Getting Started
Please ensure this property is set before continuing: ami.scm.plugins=com.f1.ami.plugins.git.AmiGitScmPlugin
Connecting to Source Control Management (SCM)
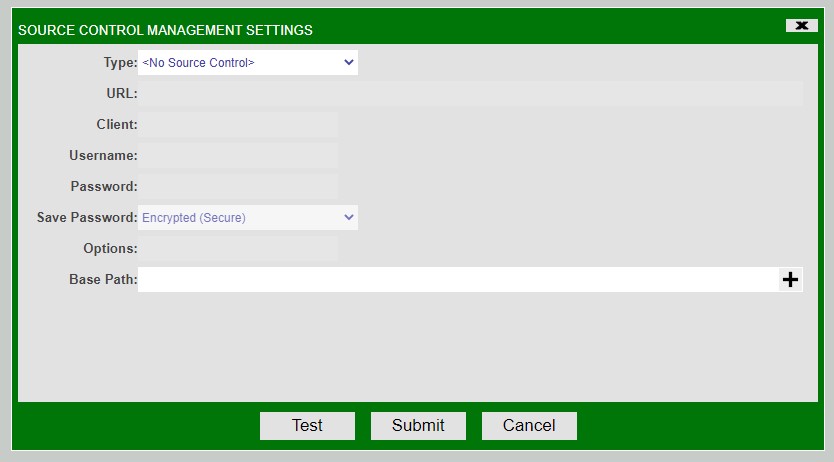
Navigate to Account > Source Control Settings, select the appropriate source control type and fill in your user credentials. The base path tells AMI where it expects files to reside which are managed under source control, including sub directories. (files outside that directory will not have source control functionality)
Loading/Saving Dashboards in SCM
Traditionally, layouts could only be stored under “my layouts” or “cloud”. Now there is an “Absolute” (File > Absolute File - Open) option which allows you to load/save files anywhere on the host. If you wish to use SCM to manage a layout file, it should be located under the SCM base path (Account > Source Control Settings > Base Path). Tip: To move a layout from my layouts into SCM, simply load it (File > My Layouts - Open) and then save it under said SCM base path (File > Absolute File - Save As).
Link multiple files to a dashboard
Open the project browser (Dashboard > Include Files)
To add an existing file:
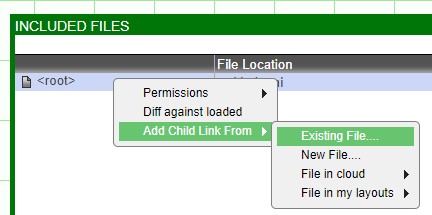
Right click on the project > Add Child Link from > Existing File > select the file to add.
To add a new file:
Right click on the project > Add Child Link From > New File > Enter the name of the new, blank file to create.
Notes:
- The alias defines how objects (panels, datamodels, etc.) within this will be referenced within the main dashboard.
- Read-only: If selected then, you will not be able to save changes made to the objects within the selected file.
- Relative Path: If true, then the file will be referenced using a path relative to the parent file; otherwise it will be an absolute path. Relative is preferred for portability.
Link to a panel from another file
Be sure the other file has been included (see Link Multiple files to a dashboard). Create a blank Panel (Window > New Window), click the blank panel’s green button > unhide panel > choose the panel to display
Refactoring
To Move a panel (and it’s dependent objects) from one file to another, click on the panels green button > Move to Different Layout > select the layout to move the panel to.
Using Source Control
- Open the project Browser (Dashboard > Included Layouts), right click > Add Child Link From > Choose the appropriate action
- To see most recent changes : File > Diff against last save
Additions to Layout Editor
Hiding Panels
Panel's Green Button > Hide Highlighted Panels
Unhiding Panels
Windows > New Window > Green Button > Unhide Panel > Choose panel to unhide (Note, any blank panel can be used to link to a hidden panel
Tab Per Layout
Several Resource editor tools are now organized such that there is one editor panel per layout.
- Custom methods:
- Dashboard > Custom methods…
- Custom css
- Dashboard > Css…
- Custom callbacks
- Dashboard > Callbacks…
Owning Layout
All resources now have the concept of an owning layout:
- Variables:
- Adding/editing global variables now allows you to choose an owning layout (Dashboard > Variables Table… > Right Click > Add/Edit/Copy > Owning Layout)
- Relationships:
- Ability to choose which file owns the relationship (Green Button > Add/Edit Relationship > Owning Layout dropdown).
- Datamodels:
- Dashboard > Datamodeler… > Right Click on Datamodel > Config Tab > Owning Layout
- Panels:
- Green Button -> Move To Different Layout File -> Move To Layout
Data Modeler
There is a list of checkboxes on the left to choose which layout’s datamodels/panels to show (Dashboard -> Datamodeler)
Dashboard Objects
View for seeing all relationships (Dashboard > Dashboard Objects). Note: This was added to allow access to hidden relationships, which is a new concept. A relationship is hidden if its source or target panel’s are hidden.
Advanced Concepts
LAYOUT FILE
Previously an .ami json file was considered a fully-contained dashboard. Now, an .ami file should be thought of as a collection of resources such as panels, datamodels, code, etc. and can contain references to other .ami files. An individual .ami file is referred to as a layout. There are a few key points:
Root Layout
This is the file that was directly loaded (ex: File > Absolute File - Open) and is used as the “bootstrap” to determine which windows are loaded and displayed within the desktop.
Parent/Child Layout Relationship
A layout can include any number of child layouts such that each included layout must have a uniquely identifying alias. Note that the root Layout has no parent
Layout Alias
Each layout (.ami file) within the dashboard is uniquely identified using an alias (note that when you attach a child layout, you are prompted to choose a unique alias). This alias is used to reference objects within the layout.
Layout Nesting
Because layouts can recursively include other layouts, it’s possible to have child layouts, grandchild layouts, etc. In this case the alias is constructed by dotconcatenation, ex: a.b.c
Complex Nesting
Circular references are not supported (ex; A.ami -> B.ami -> A.ami). Diamond references are supported (A.ami -> B.ami -> C.ami & A.ami -> D.ami -> C.ami).
Read-only/Locked
A layout file can be marked as read-only (Dashboard > Included Layouts > (right click) > Permissions). If the same file is referenced multiple times (as with the diamond pattern) then only one instance will be editable, and the others will be locked.
ALIAS-DOT-NAME (ADN)
Previously, all panels where identified by a unique panel ID. Now, uniqueness is enforced by combining a panel’s owning layout’s fully qualified alias plus the Panel Id. Same goes for uniquely identifying datamodels and relationships.
SCOPING
Parent layouts have access to the resources of child layouts but child layouts do not have visibility to parent objects. This is an important concept that enforces clean modularization.
CUSTOM AMISCRIPT METHODS & VARIABLE SCOPING
Because a dashboard can incorporate multiple layout files, it’s possible for the same method definition to exist in duplicate. Depending on where the AmiScript is getting executed, the appropriate version of the method will be run. For example, a parent layout could import two child layouts, each with their own onButton() method. Datamodels (or other resources) in child1 calling onButton() will get child1’s method and Datamodels in child2 calling onButton() will get child2’s version of the method. A subtle detail, if the parent layout did not define its own onButton() method and were to call onButton(), it will get the child with the higher priorities version… (See Dashboard > Included Layouts > (right click) > Move Up Higher Priority/Move Down Lower Priority)
AMISCRIPT LAYOUT OBJECT
A new, important Layout class has been introduced, which is used to represent each layout file loaded within the dashboard. The layout variable is automatically visible within AmiScript (like the session variable) and is associated with the layout that the AmiScript is owned by. This is important because it maintains relative consistency when referencing other objects with AmiScript. Note, this has replaced several methods from the session class and when loading old layouts AMI will automatically convert the code to use the layout object instead.
For example, let’s consider a layout B.ami that has two datamodels dm1 and dm2:
B.ami
→dm1
→dm2
Inside dm1, if we want to get access to dm2 we would write:
//I’m inside dm1 Datamodel dm2=layout.getDatamodel(“dm2”);
Say that we have another layout A.ami that includes B.ami with the alias b and has its own datamodel dm0:
A.ami
→dm0
→b
→dm1
→dm2
First, keep in mind the above code will continue to work because its inside dm1 which is owned by layout b so the layout instant represents b. But now, let’s say we want to get dm2 from code inside dm0. We could do either of these:
//I’m inside dm0, all three of these result in same value
Datamodel dm2;
dm2=layout.getChild(“b”).
getDatamodel(“dm2”);
dm2=layout.getDatamodel(“b.dm2”);
dm2=layout.getDatamodel(“b.dm1”).
getLayout().getDatamodel(“dm2”);
The 3rd method is needlessly complex but highlights the relative nature of layouts and resources… We’re grabbing b’s dm1 datamodel. Then because dm1 and dm2 are in the same layout we can simply do getLayout(). getDatamodel(“dm2”) on dm1.
VIRTUAL METHODS
With regards to scoping, it was mentioned that AmiScript within a child layout does not have access to it’s parent’s AmiScript. While generally true, if the layout were to explicitly define a function as virtual and the parent layout were to also define the same method, then the parent’s function will get called instead. In the example below, if we were to call doit() in the child layout, we would see the alerts parent1 and child2 because test1() was marked as virtual, but test2 was not:
Child Layout:
virtual String test1() {
     session.alert(“child1”);
}
String test2() {
     session.alert(“child2”);
}
Object doit() {
     test1();
     test2();
}
Root Layout:
String test1() {
     session.alert(“parent1”);
}
String test2() {
     session.alert(“parent2”);
}
Connecting to an Excel Datasource
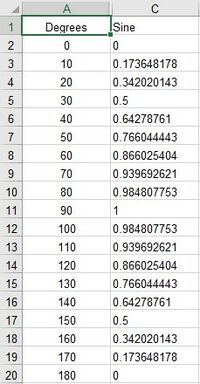
Our goal in this tutorial is to import excel data into AMI and create a visualization. In this example we have an Excel spreadsheet, sine.xlsx, with two columns: Degrees and Sine.
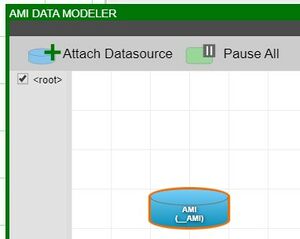
1. The first step is to add a new Excel Datasource. In developer mode, click on Dashboard from the menu and open the Data Modeler.
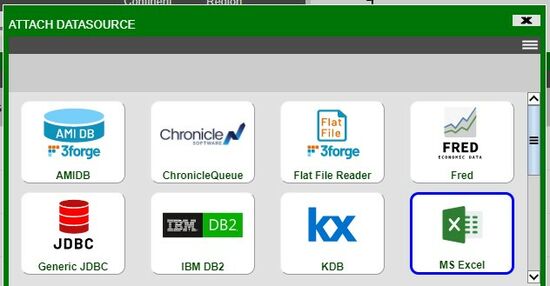
2. Inside the Data Modeler, click on Attach Datasource. This will bring up the Attach Datasource Window. Select the MS Excel icon from the list of available datasource types.
3. In the provided fields, fill out the Name and URL fields. In the Name field, put in the desired name of the new datasource. And in the URL field, provide the full file name (including the path) of the Excel file.
(Warning: prior to adding as a datasource, the Excel file must be closed and saved)
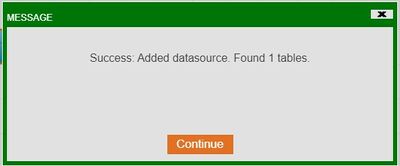
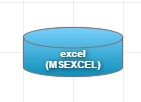
4. The successful addition of the MS Excel datasource will be confirmed with a prompt and the appearance of the Excel datasource in the Data Modeler
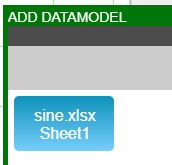
(Note: each sheet in the Excel file will be added as a table to the datasource)
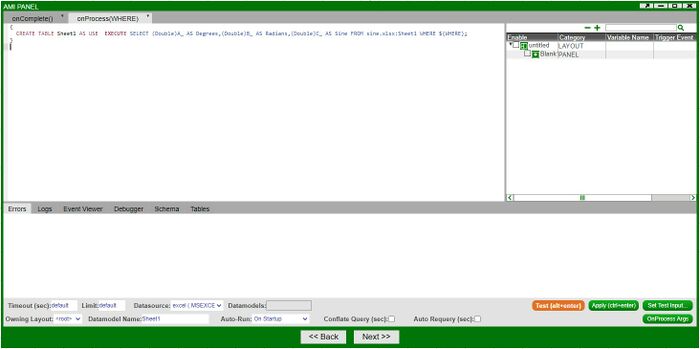
5. Double click on the datasource (or right-click and select Add Datamodel to excel) in order to see the tables under the datasource. Select the table and follow the wizard in order to create a datamodel
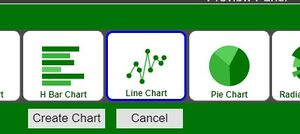
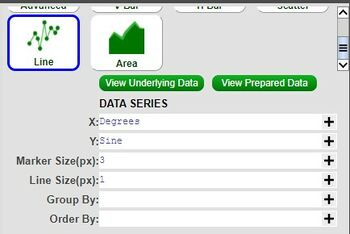
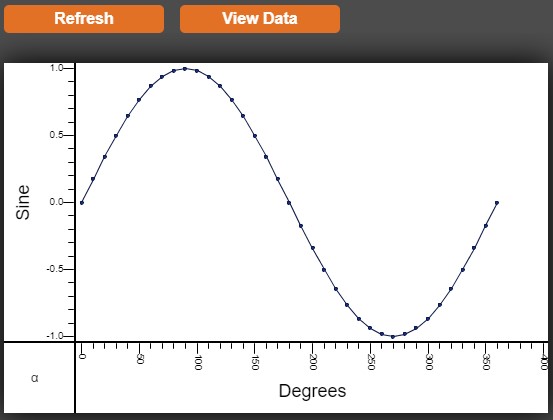
6. Once the datamodel is created, we can create a visualization (please refer to GUI > Creating Your First Visualization). In this example, we will create a line chart. In the wizard, select the appropriate variables for the X and Y axis (i.e, X: Degree, Y: Sine)
(Hint: on the right side of the wizard, click Refresh to get a preview of the chart or View Data in order to view the data that is being used)
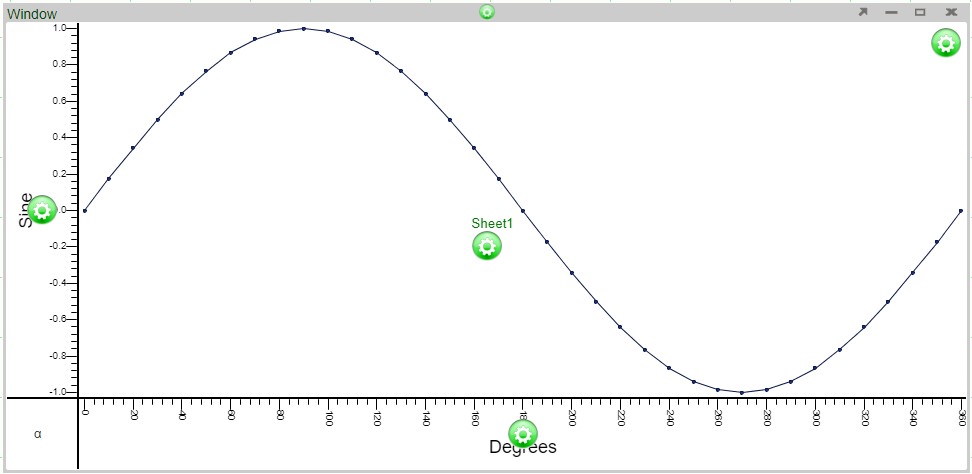
7. Click Finish in order to create the line chart based on the data in our Excel sheet
AMI WebManager User Guide
The AMI WebManager is a centralized server for deployments with multiple AMI Web Servers. Its purpose is to store and send requested layouts and preferences. The WebManager is used in conjunction with AMI Web Servers or the AMI WebBalancer. See the WebBalancer User Guide for more details.
Setup for AmiWeb Manager
1. Download AMIOne
2. Navigate to the installation directory and open amione/config/local.properties
a. If does not exist local.properties, manually create it in amione/config
3. For a minimal configuration, add the following properties:
# Starts up AMI WebManager
ami.components
# If true, file requests to parent directories are rejected
ami.webmanager.mapping.strict=true
# Assign port number
ami.webmanager.port=WEBMANAGER_PORT
4. Additional configuration properties are:
# Working directory for the WebManager
# Default is amione directory
ami.webmanager.mapping.pwd=WORKING_DIR
# Maps alias/logical name to directory
# Key=value comma-delimited list
ami.webmanager.mapping.roots=/ALIAS=PATH,[…]
For more details on the configuration properties, refer to the WebManager Configuration Properties.
Required Configuration for AMI Web Servers
Establishing a connection between an AMI Web Server and AMI WebManager will require additional configuration properties. To do so,
1. Navigate to the AMI Web Server installation directory and open amione/config/local.properties
2. Add the following properties:
# Default host is localhost
ami.webmanager.host=WEBMANAGER_HOST
ami.webmanager.port=WEBMANAGER_PORT
AMI WebBalancer User Guide
The AMI WebBalancer is a server that routes users to various AMI Web Servers. The purpose of using the AMI WebBalancer is to distribute the web load across multiple AMI Web Servers. The AMI WebBalancer is usually setup along with an AMI WebManager, see the AMI WebManager User Guide for more information.
Setup
1. Download and Install AMIOne
2. Navigate to the installation directory and open amione/config/local.properties
- If not found local.properties, manually create it in amione/config
3. Add the following properties:
# Starts up AMI WebBalancer
ami.components=webbalancer
# Routing file for AMI WebBalancer
# Default path isdata/webbalancer.routes
ami.webbalancer.routes.file=FILE_NAME
The routing file contains a list of rules for mapping IP addresses to AMI Web Servers.
Above is the minimal configuration for the AMI WebBalancer. For more details on configuration properties, refer to the WebBalancer Configuration Properties.
For more details on routing, refer to the WebBalancer.routes documentation.
Reference Links
WebBalancer Configuration Properties
Instructions for Using Python with AMI Script
How to load Python Modules in AMI Script
To import python modules, place the import statements inside the python extern block.
By default AMI looks for Python Libraries in the lib/Lib directory of amione.
Alternatively, you can also set the JYTHONPATH environmental variable and AMI will load libraries from there.
{
 CREATE TABLE _TABLE AS USE EXECUTE SELECT TableName, Broadcast, RefreshPeriodMs, SourceTableNames, PersistEngine, OnUndefColumn, DefinedBy FROM __TABLE WHERE ${WHERE};

  double n = 0;
  extern python {{
    import math
    n = math.pow(2,3)
  }};
  session.log(n);
}
How to use Python in AMI Script
Below is an example of how you can pass in variables and tables and modify and return them:
{
 CREATE TABLE inTable AS USE ds=AMI EXECUTE SELECT * FROM __TABLE;
 //INPUT VARIABLES
 String findEngine="TEXT";
 Table inTable=select * from inTable;
 //OUTPUT VARIABLES
 int foundCount;
 Table outTable=new Table("out","Name String");
 //Loop through each row of inTable and add TableName to outTable for records that have a PersistEngine equal to findEngine Variable
 //foundCount is incremented for each record added to outTable
 extern python{{
   foundCount = 0
   for row in inTable.getRows():
     if(row.get("PersistEngine") == "TEXT"):
       outTable.getRows().add(outTable.newRow(row.get("TableName")))
       foundCount+=1
 }};
 create table outTable=outTable;
 session.log("found: "+foundCount);
}
Using JDBC adapter to connect to AMIDB
Sample JDBC connection to AMI Center
import java.sql.*;
public class AmiJdbcSample {
//IMPORTANT NOTE: be sure to include out.jar in your java classpath. The out.jar file is located in the lib folder of your ami installation
    public static final String NEW_LINE = System.getProperty("line.separator");
    public static void main(String a[]) throws SQLException, ClassNotFoundException {
        Class.forName("com.f1.ami.amidb.jdbc.AmiDbJdbcDriver");
        final String url = "jdbc:amisql:localhost:3280?username=demo&password=demo123";
        final Connection conn = DriverManager.getConnection(url);
        try {
            final ResultSet rs = conn.createStatement().executeQuery("select * from __TABLE");
            System.out.println(resultSetToString(rs));
        } finally {
            conn.close();
        }
    }
    public static String resultSetToString(ResultSet rs) throws SQLException {
        final StringBuilder r = new StringBuilder();
        final ResultSetMetaData metaData = rs.getMetaData();
        final int columnCount = metaData.getColumnCount();
        for (int i = 1; i <= columnCount; i++)
            r.append(metaData.getColumnName(i)).append(i == columnCount ? NEW_LINE : "\t");
        while (rs.next())
            for (int i = 1; i <= columnCount; i++)
                r.append(rs.getObject(i)).append(i == columnCount ? NEW_LINE : "\t");
        return r.toString();
    }
}
Example: Connection to AMI Center from DBeaver
1. Add driver configuration in DBeaver
(a). Go to Database -> Driver Manager, Open driver manager dialogue and click New
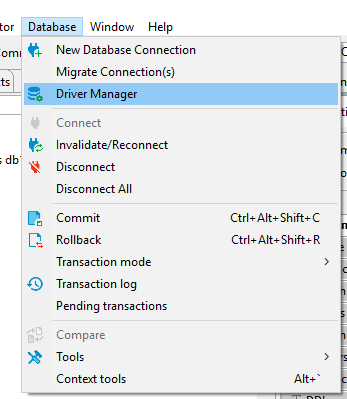
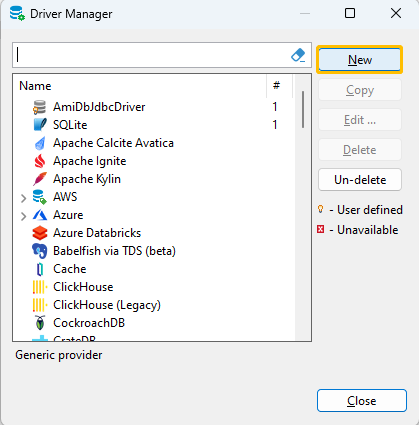
(b). Configure the AMIDbJdbcDriver
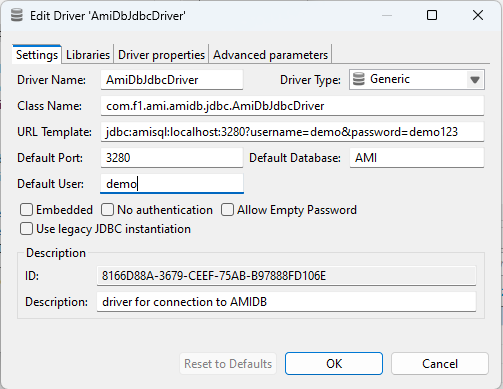
| Parameter | Description | Example |
|---|---|---|
| Driver Name | Name of your driver. It can be any name you like | AmiDbJdbcDriver |
| Driver Type | Driver Provider | Generic |
| Class Name | JDBC driver class name | com.f1.ami.amidb.jdbc.AmiDbJdbcDriver |
| URL Template | Template of driver URL, should follow the format like: jdbc:amisql:<host>:<jdbc port><login details> | jdbc:amisql:localhost:3280?username=demo&password=demo123 |
| Default Port | Default AMI JDBC port is 3280 | 3280 |
| Default Database | Default database is AMI | AMI |
| Default User | Default user name is demo | demo |
| Description | Description of the driver | driver for connection to AMIDB |
(c). Go to Libraries tab and add the out.jar file(/amione/lib/out.jar) into it and hit ok
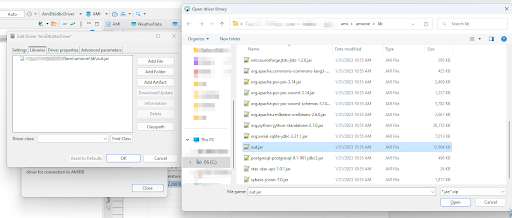
2. Establish Database Connection With the AMIDbJdbc Driver
(a). Go to Database -> New Database Connection and select the AMIDbJdbc driver we just configured
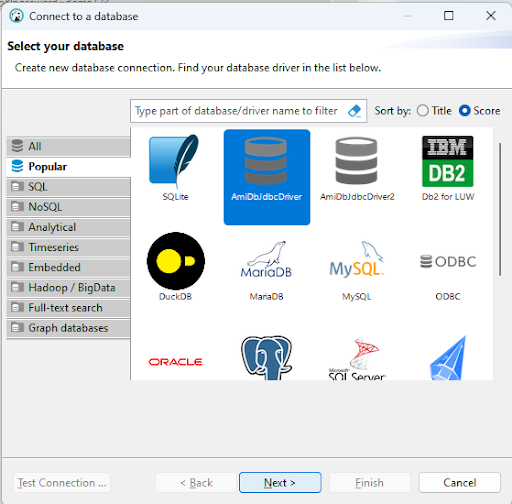
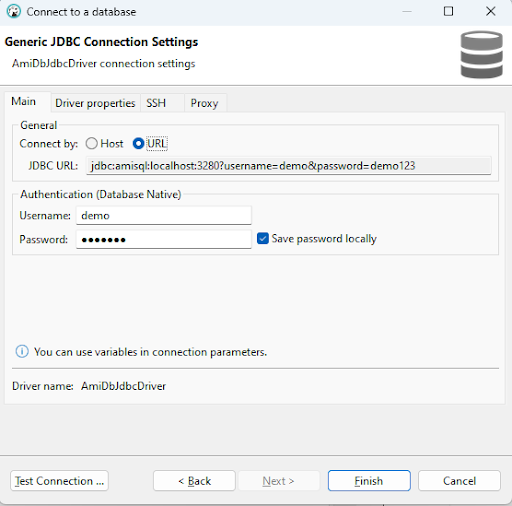
(b). Enter the URL and your login information.
Your AMI Database is ready to go.
Using JayDeBeApi - Python JDBC Adapter for AMI
Prerequisites: A jre (Java runtime environment, for JDBC) needs to be installed.
1. Install the JayDeBeApi module.
JayDeBeApi is an adapter of JDBC for python. You can install it using pip:
pip install JayDeBeApi
Alternative ways to install JayDeBeApi: https://pypi.org/project/JayDeBeApi/
2. Start AMI One
3. Connect to amisql from python:
a. You’ll need the path to the out.jar file. This can be found in the ami/amione/lib folder.
b. Find the server hostname and ami.db.jdbc.port (default is 3280).
c. Copy this script, replacing the <placeholders> with appropriate values:
import jaydebeapi
conn =
jaydebeapi.connect( "com.f1.ami.amidb.jdbc.AmiDbJdbcDriver",
"jdbc:amisql:<hostname>:<port>", {"user": "<username>",
"password": "<password>"}, "<path/to/out.jar>")
4. To run queries, create a cursor:
curs = conn.cursor()
5. Queries can then be executed using the execute method:
curs.execute ("show tables")
6. Results are fetched using the fetchall method, which returns a list:
print(curs.fetchall())
7. Close the cursor once finished:
curs.close()
You can also execute queries within a with block for the cursor so you don’t have to worry about closing it:
with conn.cursor() as curs:
curs.execute("show tables")
result = curs.fetchall()
AMI Git Adapter User Guide
1. Setup
(a). Create an account on any git-based code hosting framework and initialize a git repository.
(b). Download and unzip the git adapter, then copy and paste its contents into amione/lib .
(c). Inside local.properties, add the following property:
ami.scm.plugins=com.f1.ami.plugins.git.AmiGitScmPlugin
(d). Start/Restart AMI and verify that you can now see the Source Control settings at Account > My Source Control Settings .
(e). Please follow either the HTTPS Connection guide or SSH Connection guide below depending on your repository’s security configuration.
2. HTTPS Connection
(a). In AMI, open the Source Control Settings
(i). Select Account > My Source Control Settings > Type > Git .
(ii). Then, fill in the following: URL, Client, Username, Password (Personal Access Token), and Project Path. To obtain the respective information, please refer to the clone information from your respective git provider.
(iii). To specify a branch, go to Advanced > Branch and enter the branch name. Please note that the default branch the adapter will use is the master branch.
(iv). For more information on each field, see Source Control Properties below.
(b). Press Submit to clone and connect to the repository.
3. SSH Connection
(a). Generate a SSH key pair file in your SSHKey directory.
(i).Please follow your git repository’s guide on creating a key pair. The default key name id_rsa is no longer supported. Please use ed25519.
(b). Upload the public key data to your git-based framework. Please refer to your provider’s setup instructions.
(c). In AMI, open the Source Control Settings
(i). Select Account > My Source Control Settings > Type > Git.
(ii). Then, fill in the following : URL, Client, Project Path, SSHKey, and SSHKey Pass . To obtain the respective information, please refer to the clone information from your respective git provider.
(iii). To specify a branch, go to Advanced > Branch and enter the branch name. Please note that the default branch the adapter will use is the master branch.
(iv). For more information on each field, see Source Control Properties below.
(d). Click on Submit to clone and connect to the repository.
4. Adding & Committing Layouts
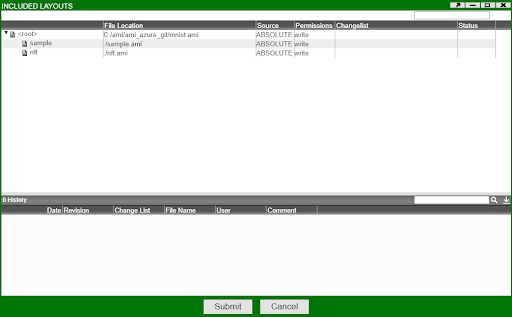
| Status | Tracked | Modified | Changed |
|---|---|---|---|
| All changes to the layout have been tracked in the repository | Changes to the layout have been tracked locally, but not in the repository | The layout has been added to the commit stage and is ready to be committed to the repository |
(a). To commit a layout, go to AMI. Select Dashboard > Included Layouts.
(b). Right click on the layout and select Source Control > Mark For Add.
(i). To revert this, right click and select Source Control > Revert.
(ii). If the Source Control option is grayed out, ensure that your layout is saved within the git directory.
(c). Right click and select Source Control > Commit.
(i). Enter a commit message into Comment and press Commit. Doing so will commit and push changes to the connected repository.
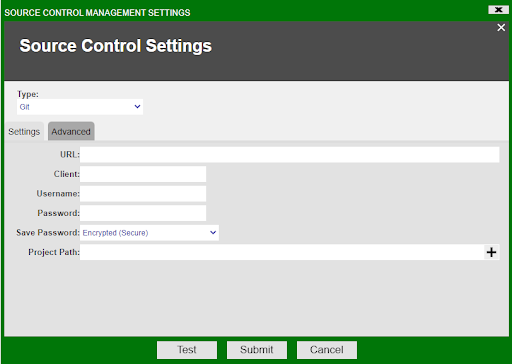
| Property | Description |
|---|---|
| URL | HTTPS / SSH URL to the git repository. |
| Client | Client name, e.g. John Smith |
| Username | Username generated by Repos > Files > Clone > Generate Git Credentials. |
| Password | Please use the personal access token generated from Github. |
| Save Password | Method used to store the password (personal access token). |
| Project Path | Directory to store and modify the git repository. |
5. Advanced Control Properties
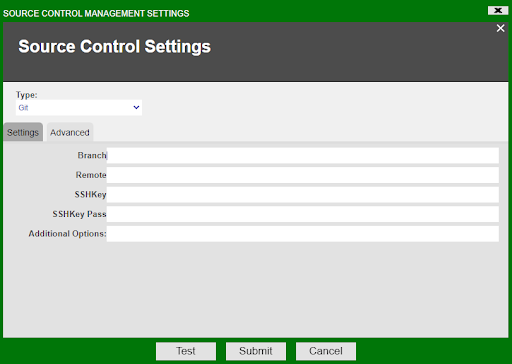
| Property | Description |
|---|---|
| Branch | Name of the branch to connect to. Default is master |
| Remote | URL to remote git repository. |
| SSHKey | Absolute path to the directory where the key pair is stored |
| SSHKey Pass | Passphrase for the private key |
| Additional Options |
Super Filter Layout
1. overview
The Super Filter layout provides a simple method for filtering common column values across multiple tables.
2.Setup
(1). In the layout which you want to use the super filter layout, include the SuperFilter.layout file through the Included Layouts panel.
(2). Open the SuperFilter.layout file, and use the SuperFilter window to pass in a mapping json (see JSON reference) and its corresponding mapping id.
(3). Open your layout and attach a new data model with the following script:
spr_fltr_initTable("PANELNAME", "MAPPINGID", null);
Where PANELNAME is the name of the panel containing the super filter and MAPPINGID is the earlier created id.
(4). Create a new panel in your layout with the name PANELNAME, and attach a table visualization on top of the previously created data model. If everything has been setup correctly, you should see a table `SEARCH FIELDS` containing your column names.
(5). Finish creating the panel and open the AMISCRIPT callbacks, on the onFilterChanging() tab, add the following line:
spr_fltr_tableFilterSearch(this,null);
(6). Submit your changes and the filters on the super filter should affect the target tables.
3. JSON Config
{

     "DmMapping": {
        //Table name should correspond to the data model name
        "TABLE_A": {
            "ColMapping": {
                //Column name on the Super Filter
                "A": {
                    //Column name on the table
                    "ColName": "TABLE_A_A",
                    //Supported types are: string, long, int, integer (non case sensitive)
                    "ColType": "String"
                },
                "B": {
                    //Full name on the table if using a JOIN
                    "ColName": "JOINED_TABLE.B",
                    "ColType": "String",
                }
        },
        "TABLE_B": {
            "ColMapping": {
                "A": {
                    "ColName": "TABLE_B_A",
                    "ColType": "String"
                }
        },
        "TABLE_C": {
            "ColMapping": {
                "B": {
                    "ColName": "TABLE_C_B",
                    "ColType": "String"
                }
        }
    },
    "FormFilterBys": [
        {
            //Super Filter column
            "FltrDisplay": "A"
        },
        {
            "FltrDisplay": "B"

	//Use Java SimpleDateFormat to parse string into long values
"FormatDate": "dd/MM/yyyy HH:mm:ss",
//Optionally specify timezone, otherwise session default will be used
"FormatTimezone": "UTC"
        }
                     ]

}
4. Supported Usage
On all column types, you can use any of the following syntax for searches
| Input | Check |
|---|---|
| 100 | Equality check |
| word | Equality check |
| >100 | >=100 numerical check |
| >=100 | >=100 numerical check |
| <100 | <=100 numerical check |
| <=100 | <=100 numerical check |
| 100-200 | >= 100 && <= 200 numerical check |
| a|b|c | string in “a” “b”, or “c” check |
Managing 3forge AMI for Multiple Environments
Introduction
3forge AMI refines the software development life cycle and improves on developers ability to write high impact code. It allows you to make rapid changes and see iterative improvements which need to be maintained overtime. This document provides a general template to manage and ensure that the development of dashboards is properly maintained for multiple environments.
The following components of 3forge AMI will need to be managed: AMI Layouts, the AMI DB Schemas, AMI Config Properties, AMI Datasources, Aeskey, Scripts, AMI Libraries. There are also additional sections in this document which may be useful such as Source Control, and AMI Database persist data files.
Environments
We recommend that development teams create multiple environments as necessary when working with AMI. Here's a recommendation, modify as necessary.
DEV - This environment is for day to day rapid changes.
QA - This environment is for promoting DEV changes for testing.
UAT - This environment should be set up with testing data but production volumes, it is for pre-production testing.
PROD - This is your production environment.
For each environment you should configure a custom properties file.
Note: You may want to set up a failover production environment to provide a backup server if a production change is not performing as expected.
Alternative Folder Structure
Note: You may to set up the environment folders at the top level, in this document we set up the environment folders at section to show developers how to manage important files.
At the root level make as many environment folders as you need.
Inside each environment folder, you should create the following subfolders that need to be managed and any additional ones you need. The below is an example.
Layouts
One of the key files you need to maintain are the dashboard layouts. These layouts are json files that define how a layout is constructed in the 3forge AMI frontend.
For the purposes of managing multiple environments we will only be using the cloud layouts.
There are three main ways 3forge AMI supports saving files: a local user file, an absolute file, and as a file in your local cloud directory. Local files are where 3forge AMI developers can make and test changes that are only visible to them. Absolute layouts can be saved anywhere on the server's file system. Cloud layouts are shared layouts available to users who have access to them.
How to Manage Layout Files for Multiple Environments
By default cloud layouts are stored in your data/cloud directory. We recommend making a cloud directory for each environment and configuring your AMI instance to use the cloud directory for that environment.
Example: Cloud directory structure
Properties
ami.cloud.dir=path/to/cloud
AMI Database Schemas
The AMI Database (AMIDB) is a core component of 3forge AMI, it allows you store and cache data for aggregations and analytics. The files that define the schema of AMIDB are amisql files.
There are two types of schema files, one is managed by 3forge AMI which allows the addition of new tables, procedures, triggers, and timers while AMI is running. The other schema files are preconfigured and any tables, procedures, triggers and timers defined in these files cannot be modified.
By default 3forge AMI only starts with the managed schema file located in
data/managed_schema.amisql
Schema Structure
We recommend creating a folder structure like below for managing your schema files across deployments. You should place your managed schemas and config schemas in these folders.
Properties
ami.db.schema.config.files=path/to/configSchema.amisql,path/to/configSchema2... ami.db.managed.file=path/to/managed_schema.amisql
Note: When defining config files, use a comma delimited format without spaces.
Configuration Properties
Configuration properties are located in your config directory. Each install contains the following default property files, these files should NOT be modified:
root.properties - contains the default included property files
defaults.properties - contains the default properties
speedlogger.properties - contains the default logging properties
By default 3forge AMI developers should create a local.properties file and place custom properties in it. To configure properties for each environment, they can make separate property files for each environment.
To use those property files they can use the #INCLUDE directive to include that property file.
Example: Properties Files
Note: Using folders is a good way to organize properties by environment
Properties
#INCLUDE path/to/env.properties
Datasources.dat and amikey.aes
The __DATASOURCE.dat file contains datasource connection properties that 3forge AMI is connected to. Datasource connection details may differ in each environment. That is why datasources are accessed through its name and are pointers to the datasource configuration which contains details such as datasource connection url.
Example __DATASOURCE.dat file
For example, if the dashboard is connected to a Mysql and a Kdb database, the file will contain two entries containing the connection details.
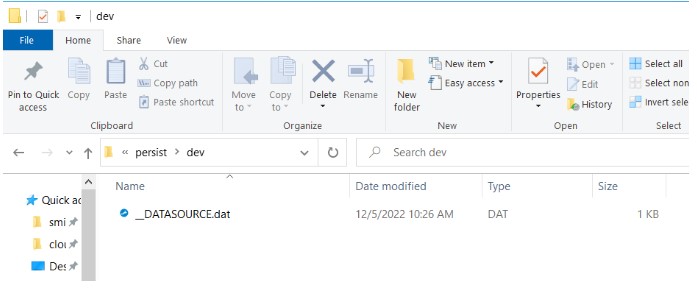
To make sure 3forge AMI connects to the intended datasources depending on the environment we recommend creating a folder for each environment and place the __DATASOURCE.dat file in them. Lastly we need to edit the environment specific property file to indicate the location of it.
Based on the screenshot below, the property for the dev environment would be:
# //Inside dev.properties
ami.db.persist.dir.system.table.__DATASOURCE=persist/dev
For prod it would be:
# //Inside prod.properties
ami.db.persist.dir.system.table.__DATASOURCE=persist/prod
Amikey.aes
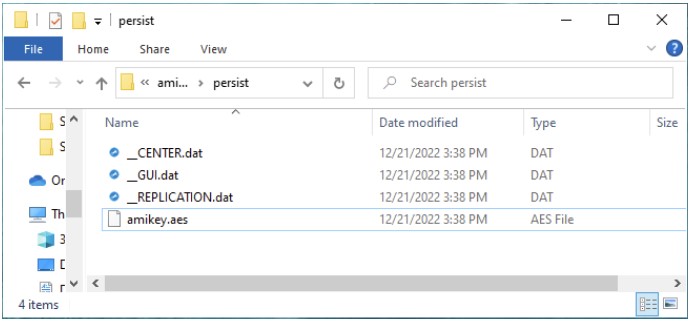
It is very important you manage your amikey.aes properly. This key is used for encrypting the connection details for your 3forge AMI datasources. It is recommended you have different amikey.aes keys for each environment. By default the key is located in your persist directory.
This key can be configured through the property:
ami.aes.key.file=path/to/amikey.aes
Properties
ami.db.persist.dir.system.table.__DATASOURCE=path/to/datasourcesfolder
ami.aes.key.file=path/to/amikey.aes
Scripts
The scripts folder contains the startup scripts for 3forge AMI. We recommend managing your start script in source control if you change or customize the start script. Some examples of why you may modify the start script: change the amount of memory 3forge AMI reserves and change the Java Garbage collector.
Libraries (Optional)
3forge provides many plugins for connecting to datasources and interfacing with other technologies. By default these libraries get stored in the lib directory. It may be a good practice to enable revision control on the 3forge AMI lib directory especially for production environments if it is necessary to conduct a rollback.
Source Control for Layouts
3forge provides a source control plugin for AMI layouts. This is set up on the AMI server. We recommend each 3forge AMI Developer to create a separate branch with the developer's userid as the branch name. They should pull from the main branch and merge into the main branch when submitting change
Persist Data
3forge stores the AMI Database data files by default in the persist folder. This can be configured through the property: ami.db.persist.dir=path/to/your/persist. You do not want to check this into version control as these files can be very large.
Properties
ami.db.persist.dir=path/to/your/persist
Log Viewer Layout
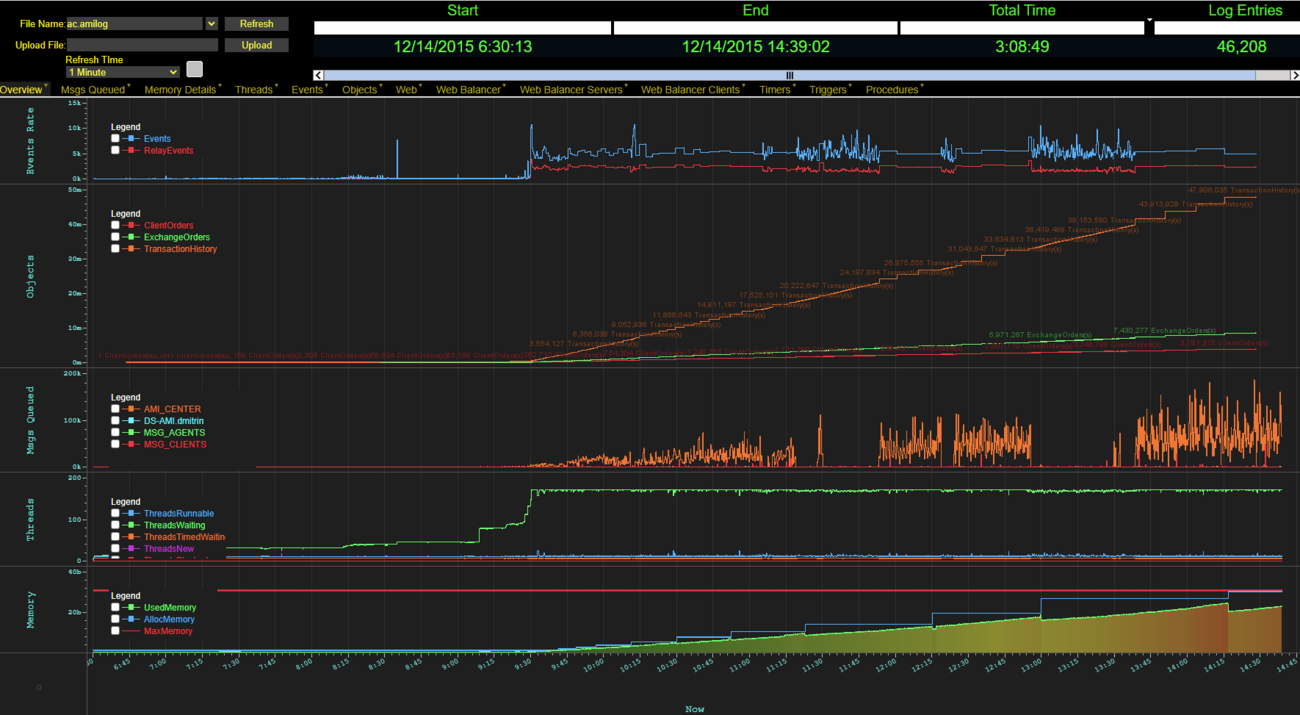
Introduction
3forge has a log viewer layout that allows developers to quickly understand resource usage across a single session and can also be extremely helpful with diagnosing performance or memory issues. The layout provides charts detailing the following areas: Messages, Memory, Threads, Events, Objects, Web, Web Balancer, Timers, Triggers, and Procedures.
How to Use
1. download and load this layout via File -> Import (copy and paste the text) OR File -> Upload (file)
2. Go to Dashboard -> Data Modeler
3. Edit the existing datasource titled AmiLogFile, give the path to a directory that contains the log files. You can use absolute path or relative path (relative to AMI's root directory)
5. Click Update Datasource. If successful, it will tell you the number of tables, or files in this case, in the directory.
Using AmiOne.amilog file to see overall diagnostics on AMI
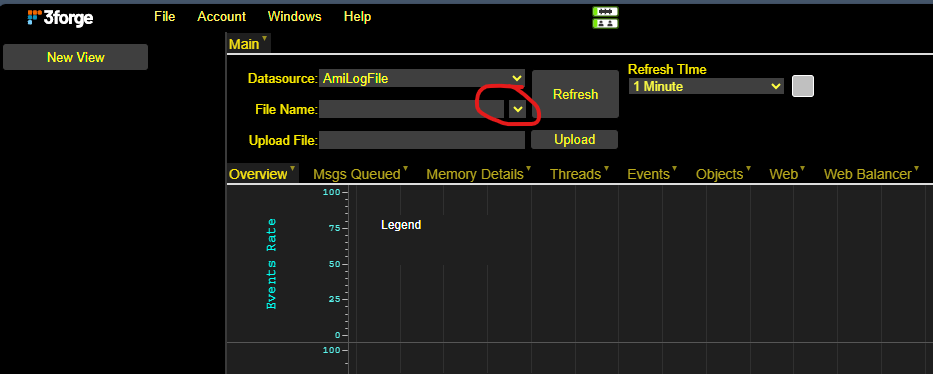
1. In the top left corner, click on the down arrow as seen in the screenshot below. In the drop down, select the .amilog file that you wish to use.
2. Feel free to switch between tabs to see different information. You can also adjust the size of the plot/legend by dragging the edge out.
Using AmiOne.log file to view query performance on AMI
1. Go to Windows -> AmiQueriesPerformance
2. type in the file name that ends in .log, e.g. AmiOne.log
3. Click on Run Analytics on the right side of the field.
4. Go to the Performance Charts tab.
5. You can change the Legends' grouping in the top left panel; filter the chart dots with the bottom left panel. Feel free to sort the table on the bottom panel to suit your needs.
