Difference between revisions of "AMI Set Up"
Robert Cooke (talk | contribs) |
Wesley Chen (talk | contribs) m (Add detached mode arg) |
||
| (57 intermediate revisions by 8 users not shown) | |||
| Line 1: | Line 1: | ||
| + | =Introduction= | ||
| + | |||
| + | <big>3forge AMI is a high performance platform for developers to rapidly build enterprise applications and solutions.</big> | ||
| + | |||
| + | <big>With the power of 3forge, your ingenuity and exceptionalism is amplified. 3forge AMI will help you meet the needs of your users in a fraction of the time and will help you roll-out a harmonized GUI strategy.</big> | ||
| + | |||
| + | |||
| + | ''This page will go through the necessary steps to get started with using 3forge AMI.'' | ||
| + | |||
| + | =Registering an account on 3forge Website= | ||
| + | |||
| + | 1. Visit https://3forge.com/signup.html to create an account if you do not already have one for your current organization. | ||
| + | |||
| + | 2. Fill out as many fields as you can: | ||
| + | {| class="wikitable" | ||
| + | |+ Creating an Account | ||
| + | |- | ||
| + | | First name || Your preferred name | ||
| + | |- | ||
| + | | Last name || Your last name | ||
| + | |- | ||
| + | | Phone number || Contact number | ||
| + | |- | ||
| + | | Company || Your current employer | ||
| + | |- | ||
| + | | Title/Role || Your Title/Role at your organization | ||
| + | |- | ||
| + | | Intended Use || Your intended use, if you are part of an existing group, select '''Other''' and provide the name of your team and your manager's full name. | ||
| + | |- | ||
| + | | Email Address || Your email address at your organization, this is your account id. Please ensure your email is able to receive external emails. | ||
| + | |} | ||
| + | |||
| + | 3. After you submit, 3forge will send you an email to activate your account. | ||
| + | |||
| + | 4. Your 3forge account is ready to use once it is activated. | ||
| + | |||
| + | =3forge AMI Resources, Documentation and Tutorials= | ||
| + | |||
| + | Visit https://3forge.com/wiki and check out our 3forge AMI documentation | ||
| + | |||
| + | Visit https://3forge.com/videos.htm and check out the video tutorials | ||
| + | |||
| + | Visit http://docs.3forge.com/mediawiki/GUI to get started using AMI | ||
| + | |||
| + | Email support@3forge.com for questions or other support related issues | ||
| + | |||
=AMI Installation Instructions= | =AMI Installation Instructions= | ||
| + | |||
| + | |||
| + | |||
==Minimum Operating Environment== | ==Minimum Operating Environment== | ||
| Line 5: | Line 54: | ||
{| class="wikitable" | {| class="wikitable" | ||
|- | |- | ||
| − | | '''OPERATING SYSTEM'''|| Ubuntu, Fedora/Red Hat, CentOS, Mac OS X, Windows Certified (Full support for Java 1. | + | | '''OPERATING SYSTEM'''|| Ubuntu, Fedora/Red Hat, CentOS, Mac OS X, Windows Certified (Full support for Java 1.8 or later) |
|- | |- | ||
| '''RAM''' || 4GB | | '''RAM''' || 4GB | ||
| Line 24: | Line 73: | ||
{| class="wikitable" | {| class="wikitable" | ||
|- | |- | ||
| − | | '''OPERATING SYSTEM'''|| Unix environment with Java 1. | + | | '''OPERATING SYSTEM'''|| Unix environment with Java 1.8 or later |
|- | |- | ||
| '''RAM''' || 32GB or more | | '''RAM''' || 32GB or more | ||
| Line 41: | Line 90: | ||
==How to Install== | ==How to Install== | ||
| − | 1. | + | 1. Register an Account on 3forge if you have not done so already at https://3forge.com/signup.html |
2. Once you receive a separate email informing you that the account has been enabled for downloading the software, please re-login at https://3forge.com/login.html | 2. Once you receive a separate email informing you that the account has been enabled for downloading the software, please re-login at https://3forge.com/login.html | ||
| Line 64: | Line 113: | ||
*Unix or Mac: Run the amione/scripts/stop.sh and amione/scripts/start.sh script files | *Unix or Mac: Run the amione/scripts/stop.sh and amione/scripts/start.sh script files | ||
*Windows: Run the amione/scripts/stop.bat and amione/scripts/start.bat script files | *Windows: Run the amione/scripts/stop.bat and amione/scripts/start.bat script files | ||
| + | |||
| + | Side note: When launching AMI on Linux operating system, if you ever run into errors on the terminal upon running "./start.sh", saying '''"Starting 3Forge AMI ONE.log/stderr.log:Error: Could not create the Java Virtual Machine."''' <br> | ||
| + | <br> | ||
| + | [[File:Error1.jpg]] | ||
| + | |||
| + | We could go to the '''/ami/log/stderr.log''' and see the detailed error message. In this case, it might be something like this: where this command is not recognized by JVM<br> | ||
| + | <br> | ||
| + | [[File:Sol1.jpg]] | ||
| + | [[File:E1.1.jpg]] | ||
| + | <br> | ||
| + | The solution will be: go to '''/amione/scripts/start.sh''' , get rid of '''"-XX:+UseConcMarkSweepCG"''' in the '''start.sh''' and launch again.<br> | ||
| + | <br> | ||
| + | [[File:sol2.jpg]] | ||
| + | [[File:Sol2.2.jpg]] | ||
| + | |||
| + | =Advanced Java Configurations= | ||
| + | == Running AMI on Java 18 == | ||
| + | If you were to run AMI on Java 18 and ever come across any Java exceptions, please add something like this to your start.sh: | ||
| + | |||
| + | <pre> | ||
| + | -XX:+PrintGCDetails \ | ||
| + | -Xloggc:log/gc.log --add-opens java.base/java.lang=ALL-UNNAMED --add-opens java.base/java.util=ALL-UNNAMED --add-opens java.base/java.text=ALL-UNNAMED --add-opens java.base/sun.net=ALL-UNNAMED --add-opens java.management/sun.management=ALL-UNNAMED --add-opens java.base/sun.security.action=ALL-UNNAMED --add-opens java.desktop/com.sun.imageio.plugins.png=ALL-UNNAMED\ | ||
| + | ${JAVA_OPTIONS}\ | ||
| + | $* -classpath $CP $APPCLASS >> log/stdout.log 2> log/stderr.log & | ||
| + | </pre> | ||
| + | |||
| + | ==Using Java G1GC garbage collector== | ||
| + | Java G1GC is a garbage collector that is designed to improve the performance and scalability of Java applications by reducing pause times and improving throughput. Here is a detailed instruction on how you can set this up on ami: | ||
| + | |||
| + | 1. From the root directory where you installed AMI_One, Open '''/amione/scripts/start.sh''' | ||
| + | |||
| + | 2. Remove the following properties: | ||
| + | |||
| + | <pre> | ||
| + | -XX:+UseConcMarkSweepGC | ||
| + | -XX:+PrintGCTimeStamps | ||
| + | </pre> | ||
| + | |||
| + | 3. And add this property. | ||
| + | |||
| + | <pre> | ||
| + | -XX:+UseG1GC | ||
| + | </pre> | ||
| + | |||
| + | |||
=Creating a License from the Website= | =Creating a License from the Website= | ||
| Line 77: | Line 171: | ||
6. Create a file under the amione folder called f1license.txt and paste the content inside the file. | 6. Create a file under the amione folder called f1license.txt and paste the content inside the file. | ||
| + | |||
| + | 7. Restart AMI for the license to take effect. | ||
[[File:IntroAMI.9.jpg|600px]] | [[File:IntroAMI.9.jpg|600px]] | ||
| − | |||
| − | |||
| − | |||
| − | |||
| − | |||
=Creating a License from AMI= | =Creating a License from AMI= | ||
| Line 113: | Line 204: | ||
Any questions regarding licensing can be directed to support@3forge.com | Any questions regarding licensing can be directed to support@3forge.com | ||
| + | |||
| + | = Manual Upgrade of AMI using .tar.gz file = | ||
| + | 1. unzip and extract the files.<br> | ||
| + | [[File:ManualUpgrade1.png]] <br> | ||
| + | 2. Move the extracted files to the project directory where the old ami folder resides and overwrite it. <br> | ||
| + | For linux machines, you can use the following command to do so:<br> | ||
| + | [[File:ManualUpgrade2.png]] <br> | ||
| + | '''tar -xf ami_unix_version<file_name>.tar.gz -c <your target directory>''' <br> | ||
| + | '''Note: This command is NOT REVERSIBLE and will overwrite your existing ami folder with the new one. You may want to backup your 3forge AMI project before proceeding to make rollback easier especially for a prod environment. This overwriting process includes the overwrite of the following files (subject to change):'''<br> | ||
| + | (1). amione/lib <br> | ||
| + | (2). amione/data <br> | ||
| + | (3). amione/scripts <br> | ||
| + | [[File:ManualUpgrade3.png]] <br> | ||
| + | Note 1 : For the '''scripts''' directory, make sure to rename your start script if it gets modified <br> | ||
| + | Note 2: These following properties files will be updated: build.properties, defaults.properties, root.properties, speedlogger.propertie, (Windows) AMI_One.vmoptions <br> | ||
| + | Note 3: You can use tar -tvf to preview the contents of a zip. <br> | ||
| + | |||
| + | = Manual Upgrade of AMI using .sh file = | ||
| + | |||
| + | Simply run the installer and select the option to update the existing installation. | ||
=Instructions for Secure Socket= | =Instructions for Secure Socket= | ||
| Line 125: | Line 236: | ||
*Now lets create a client.jks file using the server's certificate, if you have multiple clients you should run this for each client (such that each time the client.jks file is unique for that client). Note, replace clientpass with a password | *Now lets create a client.jks file using the server's certificate, if you have multiple clients you should run this for each client (such that each time the client.jks file is unique for that client). Note, replace clientpass with a password | ||
| − | <span style="font-family: courier new; ">keytool -genkey -deststoretype pkcs12 -alias 3forge_client -keyalg RSA -keypass '''''clientpass''''' -storepass '''''clientpass''''' - | + | <span style="font-family: courier new; ">keytool -genkey -deststoretype pkcs12 -alias 3forge_client -keyalg RSA -keypass '''''clientpass''''' -storepass '''''clientpass''''' -keystore '''''client.jks''''' -dname "cn=3Forge Client"</span> |
| − | |||
| − | |||
<span style="font-family: courier new; ">keytool -import -v -trustcacerts -alias 3forge_server -file '''''server.cer''''' -keystore '''''client.jks''''' -keypass '''''clientpass''''' -storepass '''''clientpass''''' -noprompt </span> | <span style="font-family: courier new; ">keytool -import -v -trustcacerts -alias 3forge_server -file '''''server.cer''''' -keystore '''''client.jks''''' -keypass '''''clientpass''''' -storepass '''''clientpass''''' -noprompt </span> | ||
| Line 148: | Line 257: | ||
Multiple instances of AMI can be run on the same machine. First, each entry should have it's own root directory. Next each additional instance must be configured to use different server ports. (Two processes can not have conflicting server ports). Below is a list of the server ports that need to be configured: | Multiple instances of AMI can be run on the same machine. First, each entry should have it's own root directory. Next each additional instance must be configured to use different server ports. (Two processes can not have conflicting server ports). Below is a list of the server ports that need to be configured: | ||
| − | * | + | *You must '''always''' replace the following default port with a new, unique port (or use -1 to disable the console): |
<span style="font-family: courier new; ">f1.console.port=3285</span> | <span style="font-family: courier new; ">f1.console.port=3285</span> | ||
| + | *If running the '''center''', you must replace the following default ports with new, unique ports: | ||
<span style="font-family: courier new; ">ami.center.port=3270</span> | <span style="font-family: courier new; ">ami.center.port=3270</span> | ||
| Line 157: | Line 267: | ||
<span style="font-family: courier new; ">ami.db.console.port=3290</span> | <span style="font-family: courier new; ">ami.db.console.port=3290</span> | ||
| + | *If running the '''relay''', you must replace the following default port with a new, unique port: | ||
<span style="font-family: courier new; ">ami.port=3289</span> | <span style="font-family: courier new; ">ami.port=3289</span> | ||
| + | |||
| + | *If running the '''web with secure https socket''', you must replace the following default port with new, unique ports: | ||
| + | |||
| + | <span style="font-family: courier new; ">https.port=33332</span> | ||
| + | |||
| + | *If running the '''web with non-secure http socket''', you must replace the following default port with new, unique ports: | ||
| + | |||
| + | <span style="font-family: courier new; ">http.port=33332</span> | ||
=Instructions for Running Center, Web and/or Relay Independently= | =Instructions for Running Center, Web and/or Relay Independently= | ||
| Line 181: | Line 300: | ||
<span style="font-family: courier new; ">ami.center.port=3270</span> | <span style="font-family: courier new; ">ami.center.port=3270</span> | ||
| − | <span style="font-family: courier new; ">ami.center.host= | + | <span style="font-family: courier new; ">ami.center.host=hostname.running.center</span> |
*Run the '''web''' | *Run the '''web''' | ||
| Line 188: | Line 307: | ||
<span style="font-family: courier new; ">ami.center.port=3270</span> | <span style="font-family: courier new; ">ami.center.port=3270</span> | ||
| − | <span style="font-family: courier new; ">ami.center.host= | + | <span style="font-family: courier new; ">ami.center.host=hostname.running.center</span> |
*Run the '''center,web''' | *Run the '''center,web''' | ||
| Line 209: | Line 328: | ||
<span style="font-family: courier new; ">ami.center.port=3270</span> | <span style="font-family: courier new; ">ami.center.port=3270</span> | ||
| − | <span style="font-family: courier new; ">ami.center.host= | + | <span style="font-family: courier new; ">ami.center.host=hostname.running.center</span> |
*Run the '''relay''' connected to '''multiple centers''' | *Run the '''relay''' connected to '''multiple centers''' | ||
<span style="font-family: courier new; ">ami.components=relay</span> | <span style="font-family: courier new; ">ami.components=relay</span> | ||
| − | <span style="font-family: courier new; ">ami.centers=center1= | + | <span style="font-family: courier new; ">ami.centers=center1=hostname.running.center1:3270,center2=hostname.running.center2:3270,center3=hostname.running.center3:3270</span> |
<span style="font-family: courier new; ">ami.center.port=</span> | <span style="font-family: courier new; ">ami.center.port=</span> | ||
| Line 223: | Line 342: | ||
<span style="font-family: courier new; ">ami.components=web</span> | <span style="font-family: courier new; ">ami.components=web</span> | ||
| − | <span style="font-family: courier new; ">ami.centers=center1= | + | <span style="font-family: courier new; ">ami.centers=center1=hostname.running.center1:3270,center2=hostname.running.center2:3270,center3=hostname.running.center3:3270</span> |
<span style="font-family: courier new; ">ami.center.port=</span> | <span style="font-family: courier new; ">ami.center.port=</span> | ||
<span style="font-family: courier new; ">ami.center.host=</span> | <span style="font-family: courier new; ">ami.center.host=</span> | ||
| + | |||
| + | =Configuring Web, Relay and Center Ports= | ||
| + | This guide describes what ports each AMI component listens or connects to. | ||
| + | |||
| + | |||
| + | <big>Console Port</big> | ||
| + | |||
| + | <span style="color:#3c78d8">''f1.console.port''</span> : default 3285 (Listens) | ||
| + | |||
| + | Admin console port all components listens on, to prevent port conflict you may need to change this. | ||
| + | |||
| + | |||
| + | |||
| + | <big>AMI Center</big> | ||
| + | |||
| + | <span style="color:#3c78d8">''ami.center.port''</span> : default 3270 (Listens) | ||
| + | |||
| + | Sets the port of the primary instance of ami center, for more connections from other AMI Web and Relay instances. | ||
| + | |||
| + | Also sets the connecting port of relay & web components to this center if configured and launched together. | ||
| + | |||
| + | |||
| + | <span style="color:#3c78d8">''ami.db.console.port''</span> : default 3290 (Listens) | ||
| + | |||
| + | The port for connecting via telnet command line interface | ||
| + | |||
| + | |||
| + | <span style="color:#3c78d8">''ami.db.jdbc.port''</span> : default 3280 (Listens) | ||
| + | |||
| + | The port for connecting to AMI via the AMI JDBC driver | ||
| + | |||
| + | |||
| + | |||
| + | <big>AMI Relay</big> | ||
| + | |||
| + | <span style="color:#3c78d8">''ami.port''</span> : default 3289 (Listens) | ||
| + | |||
| + | Sets the port that applications connect to on the Relay's host machine. See AMI Realtime API | ||
| + | |||
| + | |||
| + | <span style="color:#3c78d8">''ami.center.port''</span> : default 3270 (Connects) | ||
| + | |||
| + | <span style="color:#3c78d8">''ami.center.host''</span> (e.g. localhost) | ||
| + | |||
| + | For relay components running separately from the center, to be configured with ''ami.center.host'' | ||
| + | |||
| + | |||
| + | Note: the relay can connect to multiple centers, with a comma-delimited list entry e.g.: | ||
| + | <span style="color:#3c78d8">''ami.centers''</span>=center1=host.running.center1:3270,center2=host.running.center2:3270,center3=host.running.center3:3270 | ||
| + | |||
| + | |||
| + | <big>AMI Web</big> | ||
| + | |||
| + | <span style="color:#3c78d8">''http.port''</span> : default 33332 (Listens) | ||
| + | |||
| + | Sets the port that web browsers use to connect to AMI Web (Default 33332) | ||
| + | |||
| + | |||
| + | <span style="color:#3c78d8">''https.port''</span> : default 33333, disabled (Listens) | ||
| + | |||
| + | Sets the port that web browsers use to connect securely to AMI Web. | ||
| + | |||
| + | https.keystore.file: the path to the key store file generated using java's keytool that will be used for secure web connections. | ||
| + | |||
| + | |||
| + | <span style="color:#3c78d8">''ami.center.port''</span> : default 3270 (Connects) | ||
| + | |||
| + | <span style="color:#3c78d8">''ami.center.host''</span> (e.g. localhost) | ||
| + | |||
| + | For web components running separately from the center, to be configured with ''ami.center.host'' | ||
| + | |||
| + | |||
| + | |||
| + | <big>Web Manager</big> | ||
| + | |||
| + | <span style="color:#3c78d8">''ami.webmanager.port''</span> : default 3271, disabled (Listens) | ||
| + | |||
| + | Optional location for where to access webmanager, used for remotely loading files. | ||
| + | |||
| + | |||
| + | |||
| + | <big>Web Balancer</big> | ||
| + | |||
| + | <span style="color:#3c78d8">''ami.webbalancer.http.port''</span> : default 33330 (Listens) | ||
| + | |||
| + | Optional, the http port to listen for insecure connections on. If not specified, http is not available. | ||
| + | |||
| + | =Configure AMI properties from environment variables= | ||
| + | Another alternative solution to configuring AMI properties is to use system variables.<br> | ||
| + | For example, instead of in "local.properties", where you set:<br> | ||
| + | '''ami.db.console.port=3291''' <br> | ||
| + | You can set this up via environment variables by adding '''property_<AMI Property Name>=<value>''' <br> | ||
| + | [[File:ConfigureAMIPropFromEnvVar.jpg]]<br> | ||
| + | This will overwrite the existing property defined in local.properties and apply globally on all AMI instances running on the current machine. | ||
| + | |||
| + | =Running AMI with Docker= | ||
| + | AMI can be easily configured for use with docker using the following recommended folder configuration: | ||
| + | |||
| + | {| class="wikitable" | ||
| + | |- | ||
| + | | '''Folder'''|| '''Contents''' | ||
| + | |- | ||
| + | | ./ami || Unix installation of ami (ami/amione/...) | ||
| + | |- | ||
| + | | ./docker || Dockerfile provided below | ||
| + | |- | ||
| + | | ./scripts || start.sh script provided below | ||
| + | |} | ||
| + | |||
| + | Sample Dockerfile | ||
| + | <pre> | ||
| + | FROM ubuntu:20.04 | ||
| + | |||
| + | RUN apt-get update | ||
| + | RUN apt-get install -y default-jre | ||
| + | |||
| + | COPY ami ami | ||
| + | COPY scripts scripts | ||
| + | |||
| + | EXPOSE 3289 | ||
| + | EXPOSE 3290 | ||
| + | EXPOSE 33332 | ||
| + | |||
| + | CMD ["bash", "./scripts/start.sh"] | ||
| + | </pre> | ||
| + | |||
| + | Sample start.sh | ||
| + | <pre> | ||
| + | #!/bin/bash | ||
| + | |||
| + | SCRIPTDIR=$(dirname "$0") | ||
| + | |||
| + | mkdir -p $SCRIPTDIR/../ami/amione/resources/ | ||
| + | |||
| + | echo 'Starting AMI...' | ||
| + | AMI_EXECUTABLE=$SCRIPTDIR/../ami/amione/scripts/start.sh | ||
| + | sed -i -e 's/\r$//' $AMI_EXECUTABLE | ||
| + | sed -i -e 's/-XX:+PrintGCTimeStamps//g' $AMI_EXECUTABLE | ||
| + | chmod +x $AMI_EXECUTABLE | ||
| + | $AMI_EXECUTABLE > exec.out | ||
| + | |||
| + | echo 'Checking for errors during launch...' | ||
| + | if grep -q error exec.out; then | ||
| + | echo 'An Error Has Occured While Starting AMI, Dumping Error...' | ||
| + | error_log=$(grep -o "[^ ]*/log/" exec.out) | ||
| + | echo '' | ||
| + | more $error_log/stderr.log | ||
| + | echo '' | ||
| + | rm exec.out | ||
| + | echo 'Terminating Docker Start Script' | ||
| + | exit 1 | ||
| + | else | ||
| + | rm exec.out | ||
| + | echo 'AMI Successfully launched' | ||
| + | fi | ||
| + | |||
| + | echo 'Completed Start Script' | ||
| + | |||
| + | tail -f /dev/null | ||
| + | </pre> | ||
| + | |||
| + | |||
| + | To build the image: | ||
| + | <pre>docker build -t ami -f ./docker/Dockerfile . </pre> | ||
| + | To run the image (the use of detached mode is optional): | ||
| + | <pre>docker run -d -p 33332:33332 ami</pre> | ||
Latest revision as of 02:45, 5 February 2024
Introduction
3forge AMI is a high performance platform for developers to rapidly build enterprise applications and solutions.
With the power of 3forge, your ingenuity and exceptionalism is amplified. 3forge AMI will help you meet the needs of your users in a fraction of the time and will help you roll-out a harmonized GUI strategy.
This page will go through the necessary steps to get started with using 3forge AMI.
Registering an account on 3forge Website
1. Visit https://3forge.com/signup.html to create an account if you do not already have one for your current organization.
2. Fill out as many fields as you can:
| First name | Your preferred name |
| Last name | Your last name |
| Phone number | Contact number |
| Company | Your current employer |
| Title/Role | Your Title/Role at your organization |
| Intended Use | Your intended use, if you are part of an existing group, select Other and provide the name of your team and your manager's full name. |
| Email Address | Your email address at your organization, this is your account id. Please ensure your email is able to receive external emails. |
3. After you submit, 3forge will send you an email to activate your account.
4. Your 3forge account is ready to use once it is activated.
3forge AMI Resources, Documentation and Tutorials
Visit https://3forge.com/wiki and check out our 3forge AMI documentation
Visit https://3forge.com/videos.htm and check out the video tutorials
Visit http://docs.3forge.com/mediawiki/GUI to get started using AMI
Email support@3forge.com for questions or other support related issues
AMI Installation Instructions
Minimum Operating Environment
| OPERATING SYSTEM | Ubuntu, Fedora/Red Hat, CentOS, Mac OS X, Windows Certified (Full support for Java 1.8 or later) |
| RAM | 4GB |
| DISK | 20GB |
| PROCESSOR | 2GHZ CPU (Intel & AMD Certified) |
| CLIENT BROWSER | Up-to-date version of: Microsoft Edge, Chrome, Firefox or Safari |
| ACCESS | Must have permissions to install software |
| NETWORK | Server must have access to data sources. Firewalls should also be enabled to allow connections to port 33332 |
Suggested Operating Environment
| OPERATING SYSTEM | Unix environment with Java 1.8 or later |
| RAM | 32GB or more |
| DISK | 100GB or more |
| PROCESSOR | 3GHZ CPU, 8 cores or more |
| CLIENT BROWSER | Up-to-date version of: Microsoft Edge, Chrome, Firefox or Safari |
| ACCESS | Must have permissions to install software (often requiring Admin rights on Windows) |
| NETWORK | Server must have access to data sources. Firewalls should also be enabled to allow connections to port 33332 |
How to Install
1. Register an Account on 3forge if you have not done so already at https://3forge.com/signup.html
2. Once you receive a separate email informing you that the account has been enabled for downloading the software, please re-login at https://3forge.com/login.html
3. Click on the Files link to the left and download the version appropriate for your operating system:
- For Mac: ami_macos_some_version.dmg
- For Windows: ami_windows-x64_some_version.exe
- For Unix: ami_unix_some_version.sh
4. If installing on a server, copy the downloaded file from step 3 onto the server and logon to that server
5. Run the downloaded file from step 3 and follow the installation wizard instructions
6. After startup is complete visit http://localhost:33332 on browser, (if installed on separate server replace "localhost" with the server's hostname or ip address)
- The default login for username & password is: demo & demo123
To Stop and Start AMI
- Unix or Mac: Run the amione/scripts/stop.sh and amione/scripts/start.sh script files
- Windows: Run the amione/scripts/stop.bat and amione/scripts/start.bat script files
Side note: When launching AMI on Linux operating system, if you ever run into errors on the terminal upon running "./start.sh", saying "Starting 3Forge AMI ONE.log/stderr.log:Error: Could not create the Java Virtual Machine."

We could go to the /ami/log/stderr.log and see the detailed error message. In this case, it might be something like this: where this command is not recognized by JVM

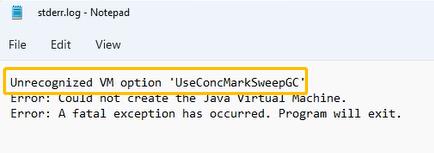
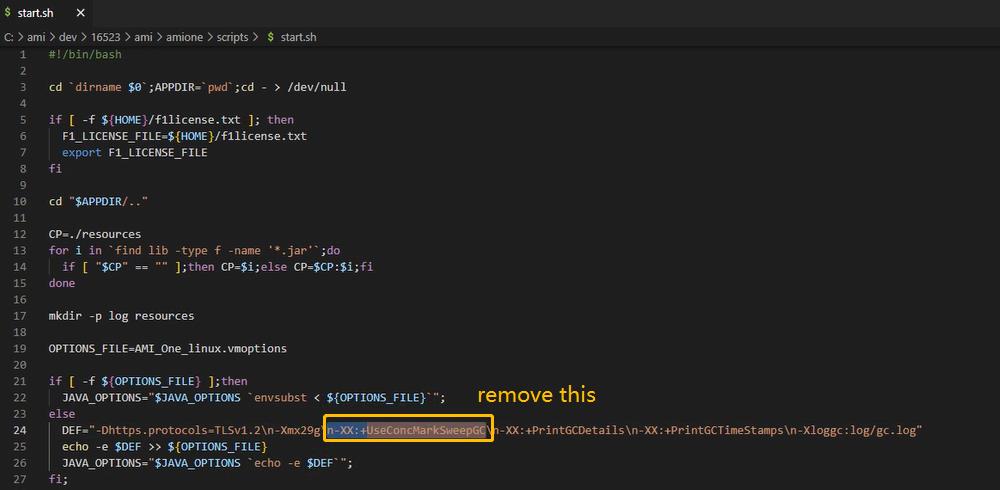
The solution will be: go to /amione/scripts/start.sh , get rid of "-XX:+UseConcMarkSweepCG" in the start.sh and launch again.

Advanced Java Configurations
Running AMI on Java 18
If you were to run AMI on Java 18 and ever come across any Java exceptions, please add something like this to your start.sh:
      -XX:+PrintGCDetails \
      -Xloggc:log/gc.log --add-opens java.base/java.lang=ALL-UNNAMED --add-opens java.base/java.util=ALL-UNNAMED --add-opens java.base/java.text=ALL-UNNAMED --add-opens java.base/sun.net=ALL-UNNAMED --add-opens java.management/sun.management=ALL-UNNAMED --add-opens java.base/sun.security.action=ALL-UNNAMED --add-opens java.desktop/com.sun.imageio.plugins.png=ALL-UNNAMED\
       ${JAVA_OPTIONS}\
       $* -classpath $CP $APPCLASS >> log/stdout.log 2> log/stderr.log &
Using Java G1GC garbage collector
Java G1GC is a garbage collector that is designed to improve the performance and scalability of Java applications by reducing pause times and improving throughput. Here is a detailed instruction on how you can set this up on ami:
1. From the root directory where you installed AMI_One, Open /amione/scripts/start.sh
2. Remove the following properties:
-XX:+UseConcMarkSweepGC
-XX:+PrintGCTimeStamps
3. And add this property.
-XX:+UseG1GC
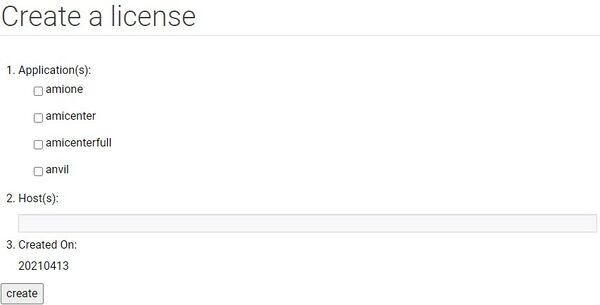
Creating a License from the Website
1. Visit https://3forge.com/secure_licenses
2. Check the AMIone checkbox
3. Enter the hostname in the Host(s) field (you can determine the hostname by reading the red warning below the AMI login page)
4. Click create
5. Copy and paste the contents into your clipboard
6. Create a file under the amione folder called f1license.txt and paste the content inside the file.
7. Restart AMI for the license to take effect.
Creating a License from AMI
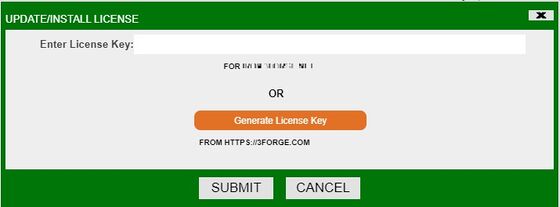
In addition to creating licenses from the 3Forge website (as mentioned above in the installation instructions), new licenses can be created/updated from AMI itself. To use this feature, please make sure the account is enabled for creating licenses.
to open up the license prompt:
1. Click Help in the top menu bar and select Enter/Update License
2. If you already have a license key generated and copied from the 3Forge website, paste the key onto the Enter License Key field. Click on the submit button and restart AMI for the new license to take effect. Continue onto step 3 if you want to generate a new license key.
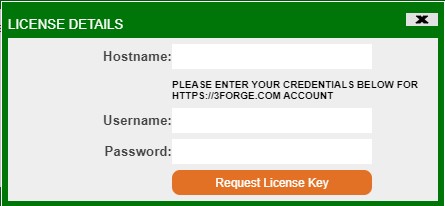
3. To generate a new license key, click on the Generate License Key button.
4. A login form will appear which asks for your 3Forge website credentials.
5. Enter the credentials and request a license key by clicking on the Request License Key button.
6. A dialog box with the new license key will appear. Click on the Update License Key button to apply the newly generated key.
7. Finally, click on the submit button to finish the license creation process.
Remember to restart AMI for the new license to take effect.
Any questions regarding licensing can be directed to support@3forge.com
Manual Upgrade of AMI using .tar.gz file
1. unzip and extract the files.

2. Move the extracted files to the project directory where the old ami folder resides and overwrite it.
For linux machines, you can use the following command to do so:
![]()
tar -xf ami_unix_version<file_name>.tar.gz -c <your target directory>
Note: This command is NOT REVERSIBLE and will overwrite your existing ami folder with the new one. You may want to backup your 3forge AMI project before proceeding to make rollback easier especially for a prod environment. This overwriting process includes the overwrite of the following files (subject to change):
(1). amione/lib
(2). amione/data
(3). amione/scripts
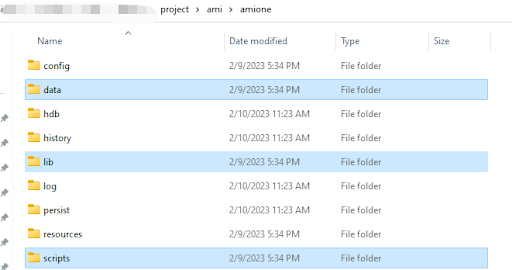
Note 1 : For the scripts directory, make sure to rename your start script if it gets modified
Note 2: These following properties files will be updated: build.properties, defaults.properties, root.properties, speedlogger.propertie, (Windows) AMI_One.vmoptions
Note 3: You can use tar -tvf to preview the contents of a zip.
Manual Upgrade of AMI using .sh file
Simply run the installer and select the option to update the existing installation.
Instructions for Secure Socket
- You'll need to start by creating the certificates. To do this, keytool must be in your PATH.
- First we create a server.jks file and a server.cer file which we will keep with the server. Note, replace serverpass with a password
keytool -genkeypair -deststoretype pkcs12 -keyalg RSA -alias 3forge_server -keystore server.jks -validity 1000 -keysize 2048 -keypass serverpass -storepass serverpass -dname "cn=3Forge Client"
keytool -export -alias 3forge_server -storepass serverpass -file server.cer -storetype pkcs12 -keystore server.jks
- Now lets create a client.jks file using the server's certificate, if you have multiple clients you should run this for each client (such that each time the client.jks file is unique for that client). Note, replace clientpass with a password
keytool -genkey -deststoretype pkcs12 -alias 3forge_client -keyalg RSA -keypass clientpass -storepass clientpass -keystore client.jks -dname "cn=3Forge Client"
keytool -import -v -trustcacerts -alias 3forge_server -file server.cer -keystore client.jks -keypass clientpass -storepass clientpass -noprompt
- To configure the server, copy the server.jks file to the server, and add the following properties to your local.properties of AMI:
ami.port.keystore.file=/path/to/server.jks
ami.port.keystore.password=serverpass
- To configure the client, copy the client.jks file to the client and instead of calling the function AmiClient::start(host, port, loginId, options) call:
AmiClient client=new AmiClient();
...
client.start(host, port, loginId, options,new File("/path/to/client.jks"),"clientpass");
Configuring Multiple Instances on a Single Machine
Multiple instances of AMI can be run on the same machine. First, each entry should have it's own root directory. Next each additional instance must be configured to use different server ports. (Two processes can not have conflicting server ports). Below is a list of the server ports that need to be configured:
- You must always replace the following default port with a new, unique port (or use -1 to disable the console):
f1.console.port=3285
- If running the center, you must replace the following default ports with new, unique ports:
ami.center.port=3270
ami.db.jdbc.port=3280
ami.db.console.port=3290
- If running the relay, you must replace the following default port with a new, unique port:
ami.port=3289
- If running the web with secure https socket, you must replace the following default port with new, unique ports:
https.port=33332
- If running the web with non-secure http socket, you must replace the following default port with new, unique ports:
http.port=33332
Instructions for Running Center, Web and/or Relay Independently
The same AMI binary is configured to run as a center, relay, web or a combination of the three. Add one of the following configuration blocks to your amione/config/local.properties to control what is run. If the local.properties file does not exist, please create it. Note, that port 3270 is the default port that the center listens on and that the web/relay connect to, but can be changed. Also, the web server never connects to the relay directly (they both connect to the center).
Finally, keep in mind that the center starts up the server port and multiple clients (relays/web) can connect to a single center.
- Default: Run the center,relay,web
ami.components=relay,center,web
ami.center.port=3270
ami.center.host=localhost
- Run the center
ami.components=center
ami.center.port=3270
- Run the relay
ami.components=relay
ami.center.port=3270
ami.center.host=hostname.running.center
- Run the web
ami.components=web
ami.center.port=3270
ami.center.host=hostname.running.center
- Run the center,web
ami.components=center,web
ami.center.port=3270
ami.center.host=localhost
- Run the center,relay
ami.components=center,relay
ami.center.port=3270
ami.center.host=localhost
- Run the web,relay
ami.components=web,relay
ami.center.port=3270
ami.center.host=hostname.running.center
- Run the relay connected to multiple centers
ami.components=relay
ami.centers=center1=hostname.running.center1:3270,center2=hostname.running.center2:3270,center3=hostname.running.center3:3270
ami.center.port=
ami.center.host=
- Run the web connected to multiple centers
ami.components=web
ami.centers=center1=hostname.running.center1:3270,center2=hostname.running.center2:3270,center3=hostname.running.center3:3270
ami.center.port=
ami.center.host=
Configuring Web, Relay and Center Ports
This guide describes what ports each AMI component listens or connects to.
Console Port
f1.console.port : default 3285 (Listens)
Admin console port all components listens on, to prevent port conflict you may need to change this.
AMI Center
ami.center.port : default 3270 (Listens)
Sets the port of the primary instance of ami center, for more connections from other AMI Web and Relay instances.
Also sets the connecting port of relay & web components to this center if configured and launched together.
ami.db.console.port : default 3290 (Listens)
The port for connecting via telnet command line interface
ami.db.jdbc.port : default 3280 (Listens)
The port for connecting to AMI via the AMI JDBC driver
AMI Relay
ami.port : default 3289 (Listens)
Sets the port that applications connect to on the Relay's host machine. See AMI Realtime API
ami.center.port : default 3270 (Connects)
ami.center.host (e.g. localhost)
For relay components running separately from the center, to be configured with ami.center.host
Note: the relay can connect to multiple centers, with a comma-delimited list entry e.g.:
ami.centers=center1=host.running.center1:3270,center2=host.running.center2:3270,center3=host.running.center3:3270
AMI Web
http.port : default 33332 (Listens)
Sets the port that web browsers use to connect to AMI Web (Default 33332)
https.port : default 33333, disabled (Listens)
Sets the port that web browsers use to connect securely to AMI Web.
https.keystore.file: the path to the key store file generated using java's keytool that will be used for secure web connections.
ami.center.port : default 3270 (Connects)
ami.center.host (e.g. localhost)
For web components running separately from the center, to be configured with ami.center.host
Web Manager
ami.webmanager.port : default 3271, disabled (Listens)
Optional location for where to access webmanager, used for remotely loading files.
Web Balancer
ami.webbalancer.http.port : default 33330 (Listens)
Optional, the http port to listen for insecure connections on. If not specified, http is not available.
Configure AMI properties from environment variables
Another alternative solution to configuring AMI properties is to use system variables.
For example, instead of in "local.properties", where you set:
ami.db.console.port=3291
You can set this up via environment variables by adding property_<AMI Property Name>=<value>
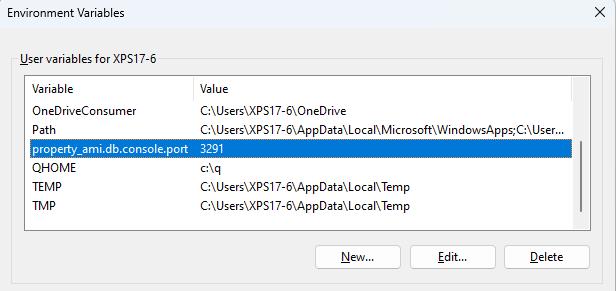
This will overwrite the existing property defined in local.properties and apply globally on all AMI instances running on the current machine.
Running AMI with Docker
AMI can be easily configured for use with docker using the following recommended folder configuration:
| Folder | Contents |
| ./ami | Unix installation of ami (ami/amione/...) |
| ./docker | Dockerfile provided below |
| ./scripts | start.sh script provided below |
Sample Dockerfile
FROM ubuntu:20.04

RUN apt-get update
RUN apt-get install -y default-jre

COPY ami ami
COPY scripts scripts

EXPOSE 3289
EXPOSE 3290
EXPOSE 33332

CMD ["bash", "./scripts/start.sh"]
Sample start.sh
#!/bin/bash

SCRIPTDIR=$(dirname "$0")

mkdir -p $SCRIPTDIR/../ami/amione/resources/

echo 'Starting AMI...'
AMI_EXECUTABLE=$SCRIPTDIR/../ami/amione/scripts/start.sh
sed -i -e 's/\r$//' $AMI_EXECUTABLE
sed -i -e 's/-XX:+PrintGCTimeStamps//g' $AMI_EXECUTABLE
chmod +x $AMI_EXECUTABLE
$AMI_EXECUTABLE > exec.out

echo 'Checking for errors during launch...'
if grep -q error exec.out; then
    echo 'An Error Has Occured While Starting AMI, Dumping Error...'
    error_log=$(grep -o "[^ ]*/log/" exec.out)
    echo ''
    more $error_log/stderr.log
    echo ''
    rm exec.out
    echo 'Terminating Docker Start Script'
    exit 1
else
    rm exec.out
    echo 'AMI Successfully launched'
fi

echo 'Completed Start Script'

tail -f /dev/null
To build the image:
docker build -t ami -f ./docker/Dockerfile .
To run the image (the use of detached mode is optional):
docker run -d -p 33332:33332 ami
