Difference between revisions of "Feed Handlers"
| Line 62: | Line 62: | ||
=Configuring AMI to stream JSON messages over Kafka= | =Configuring AMI to stream JSON messages over Kafka= | ||
| + | |||
| + | ==Overview== | ||
| + | 1. Configure AMI properties to the Kafka server. | ||
| + | |||
| + | 2. Add required dependencies for using JSON with AMI. | ||
| + | |||
| + | 3. Restart AMI and start streaming data using Kafka. | ||
| + | |||
| + | ==Step 1: Configure AMI properties to the Kafka server== | ||
| + | |||
| + | AMI needs to know where and how to deserialize messages sent over Kafka. The following properties need to be updated to achieve that: | ||
| + | |||
| + | <pre> | ||
| + | ami.relay.fh.active=ssocket,kafka | ||
| + | |||
| + | ami.relay.fh.kafka.class=com.f1.AmiKafkaFH | ||
| + | |||
| + | # insert the hostname of your kafka server here | ||
| + | ami.relay.fh.kafka.props.bootstrap.servers=<HOSTNAME>:9092 | ||
| + | |||
| + | # insert a consumer group id string (in case other processes are consuming from the same topics additionally, use that group id). E.g. test-group | ||
| + | ami.relay.fh.kafka.props.group.id=<GROUP ID> | ||
| + | |||
| + | ami.relay.fh.kafka.props.enable.auto.commit=true | ||
| + | |||
| + | # deserializer configuration to handle json messages | ||
| + | ami.relay.fh.kafka.props.value.deserializer=io.confluent.kafka.serializers.KafkaJsonDeserializer | ||
| + | |||
| + | ami.relay.fh.kafka.props.key.deserializer=org.apache.kafka.common.serialization.StringDeserializer | ||
| + | |||
| + | # insert the hostname of your kafka server running schema registry here | ||
| + | ami.relay.fh.kafka.props.schema.registry=http://<HOSTNAME>:8081 | ||
| + | |||
| + | # insert the comma delimited topic names being used for kafka e.g. topic-1,topic-2,topic-3 | ||
| + | ami.relay.fh.kafka.props.topics=<TOPIC_NAME(S)> | ||
| + | |||
| + | </pre> | ||
| + | |||
| + | ==Step 2: Add required dependencies for using JSON with AMI== | ||
| + | |||
| + | AMI needs certain dependencies for interacting with kafka and deserializing JSON messages. <span style="font-family: courier;">The kafkafh_json_deps.zip</span> file contains all the jars required. Unzip it and copy all jar files to the <span style="font-family: courier;">ami/amione/lib/ directory.</span> | ||
| + | |||
| + | ==Step 3: Restart AMI and start streaming data using Kafka== | ||
| + | |||
| + | When AMI starts up, it will automatically connect to the kafka server. | ||
| + | |||
| + | To see the data being streamed, a Realtime Table/Visualization needs to be created: | ||
| + | |||
| + | 1. Create a new window: Windows -> New Window | ||
| + | |||
| + | [[File:Kafka.01.jpg]] | ||
| + | |||
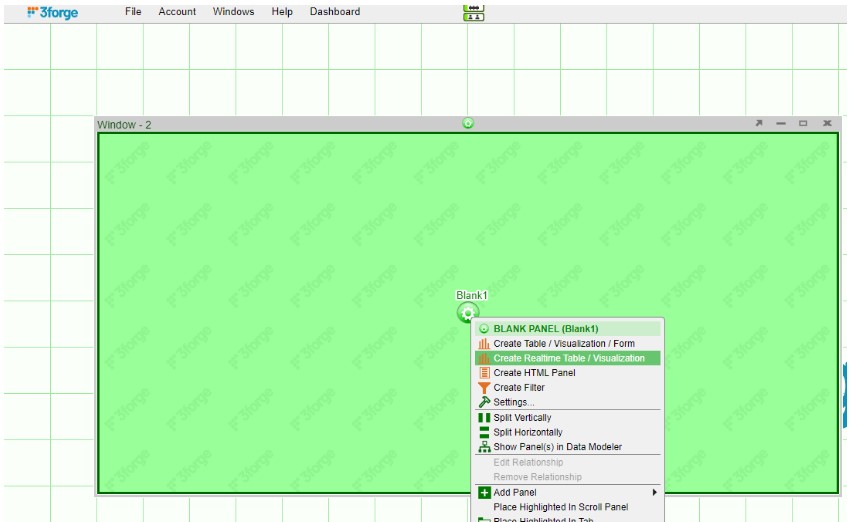
| + | 2. Create a new Realtime Table: Click on the green button on the panel just created and select Create Realtime Table/Visualization. | ||
| + | |||
| + | [[File:Kafka.02.jpg]] | ||
| + | |||
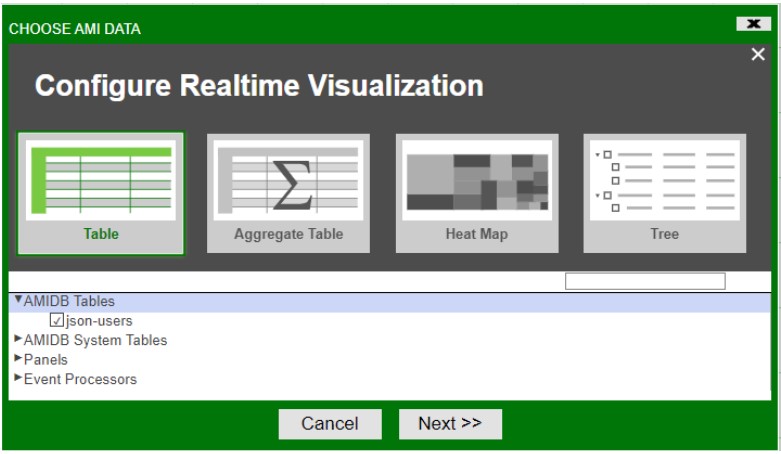
| + | 3. Create a Table: Under AMIDB Tables, select the desired table(s) (with the same topic name as defined in the properties file. Each topic has its separate table) and click Next >>. | ||
| + | |||
| + | [[File:Kafka.03.jpg]] | ||
| + | |||
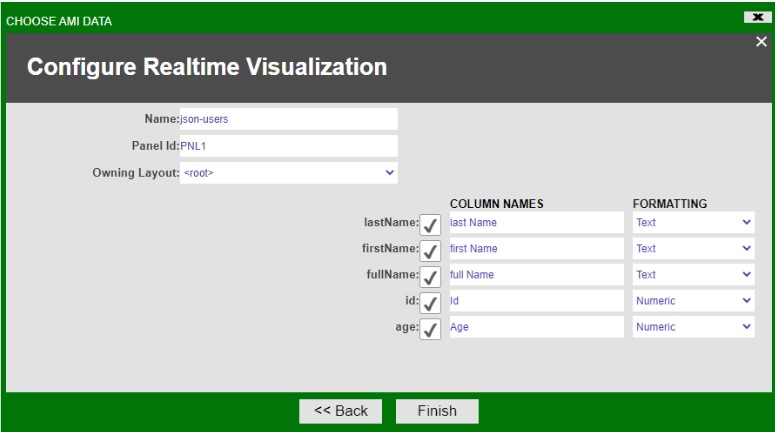
| + | 4. Select the desired columns you want to display in the table and select Finish | ||
| + | |||
| + | [[File:Kafka.04.jpg]] | ||
| + | |||
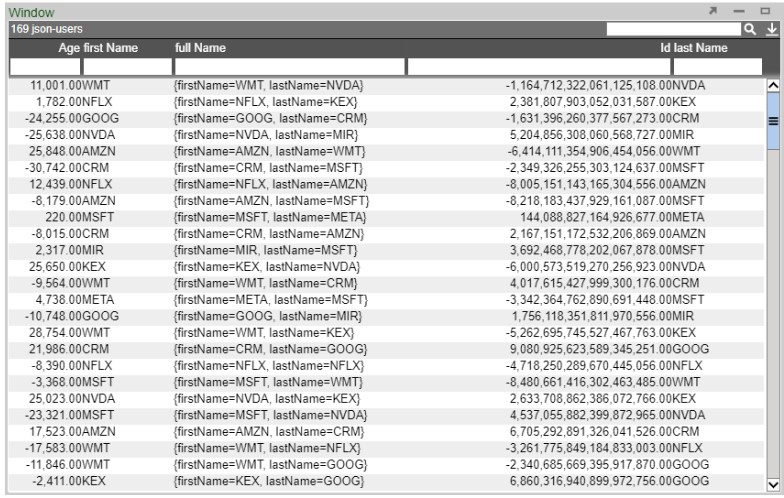
| + | The created Realtime Table: | ||
| + | |||
| + | [[File:Kafka.05.jpg]] | ||
| + | |||
| + | The Data Modeler can also be used to create data models for the realtime feeds for more customizability. | ||
| + | |||
| + | =Configuring AMI to stream Avro messages over Kafka= | ||
==Overview== | ==Overview== | ||
Revision as of 19:41, 10 January 2023
KDB Feed Handler
Prerequisites
Be sure that KDB is running before adding as a data source. Fully tested versions include 3.x
Configuring KX live streaming inside AMI Relays
KX live streaming integrates with kdb+tick via the AMI Feed handler mechanism. AMI can be configured to connect and subscribe to KX ticker plants. This enables AMI to receive all real-time updates from the ticker plant. Optionally, AMI can also be configured to recover from ticker plant log files before consuming real time updates.
Ami Relay Property Settings for KX feed handler
The following properties should be set in ami relays' config/local.properties
As with all feed handlers, add one uniquely named entry for each KX feed handler to the ami.relay.fh.active property. Be sure to include the default ssocket,cfg and cmd feed handlers. For example if you have only one kx feed handler:
- ami.relay.fh.active,=cfg,cmd,kx1
Then, for each KX feed handler, include the following properties. NOTE: Be sure to include the proper feed handler name in the property name:
- ami.relay.fh.kx1.start=true #must be set to true, otherwise it will be disabled
- ami.relay.fh.kx1.class=com.f1.ami.relay.fh.AmiKxFH #required, must be exact
- ami.relay.fh.kx1.props.kxUrl=hostname:port #location of the ticker plant
- ami.relay.fh.kx1.props.kxUsername=username #optional
- ami.relay.fh.kx1.props.kxPassword=password #optional
- ami.relay.fh.kx1.props.amiId=KX_APP_ID #indicates what the application id of messages coming from this ticker plant will be mapped to (See AMI Backend API Manual for explanation on application ids)
- ami.relay.fh.kx1.props.replayUrl=hostname:port #optional, only if recovery is required. See KDB Ticker plant Recovery steps below on how to configure and start kdb replay process.
- ami.relay.fh.kx1.props.tableKeyMap=table1=col1,col2,coln|table2=col1, col2 #Format is pipe delimited list of tables, with columns delimited by comma. Only the data included in this property will be consumed by AMI.
- ami.relay.fh.kx1.props. subscribeQuery=subscription_kx_query #optional
- Default is: .u.sub[`;`]; (.u `i`L;.u.t!{0!meta x} each .u.t)
Example Config:
ami.relay.fh.active=ssocket,kx1 ami.relay.fh.kx1.start=true ami.relay.fh.kx1.class=com.f1.ami.relay.fh.AmiKxFH ami.relay.fh.kx1.props.kxUrl=localhost:1235 ami.relay.fh.kx1.props.kxUsername=demo ami.relay.fh.kx1.props.kxPassword=demo123 ami.relay.fh.kx1.props.amiId=KX_APP_ID ami.relay.fh.kx1.props.replayUrl=localhost:1234 ami.relay.fh.kx1.props.tableKeyMap=table1=col1,col2,coln|table2=col1, col2
KDB Ticker Plant Recovery Steps
In order to support replay you must startup a KDB replay process that will be used by the AMI Relay feed handler to recover data from the ticker plant log file before resuming processing of real time events from the ticker plant.
IMPORTANT: This KDB process must have read access to the ticker plant log file.
Setup process: Create a script called replay.q with the following contents:
upd:{[t;x] (neg first .z.w)(`upd;t;x)}
replay:{if[null first x;:0];-11!x}
Startup Process: (where server_port matches port in ami.relay.fh.kx1.props.replayUrl):
q replay.q –p server_port
Configuring AMI to stream JSON messages over Kafka
Overview
1. Configure AMI properties to the Kafka server.
2. Add required dependencies for using JSON with AMI.
3. Restart AMI and start streaming data using Kafka.
Step 1: Configure AMI properties to the Kafka server
AMI needs to know where and how to deserialize messages sent over Kafka. The following properties need to be updated to achieve that:
ami.relay.fh.active=ssocket,kafka

ami.relay.fh.kafka.class=com.f1.AmiKafkaFH

# insert the hostname of your kafka server here
ami.relay.fh.kafka.props.bootstrap.servers=<HOSTNAME>:9092

# insert a consumer group id string (in case other processes are consuming from the same topics additionally, use that group id). E.g. test-group
ami.relay.fh.kafka.props.group.id=<GROUP ID>

ami.relay.fh.kafka.props.enable.auto.commit=true

# deserializer configuration to handle json messages
ami.relay.fh.kafka.props.value.deserializer=io.confluent.kafka.serializers.KafkaJsonDeserializer

ami.relay.fh.kafka.props.key.deserializer=org.apache.kafka.common.serialization.StringDeserializer

# insert the hostname of your kafka server running schema registry here
ami.relay.fh.kafka.props.schema.registry=http://<HOSTNAME>:8081

# insert the comma delimited topic names being used for kafka e.g. topic-1,topic-2,topic-3
ami.relay.fh.kafka.props.topics=<TOPIC_NAME(S)>
Step 2: Add required dependencies for using JSON with AMI
AMI needs certain dependencies for interacting with kafka and deserializing JSON messages. The kafkafh_json_deps.zip file contains all the jars required. Unzip it and copy all jar files to the ami/amione/lib/ directory.
Step 3: Restart AMI and start streaming data using Kafka
When AMI starts up, it will automatically connect to the kafka server.
To see the data being streamed, a Realtime Table/Visualization needs to be created:
1. Create a new window: Windows -> New Window
2. Create a new Realtime Table: Click on the green button on the panel just created and select Create Realtime Table/Visualization.
3. Create a Table: Under AMIDB Tables, select the desired table(s) (with the same topic name as defined in the properties file. Each topic has its separate table) and click Next >>.
4. Select the desired columns you want to display in the table and select Finish
The created Realtime Table:
The Data Modeler can also be used to create data models for the realtime feeds for more customizability.
Configuring AMI to stream Avro messages over Kafka
Overview
1. Configure AMI properties to the Kafka server.
2. Add required dependencies for using JSON with AMI.
3. Restart AMI and start streaming data using Kafka.
Step 1: Configure AMI properties to the Kafka server
AMI needs to know where and how to deserialize messages sent over Kafka. The following properties need to be updated to achieve that:
ami.relay.fh.active=ssocket,kafka

ami.relay.fh.kafka.class=com.f1.AmiKafkaFH

# insert the hostname of your kafka server here
ami.relay.fh.kafka.props.bootstrap.servers=<HOSTNAME>:9092

# insert a consumer group id string (in case other processes are consuming from the same topics additionally, use that group id). E.g. test-group
ami.relay.fh.kafka.props.group.id=<GROUP ID>

ami.relay.fh.kafka.props.enable.auto.commit=true

# deserializer configuration to handle json messages
ami.relay.fh.kafka.props.value.deserializer=io.confluent.kafka.serializers.KafkaJsonDeserializer

ami.relay.fh.kafka.props.key.deserializer=org.apache.kafka.common.serialization.StringDeserializer

# insert the hostname of your kafka server running schema registry here
ami.relay.fh.kafka.props.schema.registry=http://<HOSTNAME>:8081

# insert the comma delimited topic names being used for kafka e.g. topic-1,topic-2,topic-3
ami.relay.fh.kafka.props.topics=<TOPIC_NAME(S)>
Step 2: Add required dependencies for using JSON with AMI
AMI needs certain dependencies for interacting with kafka and deserializing JSON messages. The kafkafh_json_deps.zip file contains all the jars required. Unzip it and copy all jar files to the ami/amione/lib/ directory.
Step 3: Restart AMI and start streaming data using Kafka
When AMI starts up, it will automatically connect to the kafka server.
To see the data being streamed, a Realtime Table/Visualization needs to be created:
1. Create a new window: Windows -> New Window
2. Create a new Realtime Table: Click on the green button on the panel just created and select Create Realtime Table/Visualization.
3. Create a Table: Under AMIDB Tables, select the desired table(s) (with the same topic name as defined in the properties file. Each topic has its separate table) and click Next >>.
4. Select the desired columns you want to display in the table and select Finish
The created Realtime Table:
The Data Modeler can also be used to create data models for the realtime feeds for more customizability.


